In the Attributes pane  , click the Attributes tab to identify features and edit attributes stored in a feature attribute table or a related table. You can edit feature attributes on several layers without opening individual attribute tables.
By default, field values are restricted to values that satisfy validation criteria imposed on a field. Examples include domain values, contingent attribute values, and fields that do not allow nulls or empty field values.
If your workflow requires the ability to override these restrictions, for example, to leave a field empty that otherwise disallows null values, you can turn validation off on the project Options dialog box.
To turn attribute validation off, see Attribute options for editing.
Note:
Fields managed by attribute rules are limited to values defined by the rule. Specifying a value that breaks the rule displays a notification at the top of the pane showing the rule preventing your changes.
To learn more, see Introduction to attribute rules.
Edit attributes and related records
Select one or more features containing the attributes you want to edit and click the item in the pane. You can select and edit features on multiple layers.
Tip:
To open a feature attribute table, right-click the layer in the Contents pane and click Attribute Table. To learn more, see Open tabular data.
- On the Edit tab, in the Selection group, click Attributes
 .
.
- Select the features you want to edit and expand the selection in the pane.
- Click Select
 and select the features.
 - In the pane, expand the selection.
If a warning icon
 appears next to a feature or a table, right-click the item and click Add To Map
  .
.
- Click Select
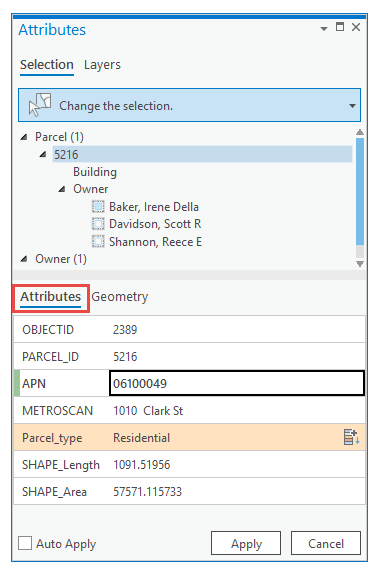
- Click the Attributes tab to edit feature attributes and subtypes.
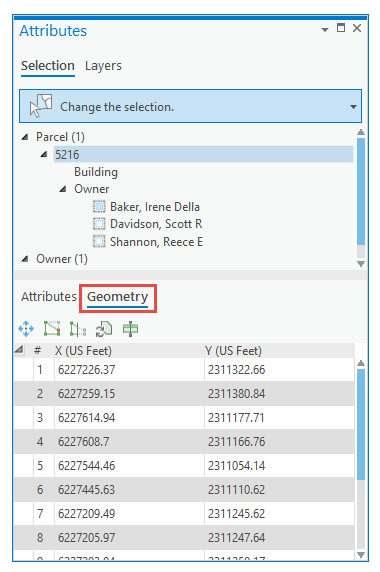
- Click the Geometry tab to view vertex or point feature coordinates or for quick access to move, vertices, and reshaping tools.
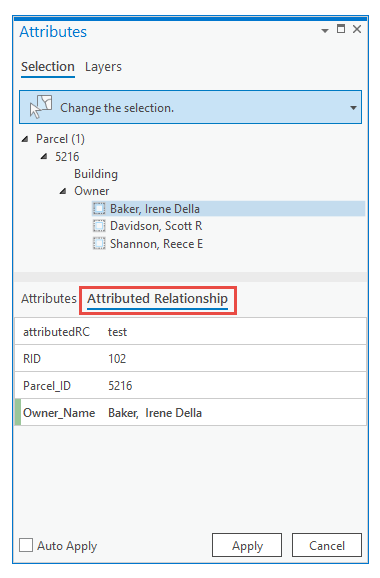
- Click the Attributed Relationship tab to edit attributes in a related table when you select the parent feature participating in the relationship class.
- Enable or clear Auto Apply.
- Check Auto Apply to apply your edits automatically when you press Enter.
- Uncheck Auto Apply to apply your edits when you click Apply. Edited fields highlight with a green vertical bar until you apply your changes.
- In the pane, click the feature containing the attributes you want to edit.
- To select multiple features, press Ctrl while clicking the features.
- To select adjacent features, press Shift while clicking the first and last feature.
- Click the cell you want to edit, change the value, and press Enter.
- Click Apply if Auto Apply is turned off.
- To cut, copy, or paste a value between cells, select the value and do the following:
- Right-click and click Copy, or press Ctrl+C, to copy the value and preserve it in the current cell.
- Right-click and click Cut, or press Ctrl+X to copy the value and delete it from the current cell.
- Right-click and click Paste, or press Ctrl+V to paste the copied value to the current cell and overwrite the existing value.
Note:
Commands that are not valid for the selected value or cell are disabled on the context menu.
- To change a subtype value, do the following:
- Click Choose Symbol Class
 and choose a subtype.
The Change Subtype dialog box appears.
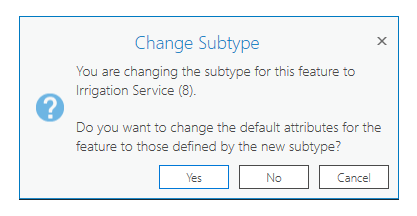
- Click Yes to apply the default values defined by the new subtype, or click No to preserve the existing feature attribute values.
- Click Apply if Auto Apply is turned off.
Note:
For steps to turn off this dialog box and always apply the new default values, see Attribute options for editing.
- Click Choose Symbol Class
Field color codes
Fields with a specific purpose or function are highlighted with a color. The color codes are described in the following table.
| Field color | Description |
|---|---|
Orange | Subtype field. |
Purple | Symbolizes the layer. |
Yellow | The field Highlight property is enabled in the attribute table Fields view. |
Copy attributes between features
When you select multiple features, you can right-click features in the selection list and use the context menu to copy and paste attribute values between features. Your field mapping settings can determine how the attribute values are copied between features.
For steps to transfer attributes between features by clicking source and target features with the pointer, see Transfer attributes between features .
- On the Edit tab, in the Selection group, click Attributes
 .
.
- Click Select
 and select the features you want to edit.
 - Click the Attributes tab.
- Expand the selection list, right-click the feature containing the attributes you want to copy, and click Copy Attributes
 .
. The attribute values are copied to the clipboard.
- In the selection list, right-click the feature to which you want to copy the attributes, and click Paste Attributes
 .
. - If Auto Apply is turned off, click Apply.
Edit contingent attribute values
Contingent attribute values are edited from a list of predefined values that act as loosely constrained lookup fields. A value in one field determines the list of choices in another field participating in the same field group.
When you edit contingent attribute values, the best practice is to start at the top of the value tree and allow the drop-down lists to guide you through the valid choices. Retired values remain visible and available in the Show All drop-down list.
To learn more, see Work with contingent values.
Note:
Contingent attribute values are defined in the source attribute table as field groups and organized in relational hierarchies. For example, a value in a city name field can determine the list of choices for a postal code field. This schema can be extended across multiple fields.
To modify this schema, open the attribute table and click the Data tab on the ribbon. In the Design group, click Contingent Values  .
.
- On the Edit tab, in the Selection group, click Attributes
 .
.
- Select the features you want to edit and expand the selection in the pane.
- Click Select
 and select the features.
 - In the pane, expand the selection.
If a warning icon
 appears next to a feature or a table, right-click the item, and click Add To Map
  .
.
- Click Select
- Click the Attributes tab.
- Uncheck Auto Apply.
- Click the feature containing the contingent attribute values you want to edit.
- Click the drop-down arrow for the attribute you want to edit, and choose a value that is a valid member
of the other values in the field group.
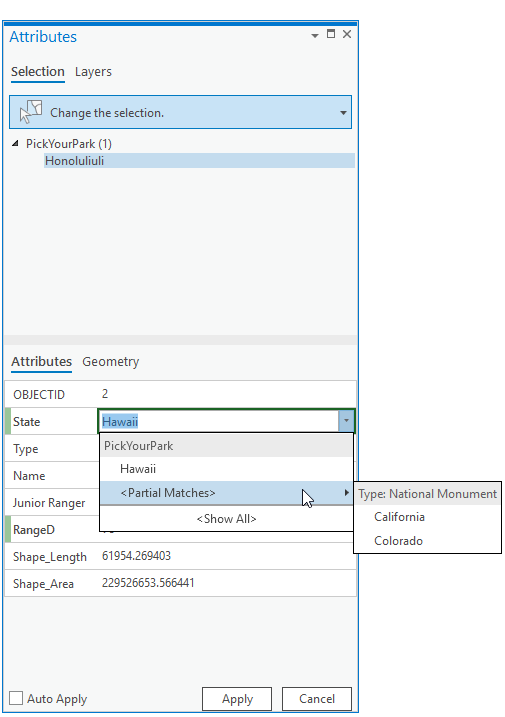
- Partial matches—Hover to show a drop-down menu containing all defined values for the field group. They appear under the field name for which they are correct choices. Choosing a partial match can require further editing of other fields until you create a valid combination of field values.
- Show All—Shows all attribute values available to the field group. This can be useful when you want to change attribute values across all fields. This control appears at the bottom of the drop-down list when you click Show Matches.
- Show matches—Shows all valid choices for the field based on its parent field value. It is the default setting. This control appears at the top of the drop-down list when you click Show All.
Incorrect values highlight the field with a vertical yellow bar and a warning appears in the pane.
- Click Apply to apply your changes.