A relationship class is one of the workflows available in ArcGIS Pro to associate features and records with each other in a geodatabase.
Tools for creating a relationship class
You have two geoprocessing tools to select from to create a geodatabase relationship class:
- Use the Create Relationship Class geoprocessing tool—Creates a relationship class to store an association between fields or features in the origin table and the destination table.
- Use the Table To Relationship Class geoprocessing tool—Creates an attributed relationship class from the origin, destination, and relationship tables. This tool allows you to specify an existing intermediate table, such as is required in a many-to-many relationship or in a relationship that has attributes.
Geodatabase relationship class considerations
To help determine the type of geodatabase relationship class to create and use in your workflow, consider the following:
- The cardinality that exists between objects in your tables or classes.
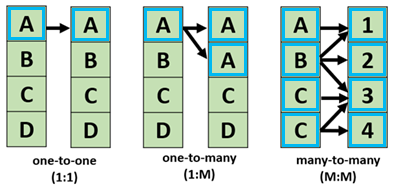
The geodatabase relationship class cardinality specifies how many rows or features in the origin table are related to how many rows or features in the destination table.
A geodatabase relationship class can have one of three cardinalities:

- One to one (1:1)—Each row or feature in the origin table can be related to zero or one row or feature in the destination table. This is the default.
- One to many (1:M)—Each row or feature in the origin table can be related to one or several rows or features in the destination table.
Many to many (M:N)—Several rows or features in the origin table can be related to one or several rows or features in the destination table.
- The common key field that exists in both the origin and destination tables or classes.
-
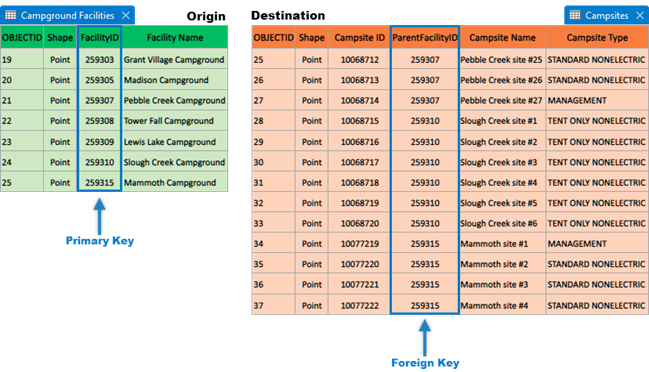
Through a common field, known as a key, you can associate records in one table (origin) with records in another table (destination). Before you can create any type of relationship class, you must identify a field in each table that shares common values and are the same data type. This field is known as the primary key field in the origin and a foreign key field in the destination.
For example, a feature class of Campground Facilities (origin table) can be associated with a feature class of Campsites (destination table), because they each share a common field containing common values, FacilityID on the origin table and ParentFacilityID on the destination table, and they have the same long integer data type for that field. In this example, associating these records would make it possible to select a single campground facility and access all the campsites associated with that campground.

Note:
In a relationship class, common fields are not required to have the same name, but they are required to have the same data type. The values in the common fields are used to link records in the table based on the defined cardinality.
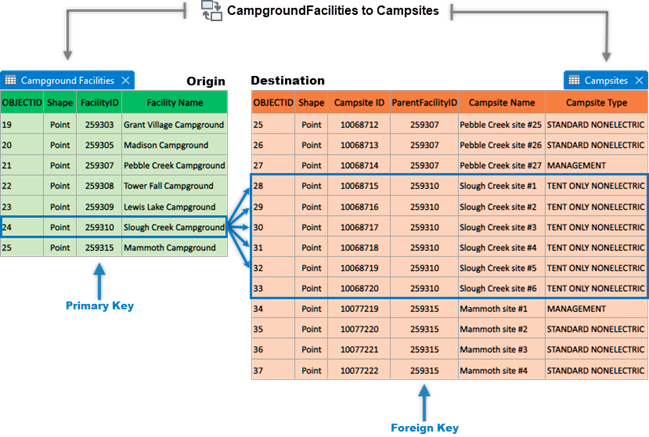
In the following example, a one-to-many relationship class has been created between campground facilities and campsites located at each campground. Using this one-to-many relationship makes it possible to select a single campground and access the associated campsites and attributes of each campsite for that campground.

A relationship class is created between Campground Facilities and the individual Campsites assigned to each campground.
-
The use of an Object ID or Global ID field to represent the relationship between the primary key on the origin table and the foreign key on the destination table.
The following are some considerations on the use of Object IDs and Global IDs:
- Object ID field
Creating a relationship class in ArcGIS Pro requires unique values to represent the relationship between the primary key and foreign key. When you create a table in ArcGIS Pro, a unique integer field that cannot have null values is added to the table to act as an object identifier (Object ID). This Object ID field stores a unique ID for each row in the table and is created in tables and feature classes as a 32-bit Object ID by default.
The Object ID field is maintained by ArcGIS Pro and guarantees a unique ID for each row in the table when initially added. Key functionality for ArcGIS, such as using the Identify tool and displaying selection sets, is dependent on each value within a table having a unique value.
- Geodatabase tables and feature classes are created in ArcGIS with 32-bit Object IDs, by default. However, there are circumstances when Object ID values need to be greater than 2.14 billion. The Migrate Object ID To 64 Bit geoprocessing tool can be used to migrate the Object ID field of a relationship class.
Caution:
When an Object ID field is migrated to store 64-bit Object IDs, the change cannot be undone and the dataset can no longer be used with ArcMap or ArcGIS Pro 3.1 and earlier versions.
Creating a relationship class that is Object ID based is not supported for branch versioning.
Tip:
Alternatively, you can run the Migrate Relationship Class tool to migrate an Object ID-based relationship class to a Global ID-based relationship class before using the data in a branch versioning environment.
- Global ID field
Global IDs are similar to Object IDs in the sense that they are maintained by ArcGIS Pro and cannot be edited.
Global IDs uniquely identify a feature in a geodatabase and across geodatabases. It is recommended that you add Global IDs to your data and use the Global ID field as the primary key. Using the Global ID field of the layer ensures the primary key of the relationship class is unique when establishing a connection between a feature class and a table.
You can also enable Global IDs on a relationship class. The Global IDs option is available on the Manage tab for attributed or many-to-many relationship classes in a file, mobile, or enterprise geodatabase. Once enabled, a Global ID field is added to the intermediate table.
One of the differences between Global IDs and GUIDs is ArcGIS Pro actively maintains Global ID fields. For example, if using a Global ID field, when a new feature is created, a unique global ID value is assigned to that feature, whereas GUID fields are left blank and the user must maintain these fields.
- Object ID field
Learn how to create a simple relationship class or how to create a composite relationship class.
Create and set rules for geodatabase relationship classes
If both the origin and destination classes exist in the same feature dataset, the relationship class will be located in that feature dataset. Otherwise, the relationship class will be located directly under the geodatabase, outside of any feature datasets.
Creating a relationship can involve several additional steps, and there are different workflows you can follow to complete the process. The workflow you should follow depends on the data you have and the type of relationship you want to create.
- If you have origin and destination classes populated with features or records, and the primary key values in the origin correctly relate to the correct foreign key values in the destination, consider this workflow:
- Create the relationship class with the Create Relationship Class tool.
Set relationship class rules if required.
See Manage relationship class rules for details about enabling and disabling rules on your relationship class.
If you set relationship class rules or are working with a composite relationship class, use validation or constraint attribute rules to test and enforce the referential integrity of your data.
Caution:
This workflow is not applicable for many-to-many (M:N) relationship classes or for attributed relationship classes.
- If you have origin and destination classes populated with features or records and have primary key values in the origin, but either have no foreign key values in the destination or have values that don't relate correctly, consider this workflow:
- Create the relationship class with the Create Relationship Class geoprocessing tool.
Set relationship class rules if required.
See Manage relationship class rules for details about enabling and disabling rules on your relationship class.
- Interactively select related origin and destination objects and relate them within the Attributes dialog box, use the Add Selected To Relationship option.
This sets the foreign key values in the destination so they relate to the primary key values in the origin.
To learn more, see Populate an attributed relationship class table.
Optionally, if the Create Relationship Class tool is used to create an attributed or many-to-many relationship class, manually populate the intermediate table because the resultant intermediate table will only have the fields generated, as ArcGIS does not map the associations between origin and destination objects.
To learn more, see Understanding attributed relationship classes.
If you set relationship class rules or are working with a composite relationship, use validation or constraint attribute rules to test and enforce the referential integrity of your data.
Caution:
This workflow is not applicable for many-to-many (M:N) relationship classes that do not include at least one feature class as the origin or destination.
- To create a many-to-many relationship class between two tables or to create a relationship class using an existing intermediate table that contains relationship attributes, consider this workflow:
- Create and populate the origin table, destination table, and intermediate table, ensuring that primary key values will correctly relate to destination key values.
Create the relationship class with the Table To Relationship Class tool.
To learn more, see Understanding attributed relationship classes and Create an attributed relationship class table.
Learn about relationship class usage tips and options available to modify a relationship class.