A project template is a customized starting state for a project. It can include maps, scenes, layouts, databases, folder connections, and other items. Any configuration of a project that you want to reuse can be saved as a project template.
One reason to create project templates is to standardize practices within a workgroup or organization. For example, you can ensure that maps, scenes, and layouts have a consistent appearance, use the same datasets, and apply the same symbology. Another reason is to customize the user interface for specific user roles. For example, you can ensure that a new project contains toolboxes with tools needed for certain tasks or that certain databases or folder connections are included.
Overview
- Video length: 4:29.
- This video was created with ArcGIS Pro 3.2.
In this tutorial, you will create a project template, share it to a portal, and view it from the portal. You will also create a project from the template.
- Estimated time: 20 minutes
- Software requirements:
- ArcGIS Pro Basic
- ArcGIS Online account with sharing privileges recommended
Note:
The quick-start tutorials are updated at each software release. For the best experience, use an online help version that matches your software version.
Open the project
Project templates are based on existing projects. You'll open a project containing a map and scene zoomed to New Zealand and share this project as a project template.
- Start ArcGIS Pro and sign in if necessary.
- On the start page, next to the list of recent projects, click Open another project.
Note:
If you already have a project open, click the Project tab on the ribbon. In the list of side tabs, click Open. On the Open page, click Open another project
 at the top of the page.
 - On the Open Project dialog box, under Portal
 , click ArcGIS Online
  .
.Note:
If you are signed in to ArcGIS Enterprise
 , you must set your active portal to ArcGIS Online to access the tutorial data. If you can't do this, you can download the data from a browser.
 - At the top of the dialog box, in the Search box, type Create a project template and press Enter.
- In the list of search results, click Create a project template to select the project package.
Note:
If there is more than one project package with this name, select the package with the Authoritative badge
 . In the Owner column, the owner name is ArcGISProTutorials. If you don't get any results, see No search results are returned.
 - Click OK.
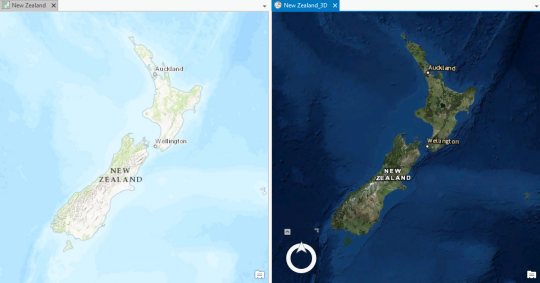
The project opens with a 2D map and a 3D scene. Both are zoomed to New Zealand.

Note:
By default, project packages are unpacked to your <User Documents>\ArcGIS\Packages folder. You can change the default location in the Share and download options.
- On the ribbon, click the View tab. In the Windows group, click Reset Panes
 and click Reset Panes for Mapping (Default).
This ensures that the Contents and Catalog panes are open and that other panes are closed.
- On the ribbon, click the Map tab. In the Navigate group, click Bookmarks
 and confirm that your project has four bookmarks.
Saved properties and settings of your project—including the map, scene, and bookmarks—will be included in the project template.
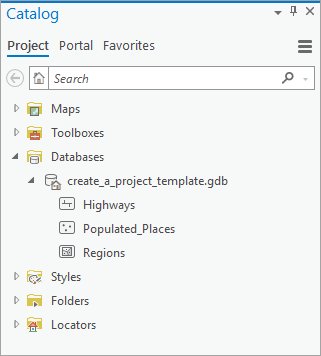
- In the Catalog pane, on the Project tab, expand the Databases container
 and expand create_a_project_template.gdb.
The project geodatabase contains three feature classes: Highways, Populated_Places, and Regions. These datasets will also be included in the project template.
Share the project as a project template
A project template can be shared to your active portal or saved locally. In this tutorial, you'll share the template to your portal to make it readily available. The steps assume you are using an ArcGIS Online portal, but the workflow is the same for an ArcGIS Enterprise portal.
If you don't have internet access or sharing privileges to your portal, you can save the project template locally. You won't be able to complete the tutorial steps exactly as written, but you will be able to access the template to create a project.
- At the top of the ArcGIS Pro window, confirm that you are signed in to your portal.
- On the ribbon, click the Share tab. In the Save As group, click Project Template
 .
.The Create Project Template pane appears. Under Start Creating, accept the default option, Upload template to Online account.
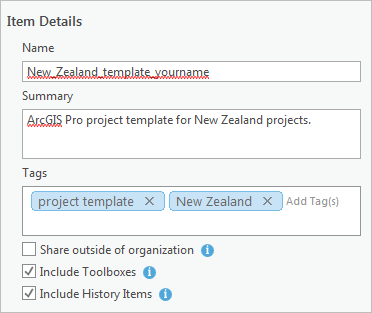
- Under Item Details, in the Name box, replace the default name with New_Zealand_template. Add your name or initials to the name.
This makes your template recognizable if other people in your organization create a project template with the same name.
- In the Summary box, type ArcGIS Pro project template for New Zealand projects.
- In the Tags box, type the following keywords: project template, New Zealand. (Be sure the two tags are separated by a comma.) Press Enter.

Note:
If spell-checking is enabled on the settings page (as it is by default), unrecognized words will be marked with wavy underlines. See Set proofing options for more information.
- Accept the default settings for the Share outside of organization, Include Toolboxes, and Include History Items options.
The Share outside of organization option is used when the template will be shared with people who don't have access to resources, such as network drives, that are paths to data used in the template. It removes these connections and copies the datasets into the template. The option is described in more detail in Share a project package.
- Optionally, under Location, click the Folder drop-down arrow and choose or create a folder in My Content
 in which to store the project template.
By default, the template is stored at the root level of My Content. (You will only see folders in the drop-down list if you have previously created them in My Content.)
- Under Share with, check the box next to the name of your ArcGIS Online organization.

The name of your organization is displayed—not the literal text Your Organization. Note:
If all the Share with options are unavailable, you don't have sharing privileges in your ArcGIS Online portal. To continue with the tutorial, at the top of the pane, under Start Creating, click Save template to file. For more information about sharing privileges, see User types, roles, and privileges in the ArcGIS Online help.
- Under Finish Creating, click Analyze.
The Messages tab appears and informs you that there are no errors or warnings.
- Click Create. If you are prompted with a Save Project message, click Yes.
When the template is created, a message appears at the bottom of the pane with a link to manage the package.
View the project template in your portal
The template has been shared to your ArcGIS Online portal. You'll open its item page in a web browser and add metadata to the item information.
- On the success message at the bottom of the Create Project Template pane, click Manage the package.

A web browser tab or window appears.
- Sign in to your ArcGIS organization if prompted.
The item details page for the project template appears. It includes a thumbnail image and summary information. The Description and Terms of Use sections need to be filled in.

- To the right of Description, click Edit.
- In the Edit Description box, type or copy and paste the following text: ArcGIS Pro project template for use with New Zealand-based projects. Includes a topographic map and an imagery scene zoomed to New Zealand. The project geodatabase includes three datasets.
- Under the text box, click Save.
- To the right of Terms of Use, click Edit.
- In the Edit Terms of Use box, type or copy and paste the following text: There are no access or use constraints on the project template. For access and use constraints on the datasets included with the template, view the metadata for those datasets in ArcGIS Pro.
- Under the text box, click Save.
Create a project based on the template
Now you can use the template to create a project.
- In ArcGIS Pro, on the ribbon, click the Project tab. In the list of side tabs, click New.
Note:
Alternatively, you can start a second ArcGIS Pro session. On the start page, next to Recent Templates, click Start with another template and continue with step 3.
- Click Start with another template
 .
. - On the browse dialog box, in the window on the left, click My Organization
 .
. - In the search box at the top of the dialog box, type New Zealand template and press Enter.
The template appears in the search results.
- Click New_Zealand_template_yourname and click OK.
- On the New Project dialog box, name the project New Zealand Test and click OK.
The template is downloaded from your portal.
- If you're prompted to save changes to the open project, click No.
A new project is created from the template. It has the same map and scene as the template.
- On the ribbon, click the Map tab. In the Navigate group, click Bookmarks
 .
.The new project includes the four bookmarks from the template.
- In the Catalog pane, on the Project tab, expand the Databases container
 .
.All projects created from the template have a default geodatabase named for the project (in this case, New Zealand Test) and a copy of the create_a_project_template geodatabase, inherited from the template.
- Expand the create_a_project_template geodatabase.
It contains the Highways, Populated_Places, and Regions feature classes saved with the template.
The start page has default templates to start a project with a map, the catalog view, a global scene, or a local scene. You can also start without a template, which allows you to work without saving a project. The template you created in this tutorial will appear in your list of recent templates on the start page.
