After building a model and confirming that all processes are valid, the model is ready to run. You can run a model step by step or in its entirety in ModelBuilder or as a geoprocessing tool from the Geoprocessing pane.
Run a model in ModelBuilder
Running a model in ModelBuilder means that you open the model for editing and run it in the ModelBuilder window. You can run a single tool, a sequence of tools, or the entire model as follows:
- Run a single tool—Running a single tool allows you to run one tool at a time, step by step through the model. Right-click the tool, and select Run.
- Run a sequence of tools—Running a tool that has dependencies on other tools runs all processes up to the tool (earlier ready-to-run processes in the chain also run; later processes in the chain do not run). Right-click the tool, and select Run.
- Run the entire model—When you click the Run button
 on the ModelBuilder ribbon, all ready-to-run tools run in sequence. If some tools have already run, they do not run again; the model runs from the first tool that has not yet run.
 Alternatively, you can right-click anywhere in the model and select Run.

If you attempt to run an individual model process that is not ready to run (invalid), a warning message appears stating that the process is not ready to run. If you attempt to run the entire model and it contains processes that are not ready to run, the ready-to-run processes run in sequence and processes that are not ready do not run.
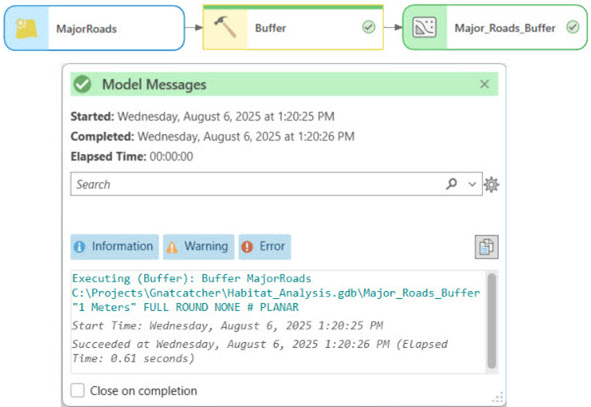
Model messages display when a model is run. To cancel a model that is running, click the Cancel button  . You can reopen the message window using the Open button
  from the ModelBuilder ribbon Messages group.
A tool element is highlighted in blue with a progress bar and a spinner control when the process is running. The tool element turns yellow with a green status bar and a Check Mark icon  when the tool has completed successfully. The output element is highlighted in green with a Check Mark icon
  after completing successfully. If the tool fails, the tool element displays with a red status bar and an Error icon
  . A group is highlighted in red if a tool within the group fails. To view error messages, right-click the tool that failed, and select Messages.
To rerun the entire model, click the Validate button  on the ModelBuilder ribbon in the Run group. This sets the model into ready-to-run state.
Note:
Tools that run in ModelBuilder are not saved to the project's geoprocessing history.
Model messages
When a model is run, a progress window shows a status bar with different colors and symbols based on the outcome as follows:
- Green with a Success symbol
 —The model completed without any error or warning messages.
 - Yellow with a Warning symbol
 —The model completed with a warning message.
 - Red with an Error symbol
 —The model failed.
To access additional details, click the Information, Warning, or Error tab for the following messages:
| Message severity | Description |
|---|---|
Informative message | An informative message is practical information that a tool returns when it runs. Informative messages include the tool's progress, the start or completion time, output data characteristics, and tool results. An informative message never indicates a problem. |
Warning message | A warning message results when a tool in the model experiences a situation that may indicate a problem or that the result may be unexpected. |
Error message | An error message indicates a critical event that prevents a tool in the model from running. |

Add To Display
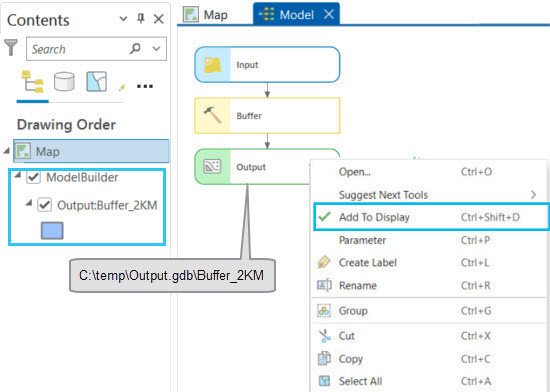
When running a model in the ModelBuilder window, you can add output datasets to a map by right-clicking an output data variable, and selecting Add To Display. If the tool has already run, the data is added to the map. If the tool has not been run, the data is added to the map after the tool runs. For management of the layers, the output is added under a dedicated ModelBuilder group layer in the Contents pane. The layer name includes both the ModelBuilder variable name and value.

Note:
To disable the adding of outputs to a ModelBuilder group layer, uncheck the Add output to model group layer option. The added layer name will include the value of the variable only.
Run a model as a geoprocessing tool
Models are saved as geoprocessing tools in a toolbox. As with any geoprocessing tool, you can open and run a model tool in the Geoprocessing pane. Locate the toolbox where the model is saved, double-click or right-click the tool, and select Open. If the model view is already open, you can also open the model tool in the Geoprocessing pane by clicking the Open button on the ModelBuilder ribbon in the Model group.
Variables that are set as model parameters in ModelBuilder display on the tool dialog box, and you can specify input and output datasets and values. The tool parameter label is the same as the name of the model variable, and the default value in the parameter is the same value as the model variable. The order of the tool parameters as well as parameter properties such as filters, dependencies, and categories can be controlled in the model properties.
Note:
After the model tool runs, only model outputs set as model parameters are added to the map.
Note:
An entry for the model tool is added to the geoprocessing history. The individual tools run in the model tool are not added to the geoprocessing history.