The 3D input devices used to support stereo mapping in ArcGIS Pro include the Stealth protocol mouse. These devices support stereoscopic mapping workflows by reducing digitizing fatigue with two-handed mouse operation and reduced feature compilation duration by providing access to multiple editing commands at your fingertips. Each device is equipped with a scroll wheel for precise elevation definition and multiple programmable buttons. Additional information on installation, setup, and use of the Stealth mouse is given below.

The Stealth mouse is a 3D input device designed specifically for use in topographic mapping applications. There are four models (S1, S2, S3, and S4), which can be implemented using the Z protocol. The protocol used by your stealth mouse can be determined by looking at the sticker on the underside of the device.
The Stealth mouse has 10 buttons, a high-precision thumbwheel to support height definition, and two joysticks (S4 model only). The 10 buttons can be programmed to store up to 32 commands, which simplifies the editing workflow by allowing you to assign commonly used editing commands to the mouse keys, reducing the need to access desired commands from the ArcGIS Pro main menu.
Once ArcGIS Pro has been initialized, the Stealth mouse can be used as both a system mouse and a stereoscopic input device. Unlike a regular system mouse, the Stealth mouse will not work if there is not an active instance of ArcGIS Pro.
Stealth-Z mouse setup
Follow the steps below to set up your Stealth-Z mouse. First, install the FTDI driver, and then configure the Stealth-Z mouse for use with ArcGIS Pro.
Install the FTDI mouse driver
A one-time installation of the Stealth mouse driver is required prior its use. The Stealth mouse must be disconnected from the system during the installation process. Use the following as a guide to download and install the required driver.
Note:
If working with an older Stealth mouse model (2015 or earlier), the device may not be recognized by ArcGIS Pro. It is recommended that you contact the Stealth mouse manufacturer for instructions on how to proceed.
- Download the driver package to a known location on disk.
- Unzip the downloaded package.
- Right-click the extracted setup file and select Run as administrator.
Click Yes if prompted to continue with the installation process.
The FTDI CDM Drivers window appears.
- Click Extract on the FTDI CDM Drivers window to load the Device Driver Installation Wizard.
The Device Driver Installation Wizard appears.
- Click Next on the Welcome to the Device Driver Installation Wizard page.
The License Agreement page appears.
- Check the I accept the agreement button, and then click Next to start the installation.
The driver is installed. This takes a few minutes.
- Click Finish once the installation process is complete.
The FTDI device driver is now installed.
Configure the Stealth mouse
After installing the FTDI device driver, you are ready to proceed with configuring the Stealth mouse for use with ArcGIS Pro. Follow the steps below to properly configure the Stealth mouse.
- Connect the Stealth mouse to a computer with a USB port.
- Open an ArcGIS Pro project, or create one.
- Once ArcGIS Pro is open, on the main menu, select Project > Options.
The Options window appears, allowing you to set preferred options to configure the use of the Stealth mouse in ArcGIS Pro.
- In the Application section, click 3D Input Device.
The Set options for Stereo Map mouse window appears.
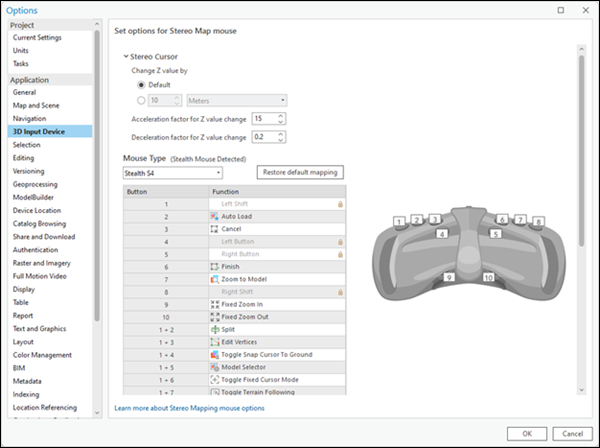
Next to Mouse Type, a Stealth Mouse Detected notification is displayed, indicating that ArcGIS Pro recognized the connected Stealth mouse. The absence of this notification indicates the device is disconnected.
Once connected, the Stealth mouse can be disconnected and reconnected without the need to restart ArcGIS Pro.
- From the Mouse Type drop-down list, select the Stealth mouse model you are working with.
A graphic of the selected mouse model is displayed on the page. You may need to expand the page to view the full image.
The button function user interface shows default button assignments and allows you to assign commands to your preferred mouse buttons.
Note:
Buttons with associated functions that are unavailable and show a lock icon are not customizable. Those include Stealth mouse button 1 (left shift), 4 (left button), 5 (right button), and 8 (right shift).
Assign mouse buttons
Various editing and stereo mapping functionality can be assigned to the Stealth mouse buttons to enhance stereo mapping efficiencies. The Stealth mouse is equipped with 10 buttons, a thumbwheel and two joysticks (Stealth S4 model only). Excluding the joysticks, these buttons can accommodate up to 32 programmable functions. Functions cannot be mapped to the joysticks. A list of commands that can be assigned to the mouse buttons is shown in the steps below.
- In the Button column, click a specific button or button combination number to assign a function to.
The function associated with the selected mouse button is highlighted in the list. The selected mouse button is highlighted in blue on the Stealth mouse graphic.
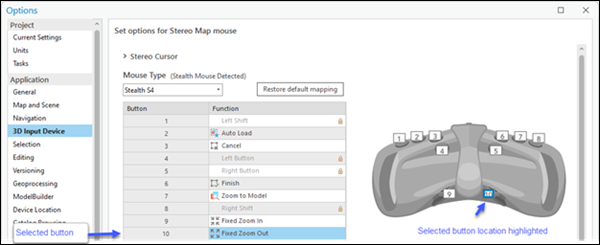
- Click a function.
A drop-down list of supported functions is displayed.
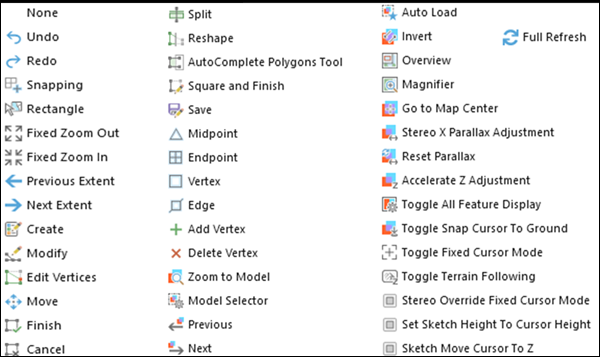
- Select a function to assign to the associated button or buttons from the drop-down list.
- Repeat the above steps to assign other functions to the Stealth mouse buttons.
- Once you finish assigning functions to buttons, click OK at the bottom of the window to accept all changes.
Click the Restore to Default button to return to the default button assignments.
The table below lists the commands that can be assigned to the Stealth mouse buttons.
The table below provides a brief description of non-programmable function keys for the Stealth mouse.
| Button | Function | Explanation |
|---|---|---|
1 | Shift Left | Similar to a function key, the Shift key works in combination with other keys to expand mouse button mapping capacity. |
8 | Shift Right | Similar to a function key, the Shift key works in combination with other keys to expand mouse button mapping capacity. |
4 | Left Click | Mimics left-click functionality on the system mouse. |
5 | Right Click | Mimics right-click functionality on the system mouse |
1 + 8 | Clutch | Clutch enables the moving of the mouse without changing its x,y and z position on the screen. |
Invert mouse wheel scrolling
You can invert the scroll direction on the Stealth mouse by following the steps below.
- Open ArcGIS Pro and click Project > Options.
The main Options window appears.
- Under the Applications section, click Navigation.
The Set options for navigating maps and scenes pane appears.
- Under Mouse wheel roll forward, click the Zoom out button, and click OK at the bottom of the window to accept the changes.
The Set options for navigating maps and scenes pane closes.
- Click the back arrow in the About ArcGIS Pro window to return to the ArcGIS Pro home page.
Adjust the mouse z rate of change sensitivity
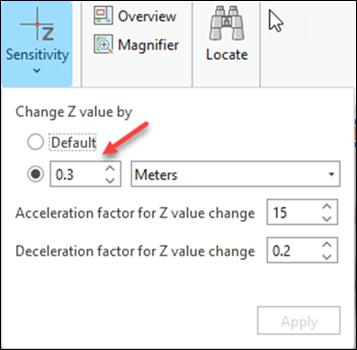
The thumbwheel on the Stealth mouse enables accurate height adjustments in the stereo window. Height increment changes are controlled by the Change Z Value By option in the Stereo Cursor section, found at the top of the Set options for Stereo Map mouse window.
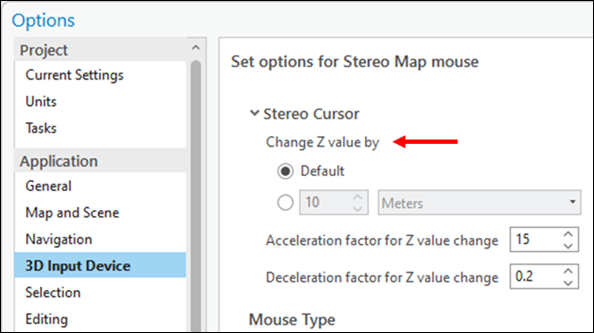
This option can also be found on ArcGIS Pro main menu, on the Stereo Map tab, with the Z Sensitivity option in the Cursor group. For ease of access, it is recommended that you use the Z Sensitivity option when working in the Stereo map display.

The default settings changes the height value in system defined increments. For smaller, or specific, increment changes, follow the steps below.
- Open a Stereo Map window. On the main menu, click Insert, and on the New Map drop-down menu, click New Stereo Map.
The Stereo Map tab is enabled on the ArcGIS Pro main menu.
- Click the Stereo Map tab, and click Z Sensitivity in the Cursor group.
The Z Sensitivity dialog box appears.
- Check the button below Default to enable custom height increment settings.
- To adjust z values in increments of 30 cm, enter a value of 0.3 in the box adjacent to the units setting.
- Click Apply to accept the changes and close the Z Sensitivity dialog box.
As you rotate the Stealth mouse thumbwheel, you will see the z values in the coordinate tray (at the bottom of the Stereo window) changing in increments of 30 centimeters.
