The Snap Chip button  is a drawing aid that appears near a clicked location and displays a pop-up window that allows you to snap to a feature that shares the same location with other coincident feature geometry. You can turn it on and off on the status bar and on the Edit ribbon tab.
The snap chip is intended for workflows that need to create features or edit vertices that must maintain contiguity with specific coincident features. Examples include snapping a utility network power line to a source or load terminal or snapping a z-aware feature to one of several coincident features with different elevation z-values.
When you use the snap chip, consider the following:
- The snap chip requires snapping to be turned on and the desired snap agents enabled. To avoid clutter in the Snap To pop-up window, turn off unnecessary snap agents.
- If the scale or complexity of the data causes snapping to unwanted features, consider turning off snapping by layer in the Contents pane.
- Press the Spacebar to temporarily turn off snapping as you create features.
- The snap chip is not available in 3D scenes.
To use the snap chip, complete the following steps:
- Turn on Snapping
 and enable the snap agents required to work effectively with your data and workflow.
Tip:
Turn off the Edge
 and Intersection
  snap agents to reduce clutter in the Snap To pop-up window.
 - Hover over Snapping
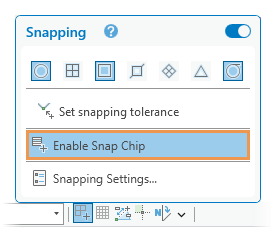
 on the status bar and turn on Enable Snap Chip
  .
.
Alternatively, on the Edit ribbon tab, click the Snapping drop-down arrow
 in the Snapping group and turn on Enable Snap Chip.
The snap chip is enabled.
- Click the Map view tab to ensure it is the active view.
- Click an editing template in the Create Features pane and start sketching a feature.
- Click and snap to existing features that share the same x,y location, for example, a shared vertex or point location.
The snap chip appears near the pointer.
- Click the Snap Chip button
 .
.The Snap To pop-up window appears.
- Click the row for the target feature in the Snap To pop-up window.

Note:
- To cancel the selection and snap to the default feature, click the Discard button
 , or press Esc. This action closes the Snap To pop-up window.
 - To close the Snap Chip and continue sketching the feature, click the map.
A circle flashes at the target snap location for the selected feature.
- To cancel the selection and snap to the default feature, click the Discard button
- Click the Apply button
 on the Snap To pop-up window, or double-click the row.
Alternatively, press Enter.
Tip:
Click the Snap Chip button
 to snap to the selected feature and close the Snap To pop-up window in a single action.
The pointer snaps to the selected feature.
- Continue sketching the feature, or click Finish
 or press F2 if you're finished.