Ground to grid correction is a drawing mode used with COGO editing that converts ground measurements entered with ground to grid-aware tools into grid geometry defined by the coordinate system of the feature data. It is turned on or off on the Edit tab and on the status bar at the bottom of the active map.
If ground to grid is turned on, direction values are rotated by the enabled offset angle, and distance values are scaled by the enabled distance factor. If the source feature class is COGO enabled, the entered values are written to the corresponding COGO attribute field
When you use ground to grid corrections, consider the following:
- Each map in a project stores its own ground to grid correction settings.
- The scale factor can be specified as a constant value or as a combined scaled factor referencing elevation surfaces.
- Ground to grid correction is not available with 3D scenes.
Caution:
Changing correction settings while creating or modifying features from the same survey document can introduce slight differences in the geometries you create. As a best practice, confirm your correction settings before creating features.
Turn ground to grid correction on
To turn ground to grid correction on, complete the following steps.
- On the ribbon, click the Edit tab. In the Corrections group, click the Ground To Grid button
 .
.Alternatively, on the status bar at the bottom of the active map, click the Ground To Grid button
 .
.
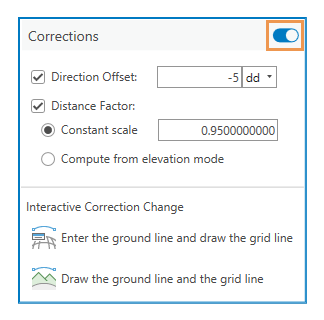
Or, hover over the button until the pop-up dialog box appears, click the Corrections toggle button, and move the pointer back to the map.

Set a direction offset
The direction offset specifies the rotation angle that is applied to direction values entered with ground to grid-aware tools.
- A positive angle rotates values counterclockwise.
- A negative angle rotates values clockwise.
For example, setting a direction offset of -5° and entering a ground direction of N40°E using a ground to grid-aware tool creates or constrains the new segment at N45°E. If the feature is COGO enabled, N40°E is written to the Direction field.
- On the ribbon, click the Edit tab. In the Corrections group, click the Ground To Grid drop-down arrow
 .
.Alternatively, on the status bar at the bottom of the active map, hover over the Ground To Grid button
 until the pop-up dialog box appears.
- Check or uncheck the Direction Offset check box.
Checked
Rotate line segments by the specified value when you are using ground to grid tools.
Unchecked
Do not rotate line segments when you are using ground to grid tools.
- Click the Direction Offset drop-down arrow and set the direction units.
- Click the Direction Offset text box and type the offset angle for the specified units.
- To close the dialog box and save your settings, click the map.
Set a distance factor
The distance factor specifies the scale factor that is applied to ground distance values entered with ground to grid-aware tools.
For example, setting a distance factor of 0.95 and entering a ground distance of 100 feet using a ground to grid-aware tool creates or constrains the new segment to 95 feet. If the feature is COGO enabled, 100 feet is written to the Distance field.
- On the ribbon, click the Edit tab. In the Corrections group, click the Ground To Grid drop-down arrow
 .
.Alternatively, on the status bar at the bottom of the active map, hover over the Ground To Grid button
 until the pop-up dialog box appears.
- Check or uncheck the Distance Factor check box.
Checked
Scale line segments by the specified value when you are using ground to grid tools.
Unchecked
Do not scale line segments when you are using ground to grid tools.
- Click one of the following methods to configure how the distance factor value is specified.
Constant scale
Scale all distances by the specified scale factor. Click the text box and type a scale factor.
Compute from elevation mode
Compute a combined scale factor using z-values generated by the current elevation mode and the coordinate system for the active map. You can set the elevation mode to a constant z-value or set it by clicking an elevation surface using the pointer.
Note:
This setting computes a combined scaled factor using map projection information, and the location and elevation of the data being edited. The scale factor updates dynamically on the corrections display as you move the pointer and create features.
- To close the dialog box and save your settings, click the map.
Enter the ground line and draw the grid line
This method computes correction values by comparing entered COGO ground values with the equivalent grid line drawn in the map using the pointer.
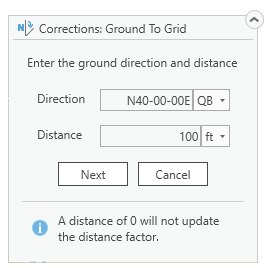
For example, entering known basis of bearing values for direction and distance and clicking the two monuments in the map computes the correction. A ground direction of N40°E and a drawn grid line at N45°E sets the direction offset to -5°. A ground distance of 100 feet and a drawn grid line at 95 feet sets the distance factor to 0.95
- On the ribbon, click the Edit tab. In the Corrections group, click the Ground To Grid drop-down arrow
 .
.Alternatively, on the status bar at the bottom of the active map, hover over the Ground To Grid button
 until the pop-up dialog box appears.
- Click Enter the ground line and draw the grid line
 .
.
- Enter the known ground values for direction and distance.
- Click the Direction Offset drop-down arrow and set the direction units.
- Click the Direction Offset text box, type the offset angle for the specified units.
- Click the Distance drop-down arrow and set the units.
- Click the Direction text box, type the distance for the specified units.
To preserve the current constant scale setting and update only the direction offset, enter or accept the default value of zero (0).
- Click Next.
- Draw the grid line using the pointer following the on-screen prompts appearing in the upper right corner of the map.
- Click the start point of the grid line.

- Click the endpoint of the grid line.

- Click the start point of the grid line.
- To view the computed correction values, click the Ground To Grid drop-down arrow
 .
.Alternatively, on the status bar at the bottom of the active map, hover over the Ground To Grid button
 until the pop-up dialog box appears.
To close the dialog box, click the map.
Draw a ground line and a grid line
This method computes correction values by comparing a line drawn in the map with the pointer using COGO direction and distance values with an equivalent grid line also drawn in the map.
For example, drawing a ground line at N40°E and a grid line at N45°E sets a direction offset of -5°. Drawing a ground line of 100 feet and a grid line at 95 feet long sets a distance factor of 0.95.
- On the ribbon, click the Edit tab. In the Corrections group, click the Ground To Grid drop-down arrow
 .
.Alternatively, on the status bar at the bottom of the active map, hover over the Ground To Grid button
 until the pop-up dialog box appears.
- Click Draw the ground line and draw the grid line
 .
. - Draw the ground line using the pointer following the on-screen prompts appearing in the upper right corner of the map.
- Click the start point of the ground line.

- Click the endpoint of the ground line.

- Click the start point of the ground line.
- Draw the grid line using the pointer following the on-screen prompts appearing in the upper right corner of the map.
- Click the start point of the grid line.

- Click the endpoint of the grid line.

- Click the start point of the grid line.
- To view the computed correction values, click the Ground To Grid drop-down arrow
 .
.Alternatively, on the status bar at the bottom of the active map, hover over the Ground To Grid button
 until the pop-up dialog box appears.
To close the dialog box and save your settings, click the map.