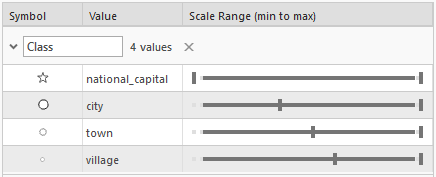
When a layer is symbolized with either unique value or graduated colors symbology, you can specify the visible scale range for each symbol class. This is an effective strategy to limit the amount of detailed data at smaller scales without having to make multiple versions of the layer, each with a unique definition query.
For example, you may have a populated places layer where you want to show national capitals at all scales, show cities and towns between mid-scale and large-scale ranges, and small villages only at the very largest scales. By adjusting the scale range of each symbol class, you can control which features are shown in the layer as you progress through scales in the map.
Not only is it more efficient to manage and update a map organized this way than by maintaining multiple duplicate layers, but the reduction in map information is vitally important if you intend to create vector tiles from your map.
Strategies for controlling the display of features at different scales
Scale-based symbol classes are just one strategy to control which features get drawn at which scales. Scale-based symbol classes are convenient when the attribution you symbolize on is the same as the attribution you use to manage scale display. To manage the scale display using different attributes from those used for symbology, consider using display filters instead. For a less fine-grained approach, or where sufficient attribution is not available, you may want to control the scale ranges for the entire feature layer.
Work with scale-based symbol classes
When a layer has scale-based symbol classes, the legend shown in the Contents pane for the layer dynamically updates as you zoom in and out of the map so that only those symbol classes that are defined for the current scale are shown.
Scale-based symbol classes limit the features that are shown at each scale, but they don't affect labeling. To ensure that labels match with features at each scale, you must define matching label classes for each symbol class with the same scale ranges.
To use scale-based symbol classes in a 3D scene, the layer must be in the 2D Layers category. You cannot use scale-based symbology on layers in the 3D Layers category.
Set up scale-based symbol classes
To refine the scale range of symbol classes, complete the following steps:
- Highlight a feature layer by clicking its title in the Contents pane.
- On the Feature Layer tab, in the Drawing group, click Symbology
 to open the Symbology pane.
 - In the Symbology pane, on the Primary symbology tab
 , ensure the feature layer is drawn with unique values or graduated colors.
 - On the Scales tab, adjust the scale sliders for each symbol class as needed.
The stops on the sliders are derived from the map scales. The slider extends across the complete scale range, from an infinitely small scale (zoomed very far out) on the leftmost end of the slider, to a large scale of zero (zoomed very far in) at the rightmost end of the slider. The darker part of the slider shows the scale range of the layer. The features of a symbol class only draw at scales that are within both the scale range of the layer and the scale range of the corresponding symbol class.
Show alternate symbols at different scales
Once scale ranges are applied to symbol classes, you can further refine the appearance of features within those scale ranges by establishing alternate symbols to different parts of the symbol class scale range. This is another strategy to limit the visual dominance of symbols at small scales, both by avoiding symbol overlap and by reducing excessive visual weight.
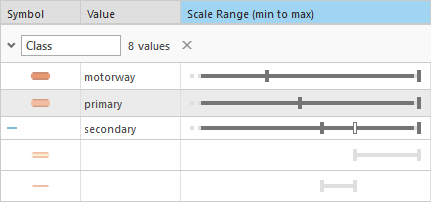
A common approach is to use a complex symbol at large scales and a simple, but related alternate symbol at small scales. For example, you can symbolize road features as
light orange with a darker orange casing at larger scales, but just as
a single solid dark orange line at smaller scales. In this example, these lines would be defined
as two separate symbols for the same symbol class. The orange color ties the symbols together so it is clear they are referencing the same features, but the uncased solid lines at smaller scales are visually lighter and take up less map space. 
To add alternate symbols to a symbol class, you subdivide the visible scale range into parts by adding interim scale stops to the scale range slider for the symbol class. Drag the interim stops to a new scale location, or click them to open a pop-up to choose a different map scale. The scale stops are determined by the map scales defined in the map. You work only with the stops on the main slider. The subsliders below the main slider are there to give a visual understanding of the scale ranges of each symbol.
To show alternate symbols at different scales, complete the following steps:
- In the Symbology pane, for a feature layer drawn with unique values or graduated colors, on the Primary symbology tab
 , highlight the symbol class to be subdivided.
 - On the Scales tab, highlight a symbol class and click the Add Alternate Symbol button
 .
.The scale range for the symbol class is divided at a map scale, and subscale ranges are shown below the main scale range for the symbol class.
- Adjust the scale stop on the main slider to set the scale at which the symbol class changes from one symbol to the other.
The subscale ranges adjust accordingly.
When subscale ranges are created, identical symbols are applied to all of them. Click these symbols to modify them as necessary in the Format Symbol pane. There is no limit to how many symbols are assigned to a single symbol class, but be aware that too much complexity may be difficult to manage. If you need to define more than two or three symbols for a single symbol class, you may want to reconsider how your data is classified. The Contents pane, and any legends generated for a layer with symbol classes with multiple symbols, show only the symbol that is visible for the current display scale.
Control the display at scale boundaries
When setting scale ranges, it is important to understand what happens at the boundaries of those scale ranges. You want to avoid two versions of a feature drawing simultaneously at scale boundaries, but also avoid a small gap where neither version of the feature draws. There is a map property that manages this case. It applies anywhere in the map where scale ranges are specified.
- In the Contents pane, right-click a map and click Properties
 to open the Map Properties dialog box.
 - On the General tab, ensure that Draw up to and including the maximum scale in scale ranges is not checked.
It is not checked by default on new maps but it is checked in map documents that were imported from ArcMap.