Mit der Data Reviewer-Lizenz verfügbar.
Reviewer results represent a potential error in your data. Results are generated in two ways:
- Automated—Through execution of a Reviewer batch job
- Manual—Through redlining, such as markup, by a subject matter expert
Once reviewed, results can be corrected. When a result is corrected, its life cycle advances to Correction, and the result is updated with information regarding who made the correction and when the correction was applied. Notes supporting how the result was handled can also be added to aid in later verification.
Once corrected, results can be verified. When a result is verified, its life cycle advances to Verification, and the result is updated with information regarding who made the verification and when the verification was applied. Notes supporting how the result was verified can also be added to aid in process improvement or to meet organizational documentation requirements.
Correct results
Depending on the types of Reviewer results in a session, you may need to resolve results by modifying geometries or attributes, updating metadata values, or manually reviewing sampling results. With feature and table records, you can indicate whether one or more records have been resolved and add explanatory notes. A status of Resolved means the error condition has been corrected. In special cases, a result can be marked as an exception due to unique circumstances related to that feature.
Metadata check results can also have a status of Resolved or Mark as Exception. A Resolved status means that the metadata element value has been corrected or populated as necessary. A Mark As Exception status means the metadata has not been updated and remains an exception.
Once a correction is applied, the result moves to the Correction group in the Update Results pane. The correction details also populate in the Reviewer Results pane, including who made the correction, and when, with any explanatory notes.
Hinweis:
Results can move directly from the Correction group to the Verification group to support certain process workflows. To automatically verify a record, be sure to check the Automatically verify result check box in the Update Results pane.
- In the Catalog pane, expand the Reviewer Results group.
- If necessary, right-click the Session Results group and click Add Session to add a Reviewer session to the project.
- Right-click the name of a Reviewer session and click Open.
The Reviewer Results pane appears with all the results that have been stored in a session. Now you can browse the table and select a result or group of results for correction.
- Press Ctrl or Shift and click the row header to select individual or multiple results.
- After the results have been corrected, right-click the selection and click Update Results.
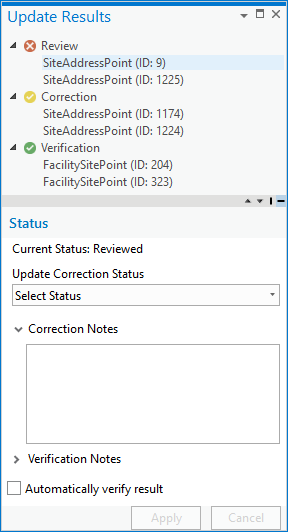
The Update Results pane appears, displaying the selected results based on their life cycle.

- Select one or more records in the Review group.
- In the Status panel, click the Update Correction Status drop-down arrow and choose a status for the results.
- Optionally add comments about the correction in the Correction Notes text box.
- Click Apply.
The results move to the Correction group in the Update Results pane, and the life cycle icon updates in the Reviewer Results table. The Correction Details for each result are also updated.
Tipp:
Results can move directly from the Correction life cycle to the Verification life cycle to support certain process workflows. Check the Automatically verify result check box to move a record directly to the Verification group.
Verify results
Verification is the process of ensuring that the Reviewer results have been corrected, or reviewed, as necessary. The verification states of results are Acceptable and Unacceptable. When a result is marked as Acceptable, it means that the result has been corrected, or is correct as it is. A status of Unacceptable means that the result has not been corrected, and it is returned to the Reviewed state.
Once the verification changes are applied, the result moves to the Verification or Review group in the Update Results pane, respectively. The Verification Details for each result are also updated in the Reviewer Results pane, including who verified the result, and when, with any explanatory notes.
- In the Catalog pane, expand the Reviewer Results group.
- If necessary, right-click the Session Results group and click Add Session to add a Reviewer session to the project.
- Right-click the name of a Reviewer session and click Open.
The Reviewer Results pane appears with all the results that have been stored in a session. Now you can browse the table and select a result or group of results for verification.
- Press Ctrl or Shift and click the row header to select individual or multiple results.
- Right-click the selection and click Update Results.
The Update Results pane appears, displaying the selected results based on their life cycle.
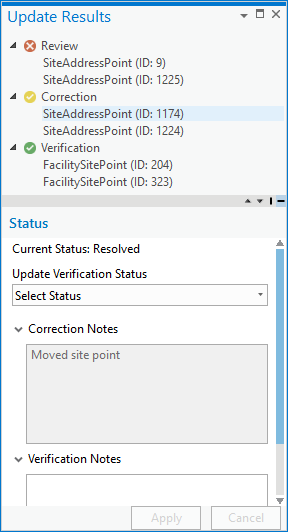
The Correction Notes text box is disabled. You can view the correction notes for a record but cannot modify them.

- Select one or more records in the Correction group.
- In the Status panel, click the Update Verification Status drop-down arrow and choose a verification status for the records.
- Click Apply.
If the results are given a status of Acceptable, they appear in the Verification group in the Update Results pane. If the results are given a status of Unacceptable, they are returned to the Review life cycle and appear in the Review group.
The Verification Details for each result are also updated in the Reviewer Results pane.
Tipp:
After a record has been verified, you can revise its status. For example, if a record has been marked as Acceptable and you want to mark it as Unacceptable, you can change the status and return it to the Review life cycle.
Update sampling records
Sampling is the process of creating a set of features from one or more layers that can be visually inspected to ensure they are valid. The sample is created from the feature classes that have been selected to include in the sample based on what was loaded in the map. The Sampling check allows you to assign weights to feature classes, which increases or decreases the number of features included in the sample.
The initial status of results generated by the Sampling check is New, and they are in the Review life cycle. Once they are reviewed, they can be assigned a status of Pass or Fail and automatically verified. After all the results are verified, you can determine whether most of the sampled results passed or failed inspection.
- In the Catalog pane, expand the Reviewer Results group.
- If necessary, right-click the Session Results group and click Add Session to add a Reviewer session to the project.
- Right-click the name of a Reviewer session and click Open.
The Reviewer Results pane appears with all the results that have been stored in a session. Now you can browse the table and select a result or group of results for correction.
- Press Ctrl or Shift and click the row header to select individual or multiple results.
- Right-click the selection and click Update Results.
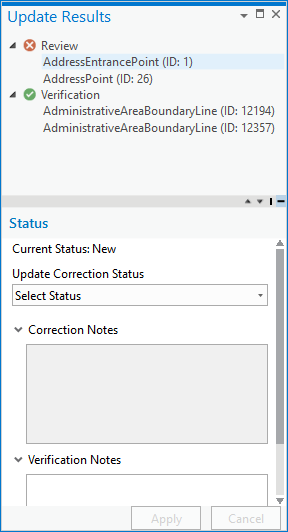
The Update Results pane appears, displaying the selected results based on their life cycle.
Sampling results can only be verified; therefore, the Correction Notes text box is disabled.

- Select one or more records in the Review group.
- Click the Update Verification Status drop-down arrow and choose a status for the result.
- Passed—The feature associated with the record passed the manual review.
- Failed—The feature associated with the record failed the manual review.
- Optionally type information about the verification in the Verification Notes text box.
- Klicken Sie auf Übernehmen.
The status changes to Verified for the selected results, and they move to the Verification group in the Update Results pane.
Tipp:
After a sampling result has been reviewed, you can revise its status. For example, if a result has been marked as Passed, you can change it to Failed.
Undo and Redo
When working in an open Data Reviewer session, you can reverse or restore the last action on a result by using the Undo or Redo tool.
- Click Undo
 and select Update Reviewer Result to incrementally undo your last edit.
 - Click Redo
 and select Update Reviewer Result to restore the changes you undid with Undo
  .
.