ModelBuilder in ArcGIS Pro is fundamentally very similar to ModelBuilder in the other ArcGIS Desktop applications. The model diagram appearance is similar, and you still build models by adding data and geoprocessing tools and connecting them to form processes. In ArcGIS Pro you can view, edit, and run models you built in previous releases of ArcGIS Desktop.
Despite these similarities, there are also some differences. Knowing about these differences will ease your transition to using ModelBuilder in ArcGIS Pro.
Compatibility
Note:
It is recommended before editing a model in ArcGIS Pro ModelBuilder that you make a copy of the original toolbox. If you edit and save the model in ArcGIS Pro, that model will not be usable in other ArcGIS Desktop applications.
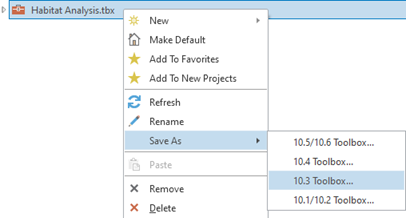
Models that are newly created, as well as any models that have been edited and saved in ModelBuilder in ArcGIS Pro, cannot be used in other ArcGIS Desktop applications. To use these models, you must save the toolbox to a new toolbox of the correct version. Right-click any toolbox, select Save As, then select a version.

You can also use the Consolidate Toolbox geoprocessing tool to analyze the models in your toolbox for previous version compatibility, and save the toolbox and related contents in a format that can be used in previous versions.
Selection, connection, and navigation
ModelBuilder previously included dedicated tools to pan, zoom, select elements, and connect elements. In ArcGIS Pro, there is a Select mode, a Pan mode, and Zoom In and Zoom Out buttons.
Select mode
By default you are in Select mode. In Select mode you can click an element to select it. You can move the selected element or connect it to another element. An element does not have to be selected to connect it to another element.
- Hover over a model element until the cursor changes to the connection mode
 and draw a connection by holding down the left mouse button while dragging the cursor toward another element.
 - Release the mouse button when the cursor is on top of the other element.
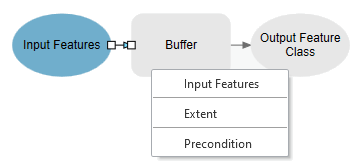
- After releasing the mouse button, choose whether to connect the element to a parameter, an environment, or use the element as a precondition.

You can also pan the model diagram when in Select mode using the vertical and horizontal scroll bars at the right side and bottom of the ModelBuilder view.
Pan mode
In Pan mode, you can click and drag the cursor anywhere in the model diagram to pan. You cannot select or connect model elements in Pan mode.
Calculate Field
The Calculate Field tool has been significantly changed in ArcGIS Pro due to the 64-bit architecture of the application.
Calculate Field no longer supports VB expressions; expressions can only use Python or Arcade syntax. If your model is saved with VB expressions, you will need to update the expression to one of the supported languages. Follow these steps to update your Calculate Field expressions.
- Right-click the model and select Edit.
- Double-click the Calculate Field tool to open it.
- Change the Expression Type parameter to Python or Arcade .
- Rewrite the Expression parameter using valid syntax.
- Click OK to commit the changes to the tool.
- Repeat these steps for any other Calculate Field tools in the model.
- Click Save to save the model.
Managed data
The Managed option has been removed in ArcGIS Pro ModelBuilder.
When you run a model, output data is created for each process in the model (unless the process only modifies the input). Some of the data created is of no use after the model is run since it was only created to connect to another process that creates new output. Such data is called intermediate data. When a model tool is run from the Geoprocessing pane, all intermediate output data is automatically deleted when the tool completes, except datasets that are output parameters. When a model is run in ModelBuilder, all data that is created is maintained.
Colors, shapes, and images
Models created in ArcGIS Pro have a slightly different color scheme compared to models created in other ArcGIS Desktop applications. In ArcGIS Pro, you cannot change the colors, shapes, or background images of model elements, and you cannot add images to the model diagram. Models that were saved with custom colors, shapes, and images from other ArcGIS Desktop applications will display these custom settings and objects in ArcGIS Pro.

Lists and series
Lists and series are not supported in ArcGIS Pro. You can use iterators to perform batch processes on a collection of datasets.