Available with Standard or Advanced license.
Depending on your level of access and the desired task, there are several ways to access the utility network dataset to add to an active map.
In the Catalog pane  , the utility network and related network classes can be accessed using different tabs:
- Portal tab—Displays the utility network and related classes when working with a utility network published from an enterprise geodatabase. Access to the utility network via the Portal tab is intended for tasks such as adding to an active map view to work with the utility network layer for editing or analytic operations.
- Project tab—Displays the utility network and related classes when working in the single-user model or multiuser model. When working within a multiuser model, the utility network is visible under Databases using a database connection
 established as the database user that owns the dataset. Access to the utility network via the Project tab with an enterprise geodatabase is intended for administration tasks and configuration of the utility network. When using the single-user model, the utility network is visible under the associated file geodatabase.
The utility network layer can be accessed via the Contents pane when the utility network is added to an active map view  . In the Contents pane, the utility network layer is prefixed with the utility network name and Utility Network, for example, EsriCoOp Utility Network.
Access the utility network ribbon
To access the Utility Network tab on the ribbon, the utility network layer and related layers must be in an active map view. To take advantage of subtype layers, the datasets that are configured with subtypes will be added using subtype group layers.
When working with an enterprise geodatabase, the utility network and related feature classes must be shared to the ArcGIS Enterprise portal via a feature service.
- On the Insert tab, in the Project group, click New Map
 .
. - On the Map tab, in the Layer group, click Add Preset
 and click Subtype Group Layer
  . Browse to the data source of the utility network and use the Ctrl key to select all the related utility network feature classes, except for the utility network dataset. Click OK.
- For a utility network shared using services, the data source is under Portal
 .
. - For a utility network stored in a file geodatabase, the data source is under Project or Computer.
- For a utility network shared using services, the data source is under Portal
- On the Map tab, in the Layer group, click Add Data
 . Browse to the utility network dataset
  and click OK.
On the ribbon, the Utility Network and Data contextual tab set appears.
- Click the Data tab under Utility Network to activate.

Access dirty areas
Dirty areas indicate a modification to the network has taken place, but it has not been validated in the network topology. To access dirty areas, the utility network layer must be in an active map view.
- Ensure the utility network and related layers are added to an active map view.
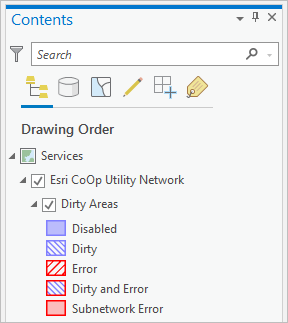
- In the Contents pane, expand the utility network layer.
You can now view and explore the Dirty Areas sublayer.

Access utility network properties
The Layer Properties dialog box provides a centralized location to view information about the current state and configuration of the utility network. As you work with and configure your utility network, any changes you make are reflected here.
The following steps summarize using the Contents pane when the utility network dataset is added to an active map view.
Tip:
The utility network properties can also be accessed through the properties context menu of a utility network dataset from within the geodatabase or database connection in the Catalog pane.To access the Layer Properties dialog box for the utility network, complete the following steps:
- Ensure the utility network and related layers are added to an active map view.
- In the Contents pane, right-click the utility network layer and click Properties to open the Layer Properties dialog box.
There are several standard tabs listed. The General, Metadata, and Source tabs contain general information about the layer.
- Click the Network Properties tab to get more detailed information about the utility network.