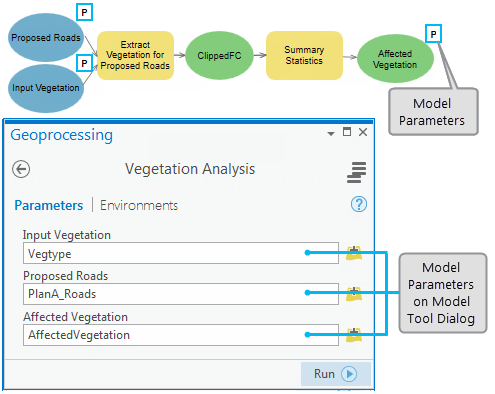
Any model variable can be set as a model parameter. There are two primary reasons to set a model variable as a parameter:
- Output variables that are set as model parameters are added to the map when the model is run as a geoprocessing tool.
- Variables that are set as model parameters appear as tool parameters when the model is run as a geoprocessing tool, allowing you to specify different data or values for your model to process than what was specified when the model was created.

Set model parameters
To set a model variable as a parameter, the model must be edited in ModelBuilder. In ModelBuilder, right-click the variable and select Parameter. When a variable is set as a parameter, the letter P appears next to the variable in the model.
The name of the variable is used as the model parameter label. You can rename a model parameter by renaming the model variable in ModelBuilder. Right-click the variable, select Rename, and enter the new name. When you open the model tool in the Geoprocessing pane, the parameter name reflects the new name. The value of a variable is used as the default value for the corresponding model parameter. If the variable has no value in ModelBuilder, the model parameter will be blank.
For the outputs of your model tool to appear in the geoprocessing history, you must set those outputs as model parameters. For example, if your tool outputs an HTML file and you want the user to be able to click to open the file from the Geoprocessing History pane, you must set the HTML output file as a model parameter.
Model parameter properties
You can change several properties of model parameters using the model Properties window. These properties impact how the parameters appear when the model tool is opened in the Geoprocessing pane.
Right-click the model tool in a toolbox and select Properties, or if you are editing the model in ModelBuilder, click the Properties button on the ribbon.
Order
Change the order of the parameters by dragging the parameters to the new order on the Parameters tab in the tool's Properties window.
Required or optional
Tool parameters are either required or optional. The designation of required or optional occurs automatically based on how the parameter is used in the model. For example, if the variable is used as the input to a required parameter of a tool in the model, that model parameter will be required. You can change model parameters from optional to required for the model tool, but you cannot change required parameters to optional.
To change an optional parameter to a required parameter, set the Type option to Required on the Parameters tab of the tool's Properties window.
Category
Parameters can be assigned a category. Categorized parameters are displayed in a drop-down section when the tool is opened in the Geoprocessing pane.
Filters
Parameter filters are used to limit or restrict the input values or data that can be specified for a model tool parameter. For example, the Value List filter requires that only values from a list can be specified for the parameter. Values entered into a parameter that do not match the filter will cause an error; the model cannot be executed until a valid value is entered.
The following filters are available:
- Value list—A list of predefined keywords. You can set a value list filter for string and numeric model parameters.
- Range—The minimum and maximum numeric value. The range is inclusive, meaning both the minimum and maximum are valid choices.
- Feature class—A list of allowable feature shape types, including point, multipoint, polyline, polygon, and multipatch.
- File—A list of valid file extensions such as .txt or .gpx.
Note:
Do not enter the period for the extension. For example, type txt, not .txt. Separate list values with a semicolon (;). For example, to allow both .txt and .csv files, type txt; csv.
- Field—A list of allowable field types, including short, long, single, double, test, date, OID, geometry, BLOB, raster, GUID, global ID, and XML.
- Workspace—The type of allowable workspace, including file system, local geodatabase, and enterprise geodatabase.
Dependency
You can make a parameter dependent on another parameter. The typical use for this is to make one parameter that accepts an attribute field dependent on another parameter that is a feature class or table; the field parameter will include a drop-down list of attribute fields from the dependent parameter.
Symbology
You can save a layer file with a defined symbology and use that layer file as a template for how your model outputs will be symbolized when added to a map. This can be accomplished in two ways:
- Set the Symbology option of an output parameter to a layer file path such as C:\Data\LandUseOverlay\Symbolized.lyrx on the Parameters tab of the tool's Properties window.
- Add the Apply Symbology From Layer tool to the end of your model, and set the Symbology Layer parameter to a layer file path.