The following workflow is designed to add a table frame to an existing layout to complete it. You will add the table and make modifications to improve its appearance.
Open the project
Before you can add a table, open the tutorial project that contains the correct map and layout:
- Start ArcGIS Pro and sign in if necessary.
- Open a browse dialog box to search for the project in one of the following ways:
- On the start page, click Open another project
 .
. - In an open project, click the Project tab on the ribbon. In the list of side tabs, click Open. On the Open page, click Open another project
 .
.

- On the start page, click Open another project
- On the Open Project browse dialog box, in the navigation pane, under Portal
 , click ArcGIS Online
  .
.Note:
If you are signed in to ArcGIS Enterprise
 , you must set your active portal to ArcGIS Online to access the tutorial data.
 - At the top of the dialog box, in the Search box, type Work with a table frame and press the Enter key.
- In the list of search results, click Work with a table frame to select the project package.
Note:
If there is more than one project package with this name, select the package with the Authoritative badge
 . In the Owner column, the owner name is ArcGISProTutorials. If you don't get any results, see No search results are returned.
 - Click OK.
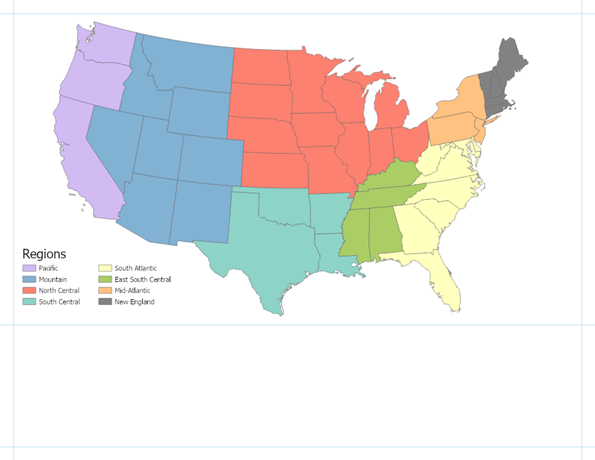
The project opens showing a layout with a map of the US symbolized by region and a legend listing the various regions.

Add a table frame to the layout
Complete the following steps to add a table frame to the layout:
- In the Contents pane, if necessary, expand the Map Frame element and the Map element. Click the USA States layer name to select it.
Select the layer or stand-alone table for the table frame to reference before adding a table frame. This allows the table frame to automatically populate with the layer's data. If you do not select a layer before adding the table frame, the table frame is added without any data and you must choose the layer or stand-alone table for the table frame in the Element pane.
- On the Insert tab, in the Map Surrounds group, click the bottom half of the Table Frame
 split button.
The table frame gallery opens.
- Select the Gray Double Alternating Rows style from the gallery.
- Below the map frame, draw a rectangle of the same width as the map frame, snapping to the guides, to define the table frame.
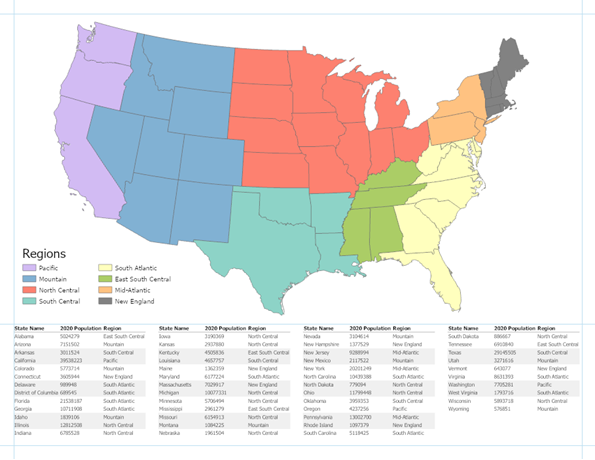
A table appears on the layout. The red ellipse in the corner of the table frame element shows that not all the data is being shown. You'll fix this in the next step.
- In the Contents pane, expand the Table Frame element. Uncheck all fields except STATE_NAME, POPULATION, and REGION.
The unchecked fields no longer display in the table frame. By default, when creating a table frame the first 10 fields are added to the table. Additional fields can be added to the table frame by right-clicking the Table Frame element in the Contents pane and choosing Add Field. Fields can be removed by right-clicking the field name under Table Frame and clicking Remove
 .
.
Reorder and sort the fields of the table frame
Complete the following steps to reorder and sort the fields of the table frame:
- In the Contents pane, select the REGION field.
- Drag the REGION field so it is between STATE_NAME and POPULATION.
The table frame updates to reflect the field order change. Now the REGION field draws in-between the STATE_NAME and POPULATION fields on the table.
- In the Contents pane, right-click the Table Frame element and choose Properties.
The Element pane appears.
- In the Element pane, click the Arrangement tab
 . Under Sorting, click Add Sort Field
  , and choose STATE_NAME.
The table frame orders the states alphabetically.
- Under spacing, change the Frame columns value to 10 pt.
The table frame columns update to be closer together.

- On the Quick Access Toolbar at the top of the ArcGIS Pro window, click the Save button
 to save the project.
Modify the table frame
Make the changes described below to improve the appearance of the table.
Modify the heading
Complete the following steps to modify the heading:
- If necessary, in the Contents pane, right-click the Table Frame element, and click Properties to open the Element pane.
- In the Element pane, click the Display tab
 .
. This tab provides options for changing how the table frame looks, including options for the entire table, table cells, headings, and row backgrounds.
- If necessary, expand the Heading section. Under Heading, click the Text Symbol button.
The pane state changes to provide access to text symbols.
- On the General tab
 , expand Appearance. Change Font name to Arial.
 - Change Size to 12 pt.
- Expand Position and change Horizontal alignment to Centered
 .
. - Click Apply.
The table updates. The headings are now centered and larger than the row text.
- At the top of the pane, click the Back button
 to return to the Display tab
  .
. - Under the Heading section next to Background, open the color gallery and use the Eyedropper tool to select one of the region colors on the map.
The table heading updates to have a background matching one of the region colors from the map.

Change row text
Change the text and background for the rows on the table to make it easier to read:
- On the Display tab
 , expand Rows if necessary. Next to Text, click the Text Symbol button.
The pane state changes to provide access to text symbols.
- On the General tab
 , expand Appearance and change Font name to Arial. Click Apply.
The row text on the table frame updates to the new font.
- Click the Back button
 to return to the Display tab
  .
. - Under Rows, for Background 1, decrease the row value to 1 row.
- Under Rows, for Background 2, decrease the row value to 1 row.

- On the Quick Access Toolbar at the top of the ArcGIS Pro window, click the Save button
 to save the project.
Modify a single field
Complete the following steps to modify the number and text formatting for a single field:
- In the Contents pane, right-click the Table Frame element and click Open.
The USA States attribute table appears.
- On the ribbon, click the Table tab. In the Field group, click Fields
 .
. The Fields view of the table opens.
- Select the table row with the field name POPULATION.
- In the Number Format column for that row, double-click the cell value Numeric to show the Determine display formatting for numeric field types button.
- Click the button to open the Number Format dialog box.
Table frames honor the Number Format settings for fields. Making changes for a field will update any table frames displaying the field, as well as the attribute table.
- Check the Show thousands separators check box and click OK.
- On the ribbon, on the Fields tab, in the Manage Edits group, click Save
 .
.The table frame updates, now the POPULATION field values have thousand separators displayed.
- Close the Fields view of the table.
- Close the attribute table.
- In the Contents pane, right-click the POPULATION field and choose Properties.
The Element pane appears, displaying options for the POPULATION field.
- In the Element pane, under Display, next to Data Text, click the Text Symbol button.
The pane state changes to provide access to text symbols.
- On the General tab
 , expand Position. Next to Horizontal alignment, click Right
  and click Apply.
The table frame updates. Now the POPULATION field is right justified. The other fields remain left justified.

- Click the back button to go the table frame properties.
- On the Quick Access Toolbar at the top of the ArcGIS Pro window, click the Save button
 to save the project.
Modify the entire table frame
Complete the following steps to format the entire table frame and finish the layout:
- In the Contents pane, right-click the Table Frame element, and click Properties to open the Element pane.
If the Element pane is already open, select the table frame in the Contents pane to show its properties. The Element pane always shows the properties of the selected layout element.
- In the Element pane, click the Display tab
 .
. - Under Table, for Frame column border, open the color gallery and use the Eyedropper tool to select the same region color on the map you used for the Heading Background.
A 1 pt colored line is added around each table frame column, making the table easier to read.
- On the ribbon, click the Table Frame tab.
- In the Size & Position group, change Position from the Top Left position anchor point to the Center position anchor point.
The table frame anchor point updates, and the table frame is now centered within its bounding box on the layout.

- On the Quick Access Toolbar, at the top of the ArcGIS Pro window, click the Save button
 to save the project.