Available with Location Referencing license.
You can create LRS route log data products using the Generate LRS Data Product tool. This tool requires an LRS data template.
The ArcGIS Pipeline Referencing extension includes a Data Product Designer wizard to create LRS data templates.
The sample route log shown in the table below is created for the Dripping Springs to Smithville 300 engineering route depicted in the following diagram. The measures on the route increase in the direction of the arrow. The route log places the records on the route as if a person moving in the direction of the arrow is noting the pipe characteristics and measure value information of the specified layers as they are encountered.
The route log data product returns the location and information of point events, line events, intersections, referent features, and polygon boundaries for the Dripping Springs to Smithville 300 engineering route. The following list shows the characteristics found along the route:
- Log fields: Anomaly Type, Coating Material, Operating Pressure, and Crossing Utility Intersection
- Location fields: Operating Area and City boundaries
- Referent field: Stationing Marker
The following table is the returned route log for the route after inputting the LRS data template into the Generate LRS Data Product tool.
| Route Name | Description | Measure | Referent | Offset | Operating Area | City | Anomaly Type | Intersection | Coating Material | Operating Pressure |
|---|---|---|---|---|---|---|---|---|---|---|
| Dripping Springs to Smithville 300 | Begin Pipe: Dripping Springs to Smithville 300 | 0 | 00+00.00 | 0 | SW | Roxton | Copper | 500 | ||
| Dripping Springs to Smithville 300 | Intersecting Dripping Springs to Smithville 300, Pipe013S | 0 | 00+00.00 | 0 | SW | Roxton | Dripping Springs to Smithville 300, Pipe013S | Copper | 500 | |
| Dripping Springs to Smithville 300 | Begin Copper coating | 0 | 00+00.00 | 0 | SW | Roxton | Copper | 500 | ||
| Dripping Springs to Smithville 300 | Begin Operating Pressure 500 PSI | 0 | 00+00.00 | 0 | SW | Roxton | Copper | 500 | ||
| Dripping Springs to Smithville 300 | Dent | 1200 | 00+00.00 | 1200 | SW | Roxton | Dent | Copper | 500 | |
| Dripping Springs to Smithville 300 | Intersecting Dripping Springs to Smithville 300, Pipe336N | 1200 | 00+00.00 | 1200 | SW | Roxton | Dripping Springs to Smithville 300, Pipe336N | Copper | 500 | |
| Dripping Springs to Smithville 300 | Leaving City Limit: Roxton | 1500 | 10+50.00 | 0 | SW | Roxton | Copper | 500 | ||
| Dripping Springs to Smithville 300 | Entering City Limit: Dean | 1500 | 10+50.00 | 0 | SW | Dean | Copper | 500 | ||
| Dripping Springs to Smithville 300 | End Operating Pressure 500 PSI | 2000 | 10+50.00 | 500 | SW | Dean | Copper | 500 | ||
| Dripping Springs to Smithville 300 | Begin Operating Pressure 350 PSI | 2000 | 10+50.00 | 500 | SW | Dean | Copper | 350 | ||
| Dripping Springs to Smithville 300 | Gouge | 2300 | 10+50.00 | 800 | SW | Dean | Gouge | Copper | 350 | |
| Dripping Springs to Smithville 300 | Internal Corrosion | 2500 | 10+50.00 | 1000 | SW | Dean | Internal Corrosion | Copper | 350 | |
| Dripping Springs to Smithville 300 | End Copper coating | 3000 | 10+50.00 | 1500 | SW | Dean | Copper | 350 | ||
| Dripping Springs to Smithville 300 | Begin Steel coating | 3000 | 10+50.00 | 1500 | SW | Dean | Steel | 350 | ||
| Dripping Springs to Smithville 300 | Intersecting Dripping Springs to Smithville 300, Pipe912N | 3650 | 30+20.00 | 300 | SW | Dean | Dripping Springs to Smithville 300, Pipe912N | Steel | 350 | |
| Dripping Springs to Smithville 300 | End Operating Pressure 350 PSI | 4500 | 45+00.00 | 0 | SW | Dean | Steel | 350 | ||
| Dripping Springs to Smithville 300 | End Steel coating | 4500 | 45+00.00 | 0 | SW | Dean | Steel | 350 | ||
| Dripping Springs to Smithville 300 | End Pipe: Dripping Springs to Smithville 300 | 4500 | 45+00.00 | 0 | SW | Dean | Steel | 350 |
Other types of route log data products that you can configure include the following:
- Change of operating conditions along pipes in different operating areas
- In-line Inspection (ILI) survey reading, document point, and ILI range along pipes with markers as the referent location
- The measure of intersections between a pipe and features such as hydrology units, transportation lines, utility lines, other pipelines, and operating area boundaries
The next sections describe how to use the Data Product Designer wizard to create a template for the Generate LRS Data Product tool to produce a route log data product similar to the one shown in the table above.
Choose an LRS data product type
The first step in the Data Product Designer wizard is to specify the data product type.
To specify the Route Log data product type, complete the following steps:
- Start ArcGIS Pro and open a project with LRS data in the map.
- On the Location Referencing tab, in the LRS Data Products group, click Data Product Designer
 .
.The Choose an LRS data product type page of the Data Product Designer wizard appears.
- Click the Data Product Type drop-down arrow and choose Route Log.

- Click Next.
The Set template properties page appears.
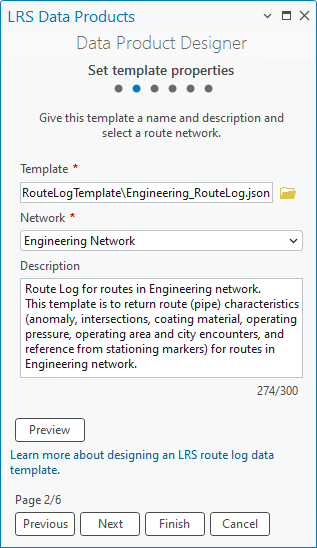
Set template properties
To set the template properties once the template type is specified, complete the following steps:
- Provide a template name.
By default, the template is saved in the project folder. Optionally, browse to a different location, provide a name for the template, and click OK.
- Click the Network drop-down arrow and choose a network.
Route characteristics will be provided for this network when the Generate LRS Data Product tool is run with the template.
- Optionally, provide a description.

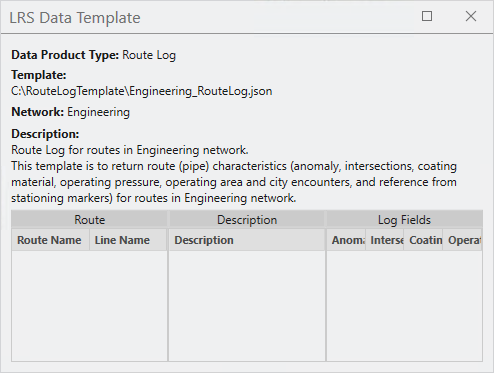
- Optionally, click Preview to preview the information on a canvas.

Note:
If the chosen network is a line network, the Line Name column appears in the route log next to the route identifier field. - Click Next.
The Select a route identifier field page appears.
Select a route identifier field
The next step to produce a template for a route log is to add a route identifier field and provide informative text. The route identifier can be a route name or route ID.
This example uses RouteName as the engineering network's route identifier field and Route Name as the display name in the Name in Table text box. The display name is also updated on the preview canvas. In the example route log, the start and end points of a route are Begin Pipe: Dripping Springs to Smithville 300 and End Pipe: Dripping Springs to Smithville 300, respectively.
To specify a route identifier field, complete the following steps:
- Click the Route Identifier drop-down arrow and choose a field.
The default option is Route ID if the specified network is not a line network, or Route Name if the specified network is a line network.
If the specified network has both a route ID and a route name configured, you can choose one of the two options using the drop-down arrow.
- Optionally, update the display name in the Name in Table text box.
The default display name is the Route Identifier value.
- Optionally, update the text in the Feature Begin Text and Feature End Text text boxes to indicate the start and end of the routes.
The default values are Begin and End, respectively.
- Optionally, provide text in the Field Value Prefix and Field Value Suffix text boxes to supplement information before and after the route identifier value, respectively.
In the example, Pipe: is the prefix for the route identifier value. The example does not include a field value suffix.


Choosing a route identifier field ensures that the route log data product generated using this template will include route information fields.

- Click Next.
The Add log fields page appears.
Add log fields
In a route log data product, the log fields form the columns that include event and intersection information. You can add log fields from log layers and supplement informative text. Informative text provides details about the log layers.
Note:
A centerline feature class can also be used as a log layer when it is configured with the Address Data Management solution or a utility network.The example in this section uses four log layers:
- Anomaly point event
- Crossing Utility intersection
- Coating line event
- Operating Pressure line event
An LRS route log data product generated using this template returns a record when any of these layers appear and end on a route.
Note:
Adding log fields is optional. If you don't want to add log fields to the template, click Next to proceed to adding location fields.
To add log fields, complete the following steps:
- Click Add to create a blank row in the Log Fields table.
- Click the Layer drop-down arrow and choose a log layer.
The layer can be a point event, a line event, or an intersection that is registered to the network specified when setting the template properties. It must be stored in the same geodatabase or feature service and have the same coordinate system as the specified network. The layer you specify determines which fields are available for the Field menu.
The first log layer configured in the example is the Anomaly point event.
- Click the Field drop-down arrow and choose a field from the layer specified.
For this example, Anomaly Type is configured as one of the log fields.
- Optionally, update the display name in the Name in Table text box.
The default display name is the Field value.
This text updates the row in the Log Fields table.
- Optionally, provide text in the Feature Begin Text and Feature End Text text boxes.
This text will appear before the start and end of log fields.
The default values are Begin and End, respectively.
Note:
The Feature Begin Text and Feature End Text text boxes are not available when using a point event layer or an intersection layer.
- Optionally, provide text in the Field Value Prefix and Field Value Suffix text boxes.
This text provides additional information about the log value and is inserted before and after the log value, respectively.
In the example below, Operating Pressure is the Field Value Prefix value and PSI is the Field Value Suffix value added for the Operating Pressure line event.
- Optionally, click New expression under Filter Expression and define an expression that filters specific log values.
Only features that meet the filter expression will be returned in route log. For example, COATING_MATERIAL <> 'Plastic' will return nonplastic coating material events.
- Optionally, check the Merge Coincident Events check box for line event log layers.
Checking this box returns coincident events with the same value in the log field as a single event in the route log.
- To add multiple log fields, repeat the previous steps for each field.
For this example, Anomaly Type, Intersection, Coating Material, and Operating Pressure are configured as log fields.


By adding log fields, route log data products generated with this template will have columns that include event and intersection information.

- Click Next.
The Add location fields page appears.
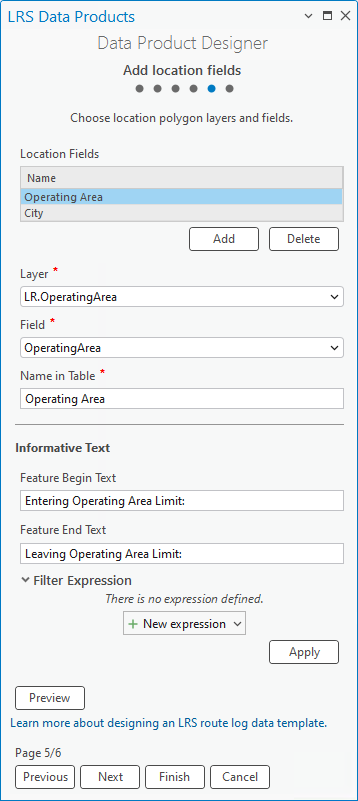
Add location fields
After adding log layers, you can add location layers and location fields. The location fields form the columns that contain information about the polygon boundaries crossed by the routes. You can also provide informative text for the location layers.
The example in this section uses Operating Area and City as the location layers. A route log data product generated using this template will return a record when a route enters or leaves an operating area or city.
Note:
Adding location fields is optional. If you don't want to add location fields to the template, click Next to proceed to selecting a referent field.
To add location fields, complete the following steps:
- Click Add to create a blank row in the Location Fields table.
- Click the Layer drop-down arrow and choose a location layer.
The layer must be a polygon feature class stored in the same geodatabase or feature service and have the same coordinate system as the specified network when setting the template properties.
The first location layer configured in the example is OperatingArea.
- Click the Field drop-down arrow and choose a field from the location layer specified.
For this example, Operating Area is configured as the location field.
- Optionally, update the display name in the Name in Table text box.
The default display name is the location field.
This text updates the row in the Location Fields table.
- Optionally, provide text in the Feature Begin Text and Feature End Text text boxes.
This text will appear before the start and end of the location fields.
The default values are Begin and End, respectively.
For this example, the Feature Begin Text and Feature End Text text boxes are updated with Entering Operating Area Limit: and Leaving Operating Area Limit: text, respectively.
- Optionally, click the Filter Expression drop-down arrow and provide an expression to filter by a specific location field.
Only features that meet the filter expression will be returned in the route log.
The example does not have a filter expression configured for location fields. One example of a filter expression, REGION = "S-US", will return only route interactions with operating areas in the Southern United States.
- To add multiple location fields, repeat the previous steps for each field.
The example has two location fields: Operating Area and City.


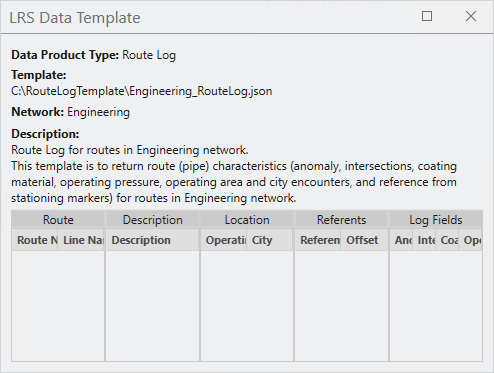
By adding location fields, the route log data products generated with this template will have columns that include records of when a route enters or leaves a location.

- Click Next.
The Select a referent field page appears.
Select a referent field
After adding location layers, you can add a referent field from a referent layer. The referent field forms the columns that include referent and offset information. You can also provide informative text for the referent layer.
Note:
- Configuring a referent field is optional. If you do not want to configure a referent field, click Finish to save the template.
- You can configure only one referent layer for a route log template.
To configure a referent field, complete the following steps:
- Click the Referent Located At drop-down arrow and choose a referent method:
- Nearest Upstream—The nearest referent feature upstream of the route log entry will be used to calculate the referent offset. If no upstream referent feature exists, the referent values will be empty.
- Nearest—The nearest referent feature, upstream or downstream to the route log entry, will be used to calculate the referent offset.
The following image and table illustrate the difference between the two referent methods. The dent anomaly is 1,000 feet upstream from the nearest stationing marker, so the offset is -1000. Additionally, the dent anomaly is 6,000 feet from the nearest upstream stationing marker, so the offset is 6,000.
Referent method Referent Offset (US Survey Feet) Nearest
70+00.00
-1000
Nearest Upstream
00+00.00
6000
- Click the Layer drop-down arrow and choose a referent layer.
The layer must be a point event stored in the same geodatabase or feature service and have the same coordinate system as the specified network when setting the template properties.
For this example, Stationing Marker is configured as the referent layer.
- Click the Field drop-down arrow and choose a referent field.
For this example, Station is the referent field.
- Optionally, update the display name in the Name in Table text box.
The default display name is Referent.
- Optionally, provide text in the Field Value Prefix and Field Value Suffix text boxes.
The text provides information about the referent value and is inserted before and after the value, respectively.
- Optionally, click the Offset Unit drop-down arrow and choose a different unit.
The default offset unit is Feet (International).
For this example, the Offset Unit value is set to Feet (US Survey).


By adding a referent field, the route log data products generated with this template will have columns that include referent and offset information.

- Click Finish to save the template.
The template is complete and can be used in the Generate LRS Data Product tool to generate an LRS data product.
Note:
To review or edit an existing template, on the Set template properties page, click Browse for the template location  next to the Template text box. You can choose a template from the project folder or from other locations.