This topic introduces vocabulary that is essential to understanding the ModelBuilder help.
Diagram
The model diagram is what you see when you edit a model in ModelBuilder, including the appearance and layout of the tools, and variables in the model.
Elements
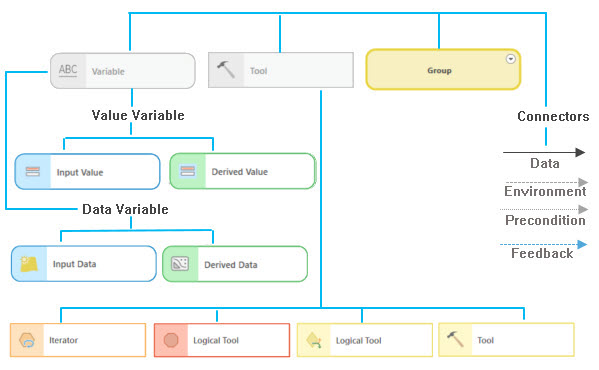
Model elements are the basic building blocks of models. The following are the four main types of model elements:
- Geoprocessing tools—Perform various operations on geographic or tabular data. When tools are added to a model, they become model elements. You can open the tool dialog box of any geoprocessing tool in a model to set the input and output parameters.
- Variables—The elements in a model that hold a value or a reference to data. There are two types of variables: data and value.
- Connectors—Connect data and values to tools. The connector arrows show the direction of processing. There are four types of connectors: data, environment, precondition, and feedback.
- Groups—The visual elements that group related tools together. These groups can collapse or expand to hide or show tools, providing more visual space to work with.
The illustration and table below show the different model elements in ModelBuilder.

| Element | Description |
|---|---|
Data variable  |
Input data variables are model elements that store paths and other properties of data on disk. Common data variables include feature class, feature layer, raster dataset, and workspace. |
Output data variable  |
Output data variables are data created or modified by a tool in the model. When a geoprocessing tool is added to a model, variables for the tool's output parameters are automatically created and connected to the tool. |
Value variable  |
Value variables are input values such as strings, numbers, Boolean (true/false values), spatial references, linear units, or extents. Value variables can contain anything except references to layers or data stored on disk. |
Derived value variable  |
Output values that are the result of a tool such as strings, numbers, or Boolean values. Output values can be inputs to other tools. The Calculate Value tool, for example, outputs the result of a logical or mathematical calculation. |
Tool  |
Tools are geoprocessing tools that are added to the model. These include all tools in a system toolbox as well as custom model and script tools. Tools in ModelBuilder also include other tools such as iterators, ModelBuilder utilities, and ModelBuilder logical tools. Iterators are special ModelBuilder-only tools that repeat the same operation or loop through a set of input data or values.
Logical tools are special ModelBuilder-only tools that branch the model based on different conditions.  Learn more about If logical tools Logical tools are used to control the logical flow of models. One logical tool is Stop.  Learn more about logical tools ModelBuilder utilities are tools that are helpful in constructing models and only work in ModelBuilder, not in scripting.  Learn more about ModelBuilder utilities  Script tools run a script file on disk, usually a Python file (.py), but also executable files (.exe or .bat).  Model tools are created and edited in ModelBuilder. |
Group  | Groups are visual categories that include other elements in the model. These groups can be expanded and collapsed. |
Processes and state
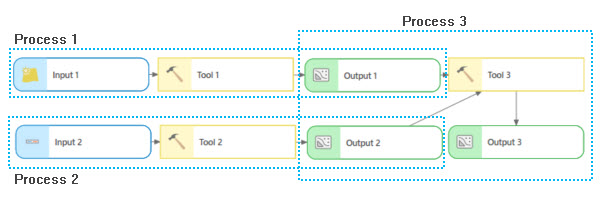
A model process consists of a tool and all variables connected to it. Connector lines indicate the sequence of processing. Many processes can be chained together to create a larger process. 
Not Ready To Run
When you initially drag a tool into ModelBuilder, the process is in the Not-Ready-To-Run state because the required parameter values have not been specified. The tool and its inputs and outputs are gray.
Ready To Run
A process is ready to run when the tool has all required parameters filled in. All model elements in the process have color.
Running
The process is in the Running state if the model tools are highlighted with a progress bar and spinner control.
Has Been Run
If you run the model in ModelBuilder, the tool will show a green status bar and a Check Mark icon  . The output data elements are displayed with a Check Mark icon
  , indicating that the process has run and the data has been created.

Variable types
The input variables in the models can be a single value, a multivalue, or a value table variable. Single and multivalue variables support a single data type. A value table variable allows you to add more than one data type. You can create a model variable by clicking the Variable button  on the ModelBuilder tab, or the Create Variable button from the model view context menu. On the Variable Data Type dialog box, you can check the Multiple Values check box to create a multivalue variable, or check the Table of Values check box to create a value table variable. Some data types have special user controls, for example, field map, extent, coordinate system, and so on, with control-specific interaction.
Validation
Model validation refers to the process of ensuring that all model variables (data or values) are valid.
Environment settings
Geoprocessing environment settings are additional settings that affect geoprocessing tools. These settings allow you to ensure that geoprocessing is performed in a controlled environment. For example, you can set the processing extent to limit processing to a specific geographic area or set a coordinate system for all output geodatasets.
The following three levels of environment settings apply to ModelBuilder:
- Project-level environments—Settings that will be applied to any tool when it is run in the current project. These environment settings are saved with the project.
- Model-level environments—Settings that are specified and saved with a model and override project-level settings.
- Model process-level environments—Settings that are applied to a single run of a tool, saved with the model, and override the project-level and model-level settings.
Workspace environments
You can use the following workspace environments in ModelBuilder to simplify model data management:
- Scratch GDB
The Scratch GDB environment setting is the location of a file geodatabase you can use to write temporary data.
The scratch GDB (geodatabase) is the preferred location for writing intermediate outputs in a model. Use this geodatabase by specifying an output dataset path such as %scratchgdb%\output.
- Scratch folder
The Scratch Folder environment setting is the location of a folder you can use to write file-based data, such as shapefiles, text files, and layer files.
- Current Workspace
Tools that honor the Current Workspace environment use the workspace specified as the default location for geoprocessing tool inputs and outputs.
- Scratch Workspace
Tools that honor the Scratch Workspace environment use the specified location as the default workspace for output datasets. The scratch workspace is intended for output data you do not want to maintain.
In addition to the above workspaces, you can also write model outputs to memory. Data written to memory is temporary and automatically cleared when the application closes.
Preconditions
You can use preconditions to explicitly control the order of operations in a model. For example, a process can be scheduled to run after another process by making the output of the first process a precondition to the second process. Any variable can be made a precondition to the running of the tool, and any tool can have more than one precondition.
Feedback
The output of a process can be used as the input to a previous process. This is known as feedback, since you feed the output back to the input.
Layout
The elements in a model can be arranged by moving the elements to the desired location or automatically arranged using the Auto Layout button on the ModelBuilder tab. To automatically arrange the elements inside the group, right-click the group, and click the Auto Layout button on the context menu. To lock or unlock the elements, click the Lock Element or Unlock Element button in the View group on the ModelBuilder tab. Locked elements are not affected by the Auto Layout status in the model.
Intermediate data
The output from the intermediate tools in a model can be retained or deleted.
In-line variable substitution
In ModelBuilder, you can substitute the value or dataset path of a variable for another variable by enclosing the substituting variable name in percent signs (%VariableName%). Substituting variables in this manner is called inline variable substitution.
For example, if you have a variable Name with a value of Wilson, you can construct a dataset path as C:\Data\Output.gdb\Clipped_%Name% and the path will be resolved as C:\Data\Output.gdb\Clipped_Wilson.
Iterators
Iteration, or looping, refers to an automated way to repeat a process. Iteration is important because automating repetitive tasks reduces the time and effort required to perform the tasks. With iteration in ModelBuilder, a process can be run repeatedly using different settings or data each time.
Utilities
ModelBuilder provides a number of support utilities, including Calculate Value, Collect Values, Get Field Value, Parse Path, and Select Data.
If-then-else branching and logical tools
If-then-else logic is a concept for performing actions based on different conditions. If-then-else logic can be explained as follows: if the condition is true, then perform an action, else perform a different action.
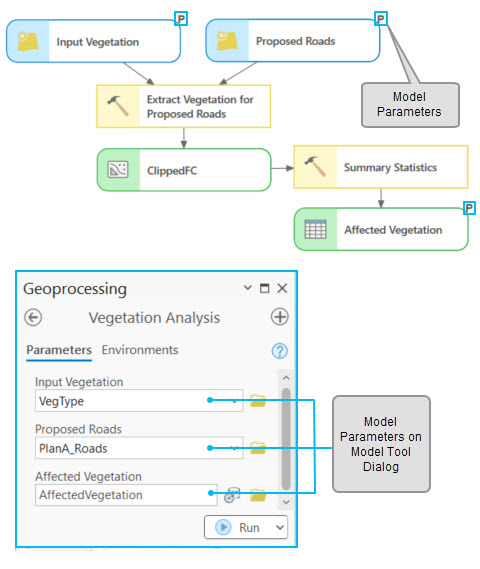
Parameters
Model parameters appears in the Geoprocessing pane when the model is opened as a geoprocessing tool. Any variable in the model can be made a model parameter. Output variables (tool outputs) that are parameters will be added to the last active map after they are successfully created.
Model tool
A ModelBuilder model is saved as a model tool in a toolbox. A model tool is the same as any other geoprocessing tool: it can be run, used in Python, or added to another model. To edit the model tool in ModelBuilder, right-click the tool, and select Edit. To open and run the model tool in the Geoprocessing pane, double-click the tool, or right-click the tool and select Open.
Add a submodel to a model
Adding and running one model tool in another model is sometimes referred to as a submodel, nested model, or model within a model. Using one model in another model allows large models to be divided into smaller, more easily managed models that can be reused.
Batch model tool
Model tools can be run in a batch mode that allows you to run the model tool multiple times using many input datasets or different parameter settings. This makes it possible to run a tool many times with very little interaction.
Schedule a model
You can schedule a model tool to run at a specific time of day or to run repeatedly at a designated time interval. This is helpful if the model takes a long time to run and you want the results to be available at a certain time.
Export a model to Python
You can export a model either to the Python window or a Python script file. Both options will generate the same Python code, which can be further edited and used as a stand-alone Python script or modified to work as a script tool.
Model report
The ModelBuilder report view shows all the variables and tools in a model along with its value and other properties. This is helpful for locating variables in a large model. You can also find and replace variable names and values in the report view.
