Available with ArcGIS Pro Standard and Data Reviewer licenses.
Tutorial summary
In this tutorial, you will use ArcGIS Data Reviewer to validate and identify data in your project to ensure it meets the data quality requirements defined by your organization and the workflows in which you can implement them. You will do this by implementing automated quality control using Data Reviewer checks to assess the quality of features stored in a file or ArcGIS Enterprise geodatabase.
Note:
If you have access to an Enterprise geodatabase or a feature service, and are familiar with the fundamentals of working with Enterprise, review the Data Reviewer quick-start tutorials for Enterprise.
Estimated time | 20 minutes |
Software requirements | ArcGIS Pro Note:The quick-start tutorials are updated at each software release. For the best experience, use an online help version that matches your software version. |
Data requirements | The data for this tutorial is available from the Data Reviewer for ArcGIS Pro Tutorial page. This package contains an ArcGIS Pro project package and a subset of the Local Government sample data.
|
Overview
Open the project
In this exercise, you will open a project package using ArcGIS Pro and verify its contents.
- Start
ArcGIS Pro and sign in if necessary.
Caution:
If you have not downloaded the Data Reviewer for ArcGIS Pro Tutorial data, review the data requirements listed above.
- On the start page, next to your recent projects, click Open another project.
Note:
If you have a project open, click Open Project
 on the Quick Access Toolbar, and proceed to step 4.
 - On the Open Project page, click Computer.
- In the folder where you downloaded and extracted the tutorial data, browse to the project file: <extracted file location>\DataReviewer_AttributeRules\Implement_automated_QC.
- Click the AutomatedQC.ppkx file.
- Click OK.
The project opens with a topographic basemap containing city data zoomed to Naperville, Illinois.
Find Data Reviewer checks
In this exercise, you will author a Run Data Check on the map data as well as a series of validation attribute rules in your geodatabase.
Before configuring any checks, review the Data Reviewer check's poster to find the checks that best fit the industry scenarios.
- Open the ArcGIS Data Reviewer checks poster link.
- In the Spatial Relationship Checks check group, read through the checks to find the check that best fits the first industry requirement: Road features must not contain duplicates.
- In the Feature Integrity Checks check group, read through the checks to find the check that best fits the second industry requirement: Road vertices must not exist within one foot from each other.
- In the Attribute Checks check group, read through the checks to find the check that best fits the third industry requirement: Road centerline Full Road Name attribute values must match the master street index.
- Once you have selected a check for each of the industry scenarios, review the table below to verify that you chose the correct Data Reviewer checks.
The following table outlines a subset of data quality requirements that support address-finding workflows. You will implement these rules as a Run Data Check and validation attribute rules to ensure that all address-related features are compliant with these requirements.
| ID | Requirement | Check | Participating feature class/table |
|---|---|---|---|
1 | Road features must not contain duplicates. | Duplicate Feature | Road Centerline |
2 | Road vertices must not exist within one foot from each other. | Duplicate Vertex | Road Centerline |
3 | Road centerline Full Road Name attribute values must match the master street index. | Table to Table Attribute | Road Centerline, Master Road Name |
Implement requirement ID 1 using the Run Data Checks tool
Before you configure validation attribute rules, conduct a quick review of the neighborhood address data to verify its accuracy using the Run Data Checks tool.
The Run Data Checks tool quickly evaluates a feature's quality with minimal setup and provides an initial assessment of data quality. You can experiment with different check configurations, make quick adjustments, and run the tool multiple times during an ArcGIS Pro session to identify specific types of errors. After you finalize a Run Data Check configuration, you can export it to a .csv file and use it as a validation attribute rule.
Complete the following steps to set up a Run Data check for data requirement one, road features must not contain duplicates, using the Duplicate Feature check to quickly establish a baseline for errors in your data:
- Click the Edit tab.
- In the Data Reviewer group, click Manage Quality
 .
. - In the Automated Review group, click the Run Data Checks
 drop-down menu and select the Duplicate Feature
  Run Data Check.
The Run Data Checks Duplicate Feature pane appears.
- On the Input Feature drop-down menu, select Local Streets.
- In the Check Parameters section, under the Features to Compare drop-down menu, select Local Streets to search for duplicate road features.
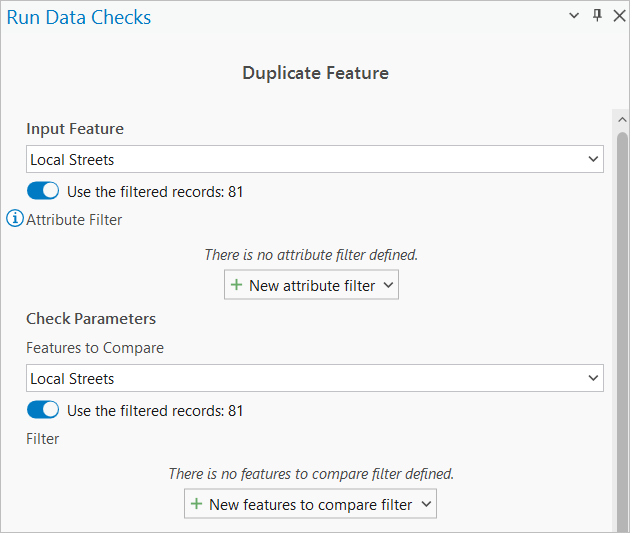
- In the Name text box, type Road features must not contain duplicates.
- Ensure that Visible Extent is selected and click Run.
Two errors are found, and a line error appears on the map and in the Contents pane as a layer.

Export the rule
Now that you have identified a baseline understanding of the duplicate feature errors in your map, export the Run Data Check rule you created as a validation attribute rule. Running the check as a validation attribute rule allows you to track error status and save the rule for future use.
- In the Automated Review group, click the History
 drop-down menu, right-click the result, and click Export to attribute rules.
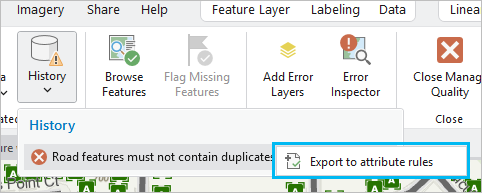
The Select Output .csv Location dialog box appears.
- Browse to the tutorial project folder to save the rule configuration: <extracted file location>\DataReviewer_AttributeRules\Implement_automated_QC.
- Click OK.
A notification appears stating the number of checks and .csv files exported.
Before you convert the Run Data Check to a validation attribute rule, you must verify that Global IDs and Editor Tracking are enabled.
- Click the Catalog
 tab if you have not already done so.
 - In the Catalog pane, click the Databases
 drop-down, click the datareviewertutorial.gdb
  drop-down, and right-click the RoadCenterline feature class, and click Properties.
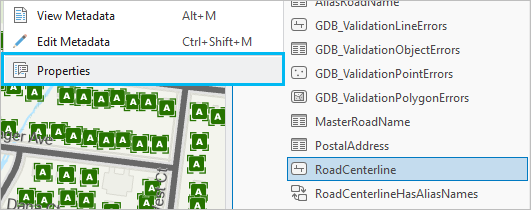
The Feature Class Properties: RoadCenterline dialog box appears.
- Click Manage.
- Verify that Global IDs and Editor Tracking are enabled.
Note:
Global IDs have been added to the datasets and editor tracking is enabled for this tutorial, but you must do these two things when you configure rules for your own data.
- Once verified, click OK.
- Repeat the above steps to ensure that Global IDs and Editor Tracking are enabled for the MasterRoadName feature class.
Now that you have verified that Global IDs and Editor Tracking are enabled, convert the Duplicate Feature Run Data Check to a validation attribute rule.
- In the Contents pane, right-click the Local Streets feature layer and point to Data Design and click Attribute Rules.
The Attribute Rules view appears for the selected feature layer.
- In the Import/Export group, click Import Rules
 .
.The Import Rules dialog box appears.
- Browse to the location where you saved the .csv file and select RoadCenterlines.csv.
Note:
If the .csv file is not appearing as expected, click Refresh
 .
. - Click OK.
- Click the Validation tab.

The rule appears under the Validation tab.
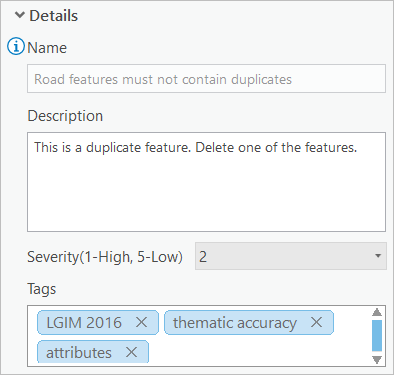
- In the Road Features must not contain duplicates check pane, scroll down to the Details section and configure the properties that will store results for features that fail validation:
- Type This is a duplicate feature. Delete one of the features. in the Description text box.
- Click the Severity(1-High, 5-Low) drop-down arrow and choose 2 to set the relative importance for results of this type compared to others.
- Type LGIM 2016, thematic accuracy, attributes in the Tags text box and press Enter.
Tip:
Tags can be used to enable requirements traceability. Consider including the data model and version for which the rule is related or including an ISO-19157 data quality element, such as thematic accuracy.
- On the Attributes Rules tab, in the Manage Edits group, click Save
 to save the new rules.
 - Exit out of the Attribute Rules: Road Centerlines tab.
Implement requirement ID 2
Now that you have configured and imported a Run Data Check as a validation attribute rule, configure more validation attribute rules to find errors for the remaining industry requirements. These rules identify features in your database that do not meet specified data quality conditions. Validation attribute rules can run multiple checks simultaneously. When errors are found, they are stored, tracked, and updated through the error-lifecycle management process, which will be demonstrated in the third tutorial, Evaluate features with attribute rules.
The second requirement, road vertices must not exist within one foot from each other, is implemented with the Duplicate Vertex check to find road centerline features that contain vertices less than a foot apart.
Complete the following steps to implement requirement ID 2:
- In the Contents pane, right-click a layer in the Roads group such as Local Streets, and click Data Design > Attribute Rules.
The Attribute Rules view appears for the Road Centerline feature class.
- On the Attribute Rules tab, in the Add Rules group, click the Ready to Use Rules
 drop-down gallery to display ArcGIS Data Reviewer automated checks.
Note:
The contents of the Ready to Use Rules gallery is a smart gallery that varies depending on the chosen data source.
- From the Ready to Use Rules gallery, in the Validation section, click Duplicate Vertex
 to add a new rule.
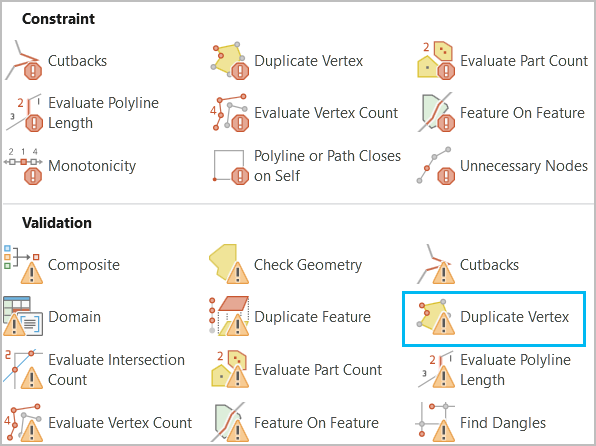
The new rule appears in the Attribute Rules view with a red row header, indicating that required parameters are missing from the rule's configuration.
- In the Check Parameters section, type 1 in the Tolerance (Required) text box and choose US Feet for the units.
- In the Details section, configure the properties that will store results for features that fail validation.
- Type Road vertices must not exist within one foot from each other in the Name text box.
- Type Road vertices exist within one foot from each other. Update the vertices to be more than one foot apart. in the Description text box.
- Click the Severity(1-High, 5-Low) drop-down arrow and choose 3 to set the relative importance for results of this type compared to others.
- Type LGIM 2016, thematic accuracy, attributes in the Tags text box and press Enter.
Tip:
Tags can be used to enable requirements traceability. Consider including the data model and version for which the rule is related or including an ISO-19157 data quality element, such as thematic accuracy.
Implement requirement ID 3
The third requirement, road centerline Full Road Name attribute values must match the master street index, is implemented with the Table to Table Attribute check to find local roads that contain road name values that are not found in an authoritative list of road names for the municipality.
Complete the following steps to implement requirement ID 3:
- On the Attribute Rules tab, in the Add Rules group, click the Ready to Use Rules
 drop-down gallery to display ArcGIS Data Reviewer automated checks.
Note:
The contents of the Ready to Use Rules gallery is a smart gallery that varies depending on the chosen data source.
- From the Ready to Use Rules gallery, in the Validation section, click Table to Table Attribute
 to add a new rule.
The new rule appears in the Attribute Rules view with a red row header, indicating that required parameters are missing from the rule's configuration.
- Configure a filter on the Road Centerlines feature class so that validation will only return results on roads that are local.
- In the Input Filters section, under Attribute, click New attribute filter.
- Construct the following clause: Road Class is equal to Local-Local.
- Click Verify the SQL expression is valid
 to validate the SQL expression.
 - Click Apply.
- In the Check Parameters section, create the relationship between the Master Road Name feature class and the full road name.
- Click the Features/Rows to Compare drop-down arrow and click MasterRoadName.
- Click New attribute relationship and construct the following SQL query: Full Road Name is equal to Full Road Name.
- Click Verify the SQL expression is valid
 to validate the SQL expression.
 - Click Apply.
- Check the Invert relationship check box to find scenarios in which the master road name doesn't match the full road name.
- In the Details section, configure the properties that will store results for features that fail validation.
- Type Road name missing from master street list in the Name text box.
- Type This check fails if the full road name is not found in the master street index. Provide a valid road name. in the Description text box.
- Click the Severity(1-High, 5-Low) drop-down arrow and choose 1 to set the relative importance for results of this type compared to others.
- Type LGIM 2016, thematic accuracy, attributes in the Tags text box and press Enter.
Tip:
Tags can be used to enable requirements traceability. Consider including the data model and version for which the rule is related or including an ISO-19157 data quality element, such as thematic accuracy.
- On the Attributes Rules tab, in the Manage Edits group, click Save
 to save the new rules.
 - Close the Attribute Rules view to close the rule design.
In this exercise, you opened an existing ArcGIS Pro project, created a Run Data Check and imported it into a validation attribute rule, and configured multiple validation attribute rules to implement quality control in your geodatabase. These rules are based on ArcGIS Data Reviewer checks that identify spatial relationship and feature integrity errors in your features. You will use these rules in the Evaluate features with attribute rules exercise to ensure that your data meets quality requirements.
