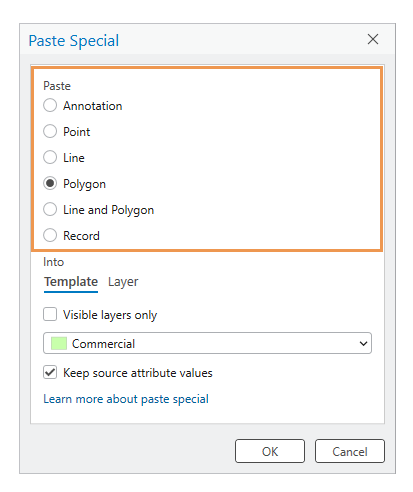
The Paste Special command  pastes the contents of the clipboard to a specified destination layer or table. This command is available on the ribbon Edit tab, in the Clipboard group, and on the context menu if the clipboard contains features and you right-click a map.
Polygon features can be pasted to line layers. In 3D scenes, 2D line features can be pasted to multipatch or 3D object feature layers, and multipatch features can be pasted to 3D object feature layers.
When you use this command, consider the following:
- To paste features to layers that aren't currently visible, uncheck the Visible layers only check box.
- You can keep the source attribute value or paste values defined by a selected destination editing template or the default values defined by the destination layer.
- If you choose to use an editing template for the destination layer and keep the source attribute values, field mapping settings are used if the source and destination layers match these settings.
Note:
If you exit ArcGIS Pro with a large amount of information on the clipboard, you are asked whether you want to save the information to be able to paste it later.
To copy and paste features or table records to a specified destination layer or table, complete the following steps:
- Open a map containing the feature layers you are editing or add the layers to the map.
Tip:
Before editing features, specify which layers can be edited, confirm that the coordinate system assigned to the active map is suitable for the type of edits you're performing, and enable the snap agents that allow you to work effectively.
For a basic checklist of settings, see Configure settings for editing.
The tab for the current map highlights blue.
- Click the ribbon Edit tab, and click the Select tool
 in the Selection group.
 - Select the features in the current map.
To select records in a table, click the row header (the small gray square containing the row number) in the table adjacent to the record you want to select. To select consecutive records, click and drag.
The Copy and Cut commands appear enabled on the ribbon Edit tab..
- Click Copy
 or press Ctrl+C.
Alternatively, right-click the map and click the command on the context menu.
Tip:
To copy the selected features or records to the clipboard and delete them from the map or table in one step, click Cut
 or press Ctrl+X instead.
The selected features or table records are copied to the clipboard.
- In the Clipboard group, click Paste Special
 or press Ctrl+Alt+V.
Alternatively, right-click the map and click the command on the context menu.
The Paste Special dialog box appears.
- If the clipboard contains a mix of feature types or records from a table, choose the feature type you are pasting.
If the clipboard contains only one feature type, these options are not available.

- Click the Template or Layer tab.
The tabs determine how you can preserve or replace source feature attribute values.
Template
Choose an editing template to specify a destination layer. You can paste source attribute values on the clipboard or defined by the specified template, or you can transfer attributes with field mapping.
Layer
Specify a destination layer. You can paste source attribute values on the clipboard or destination layer geodatabase default values.
- Check or uncheck the Visible layers only check box.
Checked
Show only visible templates and layers in the drop-down list.
Unchecked
Include templates and layers in the drop-down list that aren't currently visible. This setting allows you to choose and paste to non-visible layers without turning them on.
- Click the drop-down arrow and choose an editing template or a layer.
- Check or uncheck the Keep source attribute values check box.
This setting is disabled for annotation features.
Checked
The currently selected tab uses the following methods:
- Template tab—Field mapping settings are used to transfer attribute values. If the source and destination layers don't match, the source attributes on the clipboard are pasted.
- Layer tab—Source attributes on the clipboard are pasted.
Unchecked
The currently selected tab uses the following methods:
- Template tab—Attribute values defined by the selected editing template are pasted.
- Layer tab—Geodatabase default values defined by the specified destination layer are pasted.
- Click OK to paste the features to the map or records into the table.
Pasted features are drawn coincident with the source features from which they were copied and are the currently selected features.
By default, the Move tool
 automatically runs.
 Note:
For steps to turn this optional setting on or off, see Run the Move tool after pasting features.
- To move the currently pasted features, drag them to the new location.
- Click Finish
 or press the F2 key to finish the edit.