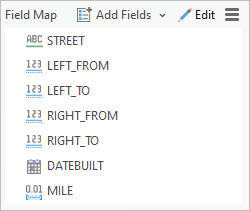
A field map is a parameter that modifies how fields from input datasets are processed, written, or mapped to an output dataset. In addition to transferring attribute fields from input to output, field mapping also supports tasks such as field concatenation, and the calculation of statistics, such as mean or sum.
Several geoprocessing tools have a field map parameter, including Spatial Join, Add Spatial Join, Join Field, Append, Merge, Export Features, and Export Table.
Field map parameter
The field map parameter displays the fields that will be processed with the output or modified dataset.

Using the field map parameter, you can perform the following tasks:
- Remove fields—Use the Remove button
 to remove a field or fields.
 - Modify the field order—Select one or many output fields to modify the order by dragging them to the preferred position.
- Open the Field Properties window—Field mapping is done in the Field Properties window. To open it, click the Edit button
 at the top of the field map parameter or from a specific field.
 - Add new fields—Use the Add Fields button
 to add fields from the input datasets with actions. You can also use the drop-down menu to add a new empty field.
 - Click the Menu button
 to access the following control and display options:
- Show Field Aliases—Switch the display between field name and alias.
- Load
 —Load an existing field map saved as a file.
 - Export
 —Save the field map as a string (.fieldmap file).
 - Reset
 —Revert the field map to its default state.
Caution:
If you use the Reset option, all changes made will be lost.
Note:
The Append tool's Field Map parameter does not support adding, removing, or reordering fields.
Field properties
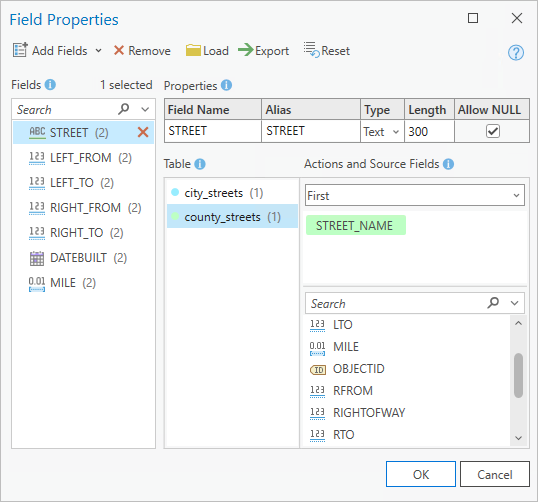
Open the Field Properties window to view or modify the properties of a selected field, and perform field mapping or matching tasks by selecting one or more source fields and actions.

The Field Properties window contains four sections:
- Fields—Select a field to view or modify its properties and source fields.
- Properties—View or modify the selected field's properties.
- Table—View or switch between datasets.
- Actions and Source Fields—View or edit the source fields and choose an action to perform on the selected source fields.
Use the Field Properties window to perform tasks such as adding and removing fields, loading or exporting the field map, or resetting the field map.
Fields
The Fields section lists the fields that will be processed and written when you run a tool. Select a field to view or modify its properties and source fields. Fields can be added, removed, and reordered.
Properties
Use the Properties section to review the properties of the selected field. This section includes the field name, alias, type, length, and whether null values are allowed.
Note:
The Append tool does not allow field properties to be modified.
Table
A table refers to the input, target, or joined datasets specified in the tool. Select a table to view the input fields that can be used as source fields.
Note:
The Table section will be hidden if there is only one table.
Actions and Source Fields
Source fields are the fields from the input dataset that are mapped to the selected field.
Source fields can be removed, added, reordered, and sliced. To slice field values, use the Slice Text button  to set text start and end characters.
Note:
Slicing can only be done on fields sourced from text fields. To access the text slicing option, hover over a text field in the input fields list.
Choose an action to determine how one or multiple source fields will be handled. For example, use the Concatenate action to combine the values of multiple fields from the same table, or use the Sum or Mean action to calculate a statistic for numeric fields.
| Action | Description |
|---|---|
| First | The first field value. |
| Last | The last field value. |
| Concatenate | Combines values with a delimiter. A comma delimiter is used by default. |
| Sum | The sum of values. A sum is calculated by adding all the values. |
| Mean | The average of the values. The mean or average is calculated by adding all the values, and dividing by the total number of nonnull values. |
| Median | The middle value. The median is calculated by sorting all of the values numerically, and selecting the value closest to the middle of the distribution. |
| Mode | The mode or most frequently occurring value. |
| Minimum | The numerically smallest or alphabetically first value. |
| Maximum | The numerically largest or alphabetically last value. |
| Standard Deviation | The standard deviation of all sourced values. Standard deviation is not a valid option for a single source field. |
| Count | The count of the nonnull values. |
| Range | The difference between the minimum and maximum value. |
Note:
The First and Last options generate the same output if one source field is selected except when joining multiple records to one record.
Map fields from inputs
To match attribute fields from an input dataset, complete the following steps:
- Click the Edit button
 to open the Field Properties window.
 - In the Fields section, select an existing field, or click the Add fields drop-down menu and click Add Empty Field to add a new blank field.
- In the Properties section, view or edit the properties of the selected field.
- If applicable, use the Table section to select a dataset to view the list of available input fields under Actions and Source Fields.
- In the Actions and Source Fields section, select a field from the list of available input fields to use as a source field, and choose an action to determine how the values from one or multiple source fields are transferred to the output field.
The selected source field appears as a tag above the input fields list.
- Click OK to confirm the changes made to the field map.
Perform multiple actions on a single input field
Use the Add fields button  to map multiple new fields from input fields. Select one or multiple input fields and corresponding actions to perform on the selected input fields. This populates the fields list with new fields. For example, if you select a numeric field named miles and choose Minimum and Maximum for the actions, the Fields list is populated with two new fields named miles_MIN and miles_MAX.
