Available with Network Analyst license.
In this tutorial, you will create a customized network dataset from data of San Diego, California, streets and public attractions. You will start by creating a basic network dataset using the Create Network Dataset tool. Then, you will go through each property page to set up additional travel attributes, such as network sources, costs, restrictions, descriptors, travel modes, and directions.
The final network dataset created using this tutorial can be used to generate routes and driving directions for tourists looking to visit public attractions around San Diego.
A completed network dataset is included in the tutorial data as an example.
Get the data
The data for this tutorial is available for download.
- Go to the data download page.
- Click the Download button, and save the file locally.
- Unzip the downloaded file.
Create a map
To create a map, complete the following steps:
- Start ArcGIS Pro.
- Click the Map template to create a project. Optionally, change the name of the project and location.
- Click OK.
A new project with a map appears.
Examine the source feature classes
Next, add the Streets and Walking_Pathways feature classes to the map.
- In the Catalog pane, which is on the right side of the application by default, right-click Folders, and choose Add Folder Connection
 .
.The Add Folder Connection dialog box appears.
- Browse to the folder where you placed the tutorial data, double-click Network Analyst, and click Tutorial to select the folder.
- Click OK.
A connection to the Tutorial folder is created.
- In the Catalog pane, expand Folders > Tutorial > CreateNetworkDataset > SanDiego.gdb > Transportation.
- Drag Streets and Walking_Pathways onto the map.
Both feature classes are added to the Contents pane and to the map.
- In the Contents pane, right-click the Streets layer and choose Attribute Table.
- Examine the fields and the values in them. Many of the fields will be used by the network dataset in some capacity.
The fields such as FT_Minutes, TF_Minutes, KPH, and Meters can be used to set up cost attributes that tell the network dataset the cost for traversing each edge. These fields are typically double or float type fields.
The F_ZLEV and T_ZLEV fields are used for defining different levels of streets. This helps to properly establish structures such as overpasses and underpasses, where you cannot turn directly from one street to another due to a difference in elevation. These fields will be covered later on, when you are creating the network dataset and choosing an elevation model.
The FUNC_CLASS field is an integer field that assigns a category to each road. This field will be used for setting up a hierarchy attribute on the network dataset. Again, this field and hierarchy will be covered in a future part of this tutorial.
There are also fields such as PAVED, AR_PEDEST, AR_BUS, AR_AUTO, DIR_TRAVEL, TF_HeightLimit_Meters, and FT_HeightLimit_Meters. These fields are used for setting up restrictions to prevent travel on certain roads in certain situations. Most of the fields have a value of Y or N. The DIR_TRAVEL field has values such as FT and TF, which will be used for setting up a one-way restriction. The FT_HeightLimit_Meters and TF_HeightLimit_Meters fields have mostly null values, with a few features filled in with a number. These two fields will be used to set up a special type of restriction called a parameterized restriction. Once the height restriction is set up, you will be able to specify a vehicle height of the tour bus in the analysis settings, and the network dataset can restrict some roads if the tour bus cannot drive on them due to its height.
- Examine the fields and the values in them. Many of the fields will be used by the network dataset in some capacity.
- Close the attribute table when you're done examining it.
Create the network dataset
Create a basic network dataset using the Create Network Dataset geoprocessing tool.
- On the Analysis tab, in the Geoprocessing group, click Tools to open the Geoprocessing pane.
- Click in the search bar in the Geoprocessing pane and type Create Network Dataset.
- Click the first result to open the Create Network Dataset geoprocessing tool.
- For the Target Feature Dataset parameter, click the Browse button
 .
. - Browse to SanDiego.gdb > Transportation, and click OK.
The Transportation feature dataset is populated in the Target Feature Dataset parameter.
- Type NewSanDiego_ND in the Network Dataset Name parameter.
- For the Source Feature Classes parameter, check only the box for Streets.
Only the Streets feature class will be included as part of the network dataset and not the Walking_Pathways or Signposts feature classes. You’ll add more features and functionality to the network dataset later in the tutorial.
- Leave the default value Elevation_Fields for the Elevation Model parameter.
- Click Run
 at the bottom of the pane.
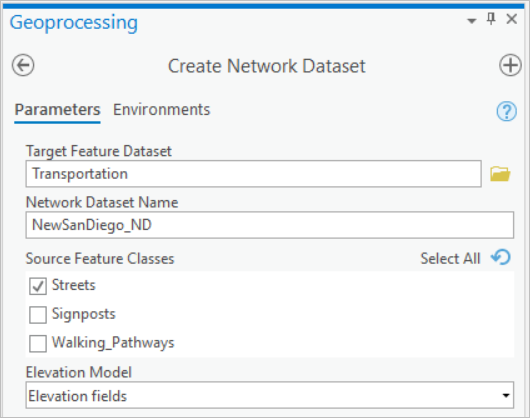
The new network dataset named NewSanDiego_ND is added to the map.
- Right-click the NewSanDiego_ND layer in the map and choose Remove to remove the network dataset layer from the map.
Network dataset properties cannot be edited while the network dataset layer is in the map. You must remove the layer from the map to proceed with the rest of the tutorial.
Add network sources and set up connectivity policies
The network dataset was created initially with only the Streets feature class as a network source. Now you will add the Walking_Pathways feature class to the network dataset and set up the appropriate group and vertical connectivity policies for both network sources.
Once a network dataset is created, all editing is performed through the network dataset property pages.
- In the Catalog pane, right-click the NewSanDiego_ND network dataset
 , and choose Properties to open the Network Dataset Properties dialog box.
 - Click Source Settings > Sources.
The page displays all the source feature classes that currently participate in the network dataset.
- Click the Add/Remove Sources button in the upper right corner of the dialog box.
One edge source and one junction source are already present. The junction source is the default junction feature class that is created and managed by the network dataset.
The Add/Remove Sources dialog box appears.
- On the Add/Remove Sources dialog box, check the box next to Walking_Pathways and click OK.
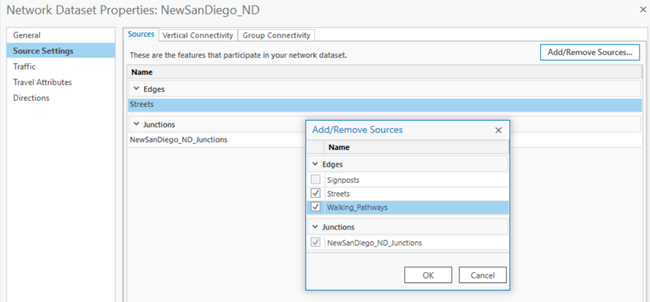
Other polyline and point feature classes that are in the feature dataset are also listed on the Add/Remove Sources dialog box. A network dataset can have many edge and junction sources that can play different roles. For now, you will only check Walking_Pathways.
Walking_Pathways appears as a network dataset source.
- Click the Vertical Connectivity tab.

Note:
You cannot have different elevation models for different sources. You cannot use z-coordinates for Walking_Pathways and elevation fields for Streets. All network dataset sources must use the same elevation model. To learn more about using z-coordinates or elevation fields with the network dataset, see Connectivity.
. - For Streets (From Node) and Walking_Pathways (From Node), change the property from the drop-down list from None to F_ZLEV.
- For Streets (To Node) and Walking_Pathways (To Node), change the property from the drop-down list from None to T_ZLEV.
The concepts of From and To nodes are derived from the digitized direction of the line feature. The From node is at the start of the line and the To node is at the end of the line. Similarly, the Along direction refers to traveling with the digitized direction of the line, while the Against direction refers to traveling in the opposite of the digitized direction of the line.
- Click OK on the Network Dataset Properties dialog box to commit the changes made and close the dialog box.
Add costs
Network analysis often involves the minimization of a cost (also known as impedance) during the calculation of a path (also known as finding the best route). In this section, you will be adding cost attributes to the network dataset. A cost attribute is used to model an impedance on the network dataset. These attributes are apportionable along an edge; that is, they are divided proportionately along the length of an edge.
Learn more about cost attributes
- In the Catalog pane, right-click the NewSanDiego_ND network dataset
 , and choose Properties to open the Network Dataset Properties dialog box.
 - Click the Travel Attributes page, and click the Costs tab.
The Create Network Dataset tool automatically creates one cost attribute, Length, which is based on the geometry field from the network sources.
- Click the Length attribute in the Distance section of the cost.
- Click the Menu button
 and choose Rename.
- Type Miles in the Name text box in the Properties section, and press Enter to accept the name change.
- Change the Units value to Miles.
Note that the value for the Streets (Along) row is the Shape field. Passing the Shape field into the evaluator passes the spatial reference, unit, and geometry for the edge into the evaluator. Using the Shape field allows the evaluator to use the spatial reference when calculating the length of the edge. In contrast, the Shape_Length field only passes in a number and unit, possibly leading to a less accurate length for the edge, depending on the coordinate system of the data.
When the evaluator uses a regular number field for the cost, if you want to change the units for the evaluator, you need to write an expression on the evaluator settings dialog box to convert the number coming from the field to the new unit. For example, to convert miles to feet, use the following expression:
!Miles_Field!*5280
When using the Shape and Shape_Length fields in the evaluator, you only need to change the units of the cost, and the evaluator performs the conversion in the background.
- In the Evaluators section, in the Edges group, for the Walking_Pathways (Along) row, change Type from Same as Default to Field Script.
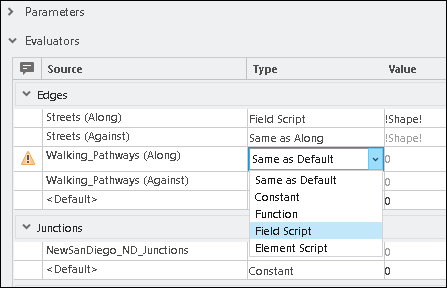
- Double-click the Value column of Walking_Pathways (Along) to make the Field Script Settings button available, and click the Field Script Settings button
 .
.The evaluator settings dialog box appears.
- In the Fields selector, double-click Shape to insert !Shape! in the Value box and click OK.
An evaluator tells the network how to calculate the impedance, or cost, for each edge. It can be a constant, based on a field, based on another attribute, or calculated from a script. Each of these is a different type of evaluator.
- Click the Menu button
 and choose New.
 - Type Minutes for the name of the new cost.
- In the Evaluators section, in the Edges group, for the Streets (Along) row, change Type from Same as Default to Field Script.
An X icon appears next to the Streets (Along) and Streets (Against) rows, but it will disappear after you choose a field on which to base the evaluator.
- Double-click the Value column of Streets (Along) to make the Field Script Settings button
 available, and click the Field Script Settings button.
 You may have one field that represents the cost for traveling either direction on an edge. For example, a Minutes field, which has been calculated by dividing the length of the line by the speed limit, will work for both the along and against directions. If the same field can be used for both directions of travel, you can use the field script evaluator for the Streets (Along) row. Then, instead of setting the field script evaluator up for the Streets (Against) direction, change the evaluator Type to Same As Along.
For this data, there are different fields to represent the along and against directions, so you'll be setting up both directions.
- In the Fields selector, find FT_Minutes and double-click it. Click OK.
- Repeat steps 12 and 13 for the Streets (Against) row.
- In the Fields selector, double-click TF_Minutes. Click OK.
- Repeat steps 12 through 16 for the Walking_Pathways (Along) and Walking_Pathways (Against) rows.
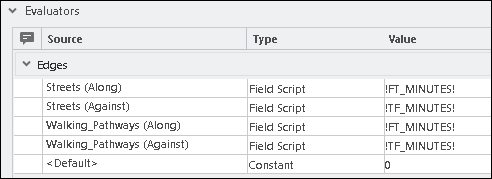
Note:
There are many types of evaluators, which can be used in Costs, Restrictions, and Descriptors. Field Script evaluators are the most commonly used because they use a single field or simple expression based on a field to determine the cost to traverse the edge.
Learn more about the types of evaluators used by the network
- Still in the Evaluators section, in the Turns group, change the Type value of the <Default> row to Turn Category.
- Double-click the Value column of <Default> to make the Turn Category Settings button
 available, and click the Turn Category Settings button.
The Turn Category Evaluator dialog box appears.
- Change the seconds for Left Turn and Reverse Turn to 5.
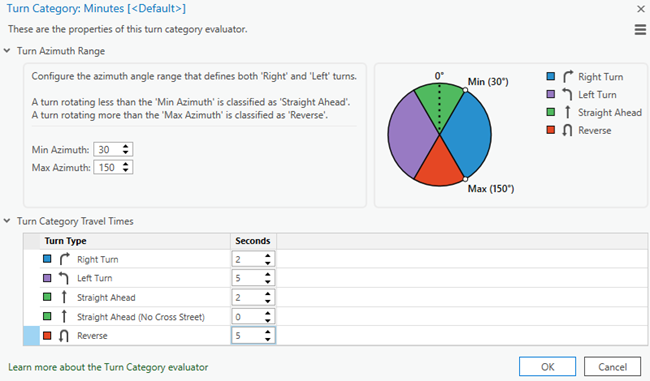
Any analysis using the Minutes cost attribute will add a 5-second delay when a left turn or a reverse turn is encountered.
- Click OK to accept the changes and close the Turn Category Evaluator dialog box.
Note:
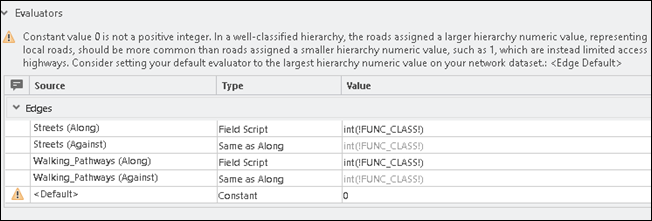
There is a warning on the Minutes cost that the Turn Category Evaluator cannot use road class to distinguish turns because there is no hierarchy attribute. This warning can be ignored. You will address it later in the tutorial when a hierarchy attribute is added.
- Click OK on the Network Dataset Properties dialog box to commit the changes made and close the dialog box.
The network dataset now has a length cost and a time cost. The next thing you will do is add restrictions, such as Driving an Automobile, Walking, and Vehicle Height Limit.
Add restrictions and descriptors
In this section, you'll add restrictions that model walking, driving a car, driving a bus, and having a height limit for vehicles. You will also add a descriptor for vehicle height that will be used with the vehicle height restriction.
During an analysis, restrictions can determine whether traversing roads with specific characteristics is prohibited entirely, to be avoided, or preferred. For example, restrictions can be used to prevent pedestrians from walking on highways or to prevent tall trucks from traveling on roads with insufficient overhead clearance.
Descriptors are attributes that describe characteristics of the network or its elements. Unlike costs, descriptors are not apportioned. This means that the value does not depend on the length of the edge element. Use descriptors to bring attributes for use in hierarchy and restrictions that are not meant to be apportioned and used in a cost into the network dataset. A descriptor will be used in this tutorial to bring the vehicle height from the TF_HeightLimit_Meters and FT_HeightLimit_Meters fields on the Streets feature class for use in the height restriction.
Learn more about descriptor attributes
First, you'll create basic restrictions for modeling driving an automobile, driving a bus, and walking.
- In the Catalog pane, right-click the NewSanDiego_ND network dataset
 , and choose Properties to open the Network Dataset Properties dialog box.
 - Click the Travel Attributes page and click the Restrictions tab.
- Click the Menu button
 in the upper right corner of the Restrictions tab and choose New.
 - Type Driving an Automobile for the name of the new restriction.
- Leave Usage Type set to Prohibited.
- In the Evaluators section, in the Edges group, for the Streets (Along) row, change the Type value from Same As Default to Field Script.
An X icon appears next to the Streets (Along) and Streets (Against) rows, but it will disappear after you choose a field on which to base the evaluator.
- Double-click in the Prohibited column of the Streets (Along) row to make the Field Script Settings button
 available, and click the Field Script Settings button.
 The evaluator settings dialog box appears.
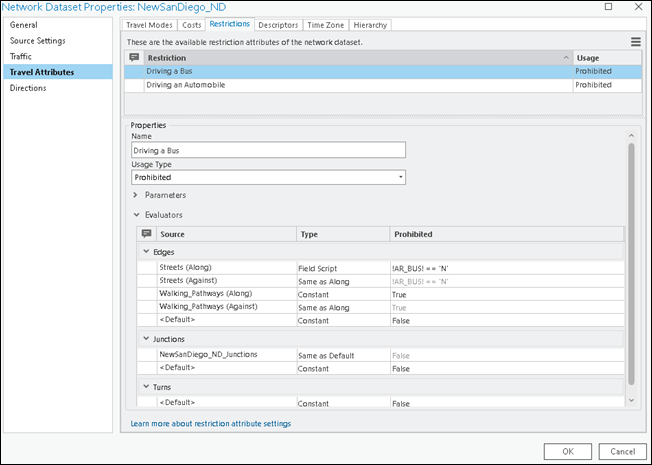
- Type !AR_AUTO!=="N" in the Value box and click OK.
This field denotes whether a car can legally travel on the road. A value of Y indicates that automobiles can travel on that road, while a value of N indicates that automobiles cannot travel on that road.
Restrictions are always a Boolean type. When you define field script, element script, or function for a restriction, you tell the restriction which values returned by the expression, script, or function count as True, which will affect that edge. Any other value will be interpreted as False, leaving the edge unaffected. In this case, when the restriction affects the edge, it will prohibit it from being traversed.
- Leave Streets (Against) set to Same as Along.
- For Walking_Pathways (Along), change Type to Constant and Prohibited to True.
- Leave Walking_Pathways (Against) set to Same as Along.
Walking pathways should never allow motorized vehicles on them, so you can set a constant value to make them always restricted when this restriction is active.
- Add a new restriction to prohibit buses from traversing certain roads by repeating steps 4 through 11, naming the restriction Driving a Bus, and using the AR_BUS field.
- Add a new restriction named Walking.
- For Streets (Along), change the evaluator Type to Field Script.
- Double-click in the Prohibited column of the Streets (Along) row to make the Field Script Settings button available, and click the Field Script Settings button
 .
. - On the evaluator settings dialog box, in the Value box, type !AR_PEDEST! == "N".
This restricts roads that are interstates or other high-traffic roads that are off-limits to pedestrians when the Walking restriction is active.
- Leave the default evaluator settings for the Walking_Pathways edge.
- Create a restriction named Avoid Unpaved Roads.
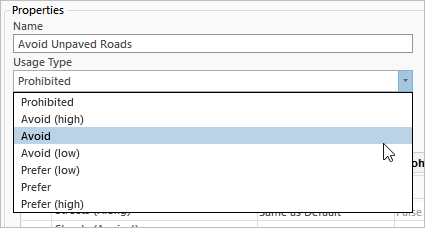
- Change the Usage Type value from -1, which indicates Prohibited, to 2, which indicates Avoid.
- For Streets (Along), change the evaluator Type to Field Script.
- In the evaluator settings, in the Value box, type !PAVED! == "N".
This way, any edge that has a value of N in the PAVED field will be moderately avoided.
- Add a new restriction named Oneway.
- For Streets (Along), change the evaluator Type to Field Script.
- Double-click in the Prohibited column of Streets (Along) to make the Field Script Settings button available, and click the Field Script Settings button
 .
. One-way streets are typically restricted in one direction of travel on a street. In this case, you want different values for different directions of travel along an edge. You’ll set up similar, but slightly different, field expressions for each direction of travel on Streets.
- In the Helpers selector, double-click Oneway.
This will insert a Python expression that will look for values of N, TF, or T and restrict that edge if it has one of those values. It is written as an expression that is not case sensitive.
The TF and T values typically stand for To-From and To, respectively. These values indicate which direction of travel is restricted on the edge. According to the expression, travel in the To-From, or against, direction is prohibited, while travel in the From-To, or along, direction is allowed. The N will be used in the expressions for both the Along and Against directions. Any line that has an N value will be prohibited from being used in a route.
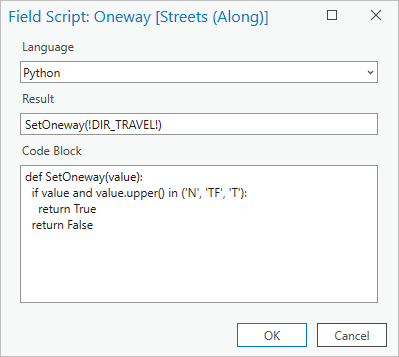
- Replace the text !Field! in the Value box with the text !DIR_TRAVEL!
This will ensure the expression works with the field name DIR_TRAVEL.
- Click OK on the evaluator settings dialog box to accept the changes.
- For Streets (Against), change the evaluator Type to Field Script.
- Open the evaluator settings dialog box for the Streets (Against) row.
- In the Helpers selector, double-click Oneway.
This expression is the same as the last one, except that instead of TF and T, it uses FT and F. This expression will restrict the opposite set of streets to the other expression, which is what is needed for the other half of the one-way restriction.
- Replace the text !Field! in the Value box with the text !DIR_TRAVEL!
This will ensure the expression works with the field name DIR_TRAVEL.
- Click OK on the evaluator settings dialog box to accept the changes.
- Click the Descriptors tab.
- Click the Menu button
 and click New.
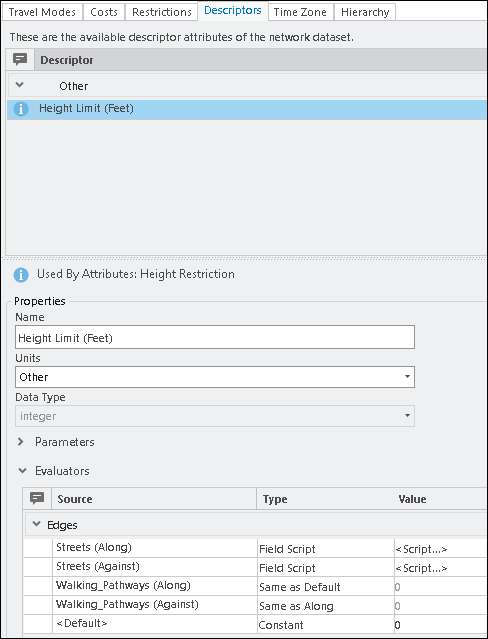
 - Type Height Limit (Feet) for the name.
- For the Streets (Along) row, change the evaluator type to Field Script.
- Open the evaluator settings dialog box for the Streets (Along) row.
- Type MetersToFeet(!FT_HeightLimit_Meters!) in the Result box and the following expression in the Code Block box:
def MetersToFeet(value):
 if value is None:
  return value
 return value / 0.3048
This expression takes the value from the FT_HeightLimit_Meters field and converts it from meters to feet.
- For the Streets (Against) row, change the evaluator type to Field Script.
- Open the evaluator settings dialog box for the Streets (Against) row.
- Type MetersToFeet(!TF_HeightLimit_Meters!) in the Result box and the following expression in the Code Block box:
def MetersToFeet(value): if value is None: return value return value / 0.3048 - Click OK to accept the expression.
- Click the Restrictions tab at the top.
- Add a new restriction attribute named Height Restriction.
- Expand the Parameters section if needed.
- In the Parameters section, click in the grid to add a new row.
- Change the name of the new parameter to Vehicle Height (Feet).
Sometimes network analysis depends on a variable condition. In those cases, you can use a parameter. A parameter behaves like a placeholder variable. It uses the default value unless that value is overwritten by something else. The parameter will be exposed in the Travel Mode settings in the analysis layer, where you can change the height of the vehicle for that analysis.
Adding parameters to a restriction, cost, or descriptor makes the restriction, cost, or descriptor a parameterized attribute. Parameterized attributes can model many things, including height, weight, vehicle axle count restrictions, or scaled travel costs.
- Leave the Type column set to double and Default Value set to 0.
Note:
Double is an appropriate type for this parameter, because a vehicle may be 4 meters tall or 4.5 meters tall. The Default Value setting will be used as the placeholder for the vehicle height until you change it from the analysis layer properties.
- Change the Type value for the Streets (Along) row to Function, and open the evaluator settings dialog box.
For a function evaluator, you create a simple mathematical function. For numeric type attributes such as a cost or descriptor, multiplication, division, subtraction, and addition can be the operation performed. Boolean attributes, such as a restriction, use comparison operands, such as greater than or less than.
- Set Attribute Name to Height Limit (Feet), which is the descriptor you created previously.
- Set Parameter Name to Vehicle Height (Feet), which is the parameter you just added to this restriction.
- For the operator, choose less than or equal to (<=).
The expression reads Height Limit (Feet) <= Vehicle Height (Feet).
If the Height Limit (Feet) on the edge is less than or equal to the Vehicle Height (Feet) input in the analysis layer, the edge will be restricted.
- Click OK to accept the function.
- Leave the default value for the Walking_Pathways row.
There is no height restriction on the walking paths, and vehicles are not allowed on them anyway, so you do not need to set up this restriction for the walking paths.
- Click OK on the Network Dataset Properties dialog box to commit the changes made and close the dialog box.
Add a time zone attribute
Time zone attributes allow a network dataset to manage time zones so that time-of-day values are clear and traffic-enabled network datasets retrieve the travel times for the right time of day. Some types of network analysis, such as Last Mile Delivery analysis, require a time zone attribute. You'll set up a time zone attribute so that you can run all analysis types using this network dataset.
Learn more about time zone attributes
- In the Catalog pane, right-click the NewSanDiego_ND network dataset
 , and choose Properties to open the Network Dataset Properties dialog box.
 - Click the Travel Attributes page and click the Time Zone tab.
- Check the Add Time Zone Attribute check box.
- From the Time Zone Table drop-down list, ensure the TimeZones table is selected.
- Ensure the values in the Evaluators grid are filled in already, with the <Default> evaluator's Type set to Constant and the Value set to (UTC-08:00) Pacific Time (US & Canada) and the other evaluators using the default value.

The TimeZones table has one entry, Pacific Standard Time. This is a value that corresponds to one in the Windows registry, which is how the network dataset knows which time zone to use. Because there is only one entry, the network dataset fills in that value as the default, and only, value to use. If your network dataset spans multiple time zones, you can set that up using a field evaluator. The steps for that process, and more information on the time zone attribute, are described in the Time zone attribute documentation.
- Click OK on the Network Dataset Properties dialog box to commit the changes made and close the dialog box.
Add a hierarchy attribute
Hierarchy is the order or rank assigned to network elements. Typically, there are three to five classes of roads, but more can be used. In a three-level hierarchy, the classes are primary, secondary, and local. Examples of local roads include small residential streets. Secondary roads may include the major roads through a town or a state route, and primary roads may include interstates and highways.
Learn more about hierarchy attributes
- In the Catalog pane, right-click the NewSanDiego_ND network dataset
 , and choose Properties to open the Network Dataset Properties dialog box.
 - Click the Travel Attributes page and click the Hierarchy tab.
- Check the Add Hierarchy Attribute box.
The hierarchy settings for Ranges and Evaluators appear.
- Change the upper range for Primary Roads to 2.
- Change the upper range for Secondary Roads to 4.
Note:
These are the ranges for this data, but your data may be classified differently.
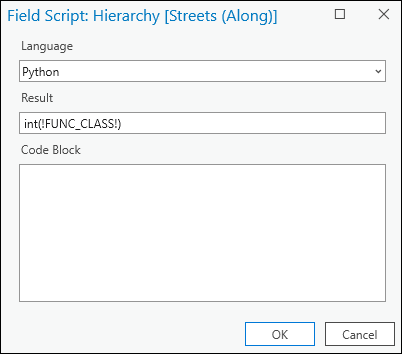
- For the Streets (Along) row, change the evaluator type to Field Script, and open the evaluator settings dialog box.
- In the Result box, type the following expression:
int(!FUNC_CLASS!)The hierarchy attribute requires an integer input greater than 0. Because the FUNC_CLASS field is a text field, you need to use a method to convert the field value to an integer.
- Click OK to accept the expression.
- Repeat steps 6 through 8 for the Walking_Pathways (Along) row.
- Click OK on the Network Dataset Properties dialog box to commit the changes made and close the dialog box.
Add travel modes
A travel mode is essentially a template consisting of a long list of travel settings that define the physical characteristics of a vehicle or pedestrian. These characteristics are considered when performing network analysis to define how the vehicle or pedestrian travels and where it can go. Having a predefined travel mode allows you to quickly apply predetermined settings to your network analysis without having to manually choose each setting.
Travel modes can model general modes, such as driving a car or walking, or they can model specific modes, such as driving a tractor trailer that cannot exceed a speed limit or driving an ambulance that can ignore certain traffic laws.
Travel modes are stored in the network dataset and can be modified in the analysis layer as needed.
You'll create five travel modes for three modes of travel: driving a car, driving a tour bus, and walking. For driving a car and driving a tour bus, you'll create distance-based and time-based travel modes. For walking, you'll only create a distance-based travel mode.
- In the Catalog pane, right-click the NewSanDiego_ND network dataset
 , and choose Properties to open the Network Dataset Properties dialog box.
 - Click the Travel Attributes page and the Travel Mode tab.
- Click the Menu button
 in the upper right corner of the dialog box and select New.
 - Name the travel mode Automobile Time.
- For Description, type something that indicates to you that this travel mode represents a time-based travel mode for driving a car.
- Leave Type set to Driving.
- In the Cost section, ensure that the Impedance value is set to Minutes.
- Ensure that Distance Cost is set to Miles.
- In the Restrictions section, check the boxes for the Avoid Unpaved Roads, Driving an Automobile, and Oneway restrictions, as shown in the following image:

When setting the travel modes, only check one of the transportation methods (Driving an Automobile, Driving a Bus, or Walking). These restrictions indicate where it is legal for each mode of transportation to traverse. Checking more than one will improperly restrict or allow some edges.
You are not checking the Height Restriction attribute because cars do not typically have a problem with height restrictions on roads.
- In the U-Turns section, change the setting to Dead-Ends and Intersections.
- Expand the Advanced section if it is collapsed.
- In the Advanced section, check the box next to Use Hierarchy.
Hierarchy generally reduces the time it takes to solve an analysis on a large network. It also simulates how people prefer to drive, because like people, it prefers larger roads such as interstates and highways, which are more predictable and simpler than local roads.
- Click the Menu button
 and select Copy.
 - Change the name of the new travel mode to Automobile Distance.
- Change the Impedance value to Miles.
- In the Advanced section, uncheck the box next to Use Hierarchy.
Hierarchy makes the most sense to use with a time-based cost attribute. If the impedance is not based on time, using hierarchy in the solve may not produce realistic results.
- Create a travel mode named Tour Bus Time.
- Change the Impedance value to Minutes.
- In the Restriction section, click Avoid Unpaved Roads.
- Change the value for Restriction Usage parameter to Avoid (high).
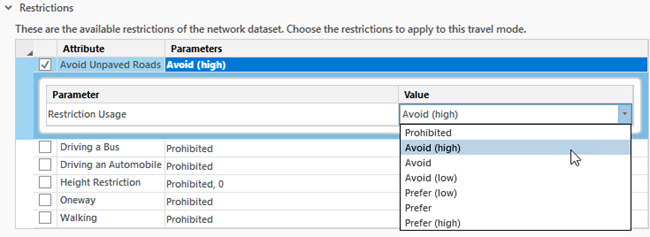
The tour buses do not handle unpaved roads well. Setting the Restriction Usage parameter for this travel mode to Avoid (High) will ensure that unpaved roads will only be used if necessary.
- Ensure that the check box for Avoid Unpaved Roads is checked.
- Click Driving a Bus
- Ensure that the check box for Driving a Bus is checked.
- Click Height Restriction.
- Change the value of the Vehicle Height (Feet) parameter to 11.
Whatever value is populated here will be the default value used for assessing vehicle height against the height limit on the road. Eleven feet is a good default value for the vehicle height because most single-level tour buses average between 10 and 11 feet tall.
- Ensure that the check box for Height Restriction is checked and Restriction Usage is set to Prohibited.
- Ensure that the check box for Oneway is checked and Restriction Usage is set to Prohibited.
- In the U-Turns section, change the policy to None.
- In the Advanced section, check the box next to Use Hierarchy.
- Copy this travel mode and rename the new one Tour Bus Distance.
- Leave all properties the same, except change the Impedance value to Miles and uncheck the box next to Use Hierarchy.
- Add a new travel mode named Walking Distance.
- Change the Type setting for the travel mode to Walking.

- Change the Impedance value to Miles.
- Check only the Walking restriction.
Pedestrians don't have to worry about one-way roads, height restrictions, or unpaved roads, so those restrictions do not need to be turned on.
- Leave the U-Turn policy as All.
- Leave the Use Hierarchy check box unchecked.
The Walking restriction prevents pedestrian travel on many primary roads, such as interstates and highways, which hierarchy would prefer.
- Click OK on the Network Dataset Properties dialog box to commit the changes made and close the dialog box.
Update a cost attribute
Now that there is a hierarchy attribute on the network dataset, the Turn Category Evaluator will have more available categories for defining turn delays. You will return to the Minutes cost to update the Turn Category Evaluator with new delay times.
Learn more about the Turn Category Evaluator
- In the Catalog pane, right-click the NewSanDiego_ND network dataset
 , and choose Properties to open the Network Dataset Properties dialog box.
 - Click the Travel Attributes page and click the Costs tab.
- Select the Minutes cost.
- Scroll down in the Minutes cost to see the Turns section.
- Double-click the Value column of <Default> to make the Turn Category Settings button
 available.
Notice that the value now says that there are 20 turn categories, rather than the 5 it showed when you set up the Turn Category Evaluator.
- Click the Turn Category Settings button
 to open the Turn Category Evaluator dialog box.
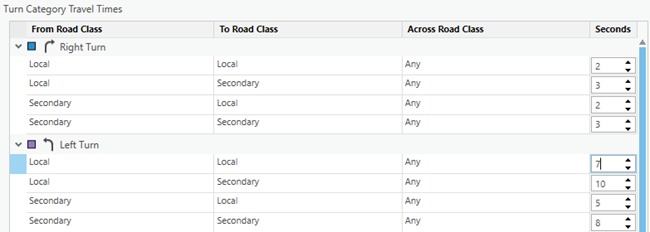
The Turn Azimuth Range section remains the same; however, there is now a section called Road Classes. This section allows you to change which hierarchy values are counted as primary, secondary, or local roads for the Turn Category Evaluator.
By default, it will use the ranges defined in the hierarchy attribute. Unless you have a specific reason to change the ranges, leave the default ranges.
The Turn Category Travel Times section shows more categories of turns now that the roads can be classified by hierarchy.
- In the Left Turn group, change the Seconds value for Local: Local :Any from 5 to 7.
The columns indicate the class of the road on which the turn starts; the class of the road on which it ends; and if any road is crossed (such as at a normal intersection), what the class of that road is. For example, if you needed to cross a major street to continue on a local alley, you would need to wait several seconds for traffic to clear. By default, this type of maneuver has a delay of 15 seconds. But if you only needed to cross another small road to continue on the alley, you wouldn’t need to wait as long. This maneuver has a delay of 2 seconds.
- Click OK to accept the changes and close the Turn Category Evaluator dialog box.
- Click OK on the Network Dataset Properties dialog box to commit the changes made and close the dialog box.
Set up directions
Directions are turn-by-turn instructions on how to navigate a route. The minimum requirements for a network dataset to support directions are as follows:
- A length attribute with length units
- At least one edge source
- At least one text field on the edge source
Basic directions can be set up with the minimum requirements, but some features of directions may require more.
Learn more about setting directions
- In the Catalog pane, right-click the NewSanDiego_ND network dataset
 , and choose Properties to open the Network Dataset Properties dialog box.
 - Click the Directions page.
- Check the box next to Support Directions.
The Directions page and Field Mappings tab are marked as having an invalid state (the red dashed underlining). You can ignore this for now. You will correct the problems when you get to the Field Mappings tab.
- Click the General tab.
- Leave all the default settings for the Attribute Mappings section.
Properties in the Attribute Mapping section will be attributes on the network dataset..
The Feature Category, Maneuver Class, and Driving Side properties are used for more fine-grained refinement of the directions. Learn more about these properties.
- In the Auxiliary Data Sources section, set the following properties:
- Set Signpost Features to Signposts.
- Set Signpost Join Table to Signposts_Streets.
- Set Abbreviations Table to Abbreviations
Properties in the Auxiliary Data Sources section will be other feature classes in the same feature dataset as the network dataset or geodatabase tables.
The Signpost Features and Signpost Join Table attributes provide the type of directional information found on highway road signs, such as exit numbers, connecting roads, and major destinations that can be reached along the connecting roads. The properties are paired, and both must be specified if you want the directions to use signpost information.
Like the Feature Category, Maneuver Class, and Driving Side attributes, the Road Forks table is used for more fine-grained directions on specific types of turns.
Written directions frequently include abbreviations for common words. However, when converting the written directions into voice guidance, the abbreviations must be expanded. The Abbreviations Table stores the rules for expanding these abbreviations.
- Leave the default settings for Localized Names.
Network dataset sources may provide street names and signpost text in multiple languages. For example, some European countries have multiple official languages, and street names may be in two or more languages in some areas. This setting determines whether directions should report street names in all available languages or only in the Directions language.
Some data requirements must be met before choosing Preferred output directions language.
- Click the Field Mappings tab.
Street name fields can be set up for each edge source in the network. These are the names that are used to report directions.
- For Alternate Names, increment the number for the Streets (Edge) source.
A single edge source can have many names. For example, two highways may share the same stretch of road for several miles. The edges representing that stretch of road will have two names. To represent this situation in directions, you can use alternate names on edge sources.
- For Alternate Names, decrement the number for the Streets (Edge) source.
The tutorial data does not use alternate names, so you do not need to set them up.
- Populate the Primary Name properties for the Streets (Edge) and Walking_Pathways (Edge) sources, as shown below:
Field mappings for an edge source in Directions
Name Source field Prefix Direction
ST_NM_PREF
Prefix Type
ST_TYP_BEF
Base Name
ST_NM_BASE
Suffix Type
ST_TYP_AFT
Suffix Direction
ST_NM_SUFF
Highway Direction
DIRONSIGN
Full Name
ST_NAME
Language
Language
Name Class
NameClass
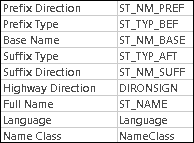
Note:
Only the Base Name property is required. All the other fields are optional.
Directions supports reporting street names in multiple languages. The Language field indicates what language the names are in. The primary name may be in one language, while the alternate name is in another.
- In the Auxiliary Properties section, for Streets (Edge) and Walking_Pathways (Edge), set Country/Region Code to CountryRegionCode and leave the other properties set to the default value.
The Administrative Area field lists which administrative area the edge is in by name. Any change in administrative area is reported in the directions, for example, “Enter California” when crossing the state line.
The Level (From), Level (To), Floor Name (From), and Floor Name (To) fields function similarly to the Administrative Area but are useful when routing indoors. They report changes in level number and floor name, respectively.
The Country/Region Code setting is used in conjunction with the Abbreviations Table. It contains an ISO 3166-2 code that is used to determine which abbreviation expansion to use in the voice guidance directions. Unlike values from the Administrative Area field, values from the Country/Region Code setting do not directly appear in the directions.
- Click the Landmarks tab.
There are two groups: Spatial Landmarks and Reference Landmarks. Spatial landmarks are feature classes, and reference landmarks are tables. Spatial landmarks rely on a spatial search at the time of the solve to determine when a landmark should be referenced. Reference landmarks have their location on the network built into the row so that only a table search is required to use the landmark in the directions. A spatial search is slower than a regular table search, so reference landmarks perform faster than spatial landmarks.
Because spatial landmarks use a simple spatial search to determine their location, they are quick to set up. You need a point feature class with at least one text field, which will serve as the label for the landmarks. Other fields may be used to define other characteristics, such as a level, often used in indoor routing, or a custom search tolerance for each point feature.
Reference landmarks require more work to set up. They need a specific schema and must be manually configured with a network location and other required fields.
You’ll be setting up both spatial and reference landmarks.
- Click the Add/Remove Spatial Landmarks button.
The Add/Remove Spatial Landmarks dialog box appears, and there are two groups in it. Confirmation guidance landmarks notify the driver that they are on the correct route; for example, “Go by Eastlake Park on your left.” Turn guidance landmarks help the driver maneuver through a junction; for example, “Turn left before the Tall White Cylindrical Building on 1st Ave.”
Landmark feature classes must be in the same feature dataset as the network dataset. A single landmark feature class can be registered as both confirmation and turn guidance landmarks.
- Expand the tree view for MajorAttractions under the Confirmation Guidance group.
Landmark feature classes are registered as either confirmation guidance or turn guidance landmarks per edge source. In most cases, you’ll want to register a landmark feature class for all edge sources as either confirmation guidance or turn guidance landmarks, or both.
- Check the box next to the top-level MajorAttractions feature class in both the Confirmation and Turn Guidance sections.
The MajorAttractions feature class represents major attractions in the city of San Diego. These attractions may be next to Streets or Walking_Pathways features. They also may be used for turn and confirmation guidance. You’ll register the MajorAttractions feature class for all edge sources for both groups of landmarks.
Note that once you check the top-level box, all the sublevel check boxes are also checked.
- Click OK to accept the registration of the spatial landmarks.
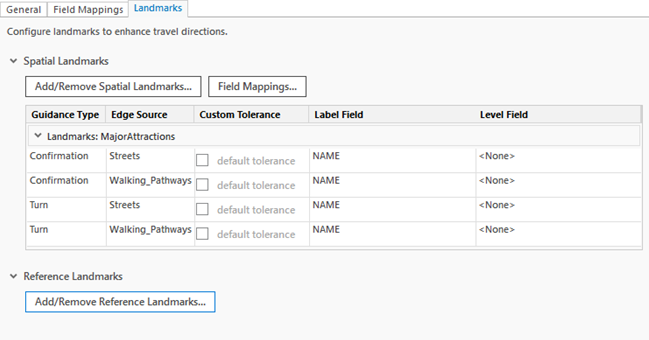
The grid under the Spatial Landmarks header will be filled in with the landmark registrations.
- Click the Field Mappings button.
The Spatial Landmarks Field Mappings dialog box appears.
By default, the Name field was selected for Label Field for the landmarks, and Level Field was left set to <None>.
- Click the drop-down lists Label Field and Level Field and note the choices.

The Label Field drop-down list shows all text fields in the MajorAttractions feature class; the Level Field drop-down list shows all integer fields.
Making a change on this dialog box sets the field mappings for all guidance types and edge sources.
- For now, do not change any of the fields, and click Cancel to close the Spatial Landmarks Field Mappings dialog box.
- Click the Add/Remove Reference Landmarks button.
The Add/Remove Reference Landmarks dialog box appears.
- Check the box next to Reference_Landmarks.

Only tables that have the required schema for reference landmarks will appear as candidates on this dialog box.
- Click OK to accept the registration of the reference landmarks.
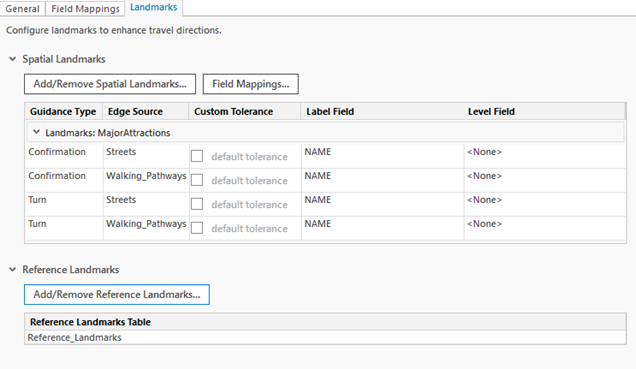
The completed Landmarks tab should resemble the image below:
- Click OK on the Network Dataset Properties dialog box to commit the changes made and close the dialog box.
Build the network dataset
Now that you've made all the changes to the network dataset settings, you need to build the network. Building the network creates and updates the network edges, ensuring that it has the most current information from the source features.
Learn more about when to build the network dataset
- On the Analysis ribbon, in the Geoprocessing group, click Tools to open the Geoprocessing pane.
- Click in the search bar in the Geoprocessing pane and type Build Network.
- Click the first result to open the Build Network tool.
- For the Input Network Dataset parameter, click the Browse button
 , browse to the NewSandiego_ND network dataset, and click OK.
 - Click the Run button
 at the bottom.
 - Alternatively, add the network dataset in the map, and in the Contents pane, right-click the network dataset and click Build in the context menu that appears.
The Build Network geoprocessing tool runs to build the network.
Explore the network dataset
Once you have set the properties on your network dataset and built it, you can inspect the elements and attributes by using the Explore Network tool.
- Drag the newly created network dataset, NewSanDiego_ND, onto the map and ensure that the network dataset layer is selected in the Contents pane.
- On the ribbon, click Data in the Network Dataset Layer group. The Explore Network tool should be available.

- Click the tool to activate it and drag a box in the map to select elements from the network dataset.
The Explore Network window appears. This window displays the network elements identified on the map and the elements and attributes associated with them.
Learn more about Explore Network
