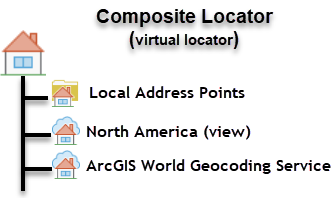
A composite locator is a virtual locator that consists of one or more individual locators or geocode services. The composite locator can be used to combine geocoding from many sources into a single locator, whether the composite is used locally or as a service. Using a composite locator allows you to geocode so that addresses can be matched against multiple locators based on different datasets at once to increase the geocoding accuracy of the matched results.
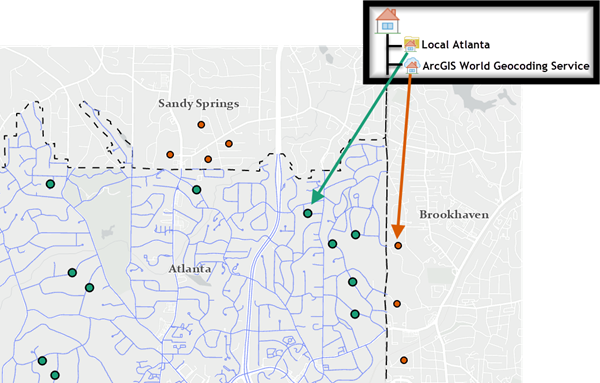
If you created a locator based on the authoritative data for the city of Atlanta and need to geocode locations in Atlanta and bordering cities, a composite locator consisting of a locator based on Atlanta street reference data and the ArcGIS World Geocoding Service can be used to return the best matches. The composite locator allows you to create a filter for participating locators to ensure that addresses in Atlanta are matched using your own Atlanta streets locator, and those in bordering cities are matched using the ArcGIS World Geocoding Service.
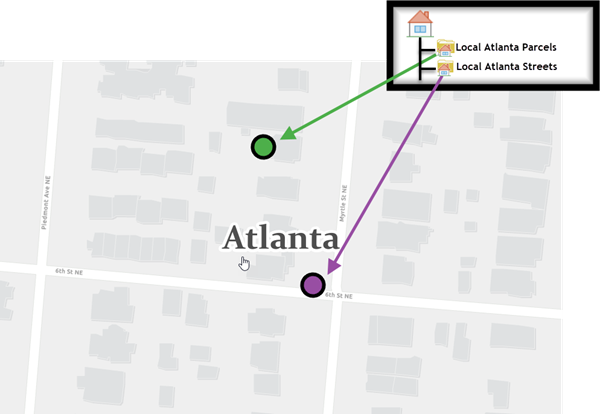
The ability to fall back to another locator to increase the probability of finding the best match is another reason to use a composite locator. For example, the county government may create a composite locator of individual locators that are based on a street dataset from the transportation department and a parcel dataset from the assessor's office and use it to locate residents who have excessive water runoff into the street. The parcel locator is listed first because it refers to an exact feature in the reference data, making it more accurate than the street centerline locator, which is based on house number ranges. If the address is not matched to the parcel, the locator can fall back to the street centerline locator where it finds the next best match.
The composite locator stores references to the participating locators and geocode services but does not contain the actual address information, indexes, and reference data of the individual locators. Composite locators can be added to new and existing projects in much the same way as individual locators.
Build a composite locator
Building a composite locator consists of the following workflow:
- Creating individual locators or identify existing locators or geocode services
- Using the Create Composite Address Locator geoprocessing tool to specify the participating locators
- Mapping the input address fields
- Optionally, defining the selection criteria
- Specifying the output composite locator name and save destination
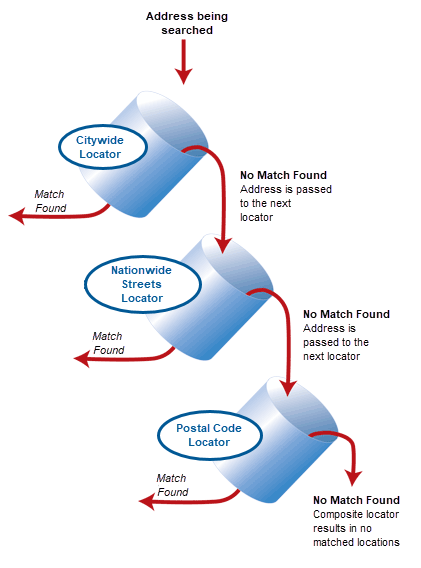
To build a composite locator, begin with existing locators. While in the initial phases of building a composite locator, plan the search process. For example, you can search a locator containing local road data first. Then, if no satisfactory results appear, you can have the address searched by a locator containing statewide or national roads. Finally, you may want to use a locator that searches for a specific zone, such as a postal code or city.
When building a composite locator, you can specify which locators are used based on the values of input fields. For example, if the composite locator uses a standard locator that contains road data for a specific city, you can filter out any addresses that do not have that particular city name. Using selection criteria disqualifies participating locators that do not meet the criteria on a particular address so that the geocoding process is more efficient. If no selection criteria are specified, addresses are geocoded against all the participating locators.
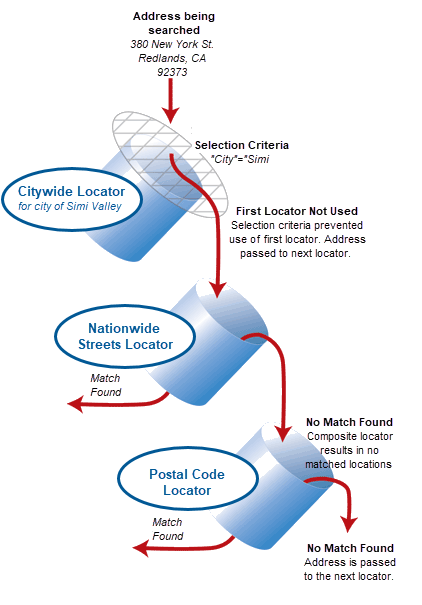
Selection criteria are used when a table of addresses with multiple input address fields is geocoded. They do not apply when geocoding a table with the addresses in a single field or when finding addresses in a single-line input in the Locate pane.
The following steps show how to create a composite locator using the Create Composite Address Locator geoprocessing tool:
- Open the Geoprocessing pane.
- Click the Tools button
 on the Analysis tab at the top of your workspace.
- Click the Tools button
- Choose the Create Composite Address Locator tool.
- In the Geoprocessing pane, choose the Toolboxes option.
- Choose the Geocoding Tools option from the list of geoprocessing toolboxes.
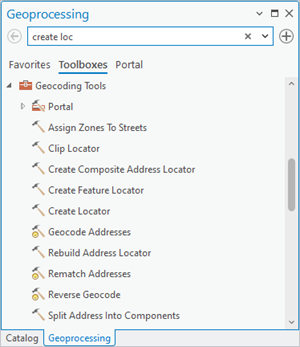
- Choose the Create Composite Address Locator tool from the list of geocoding tools.
- Click the Browse button
 next to the Address Locators text box.
 The Address Locators dialog box appears.
- Browse to the first locator you want to use in the composite locator, and click Open.
- Repeat the process of adding locators to the Address Locators text boxes (more appear as needed) until you add all the locators you want to include in the composite locator.
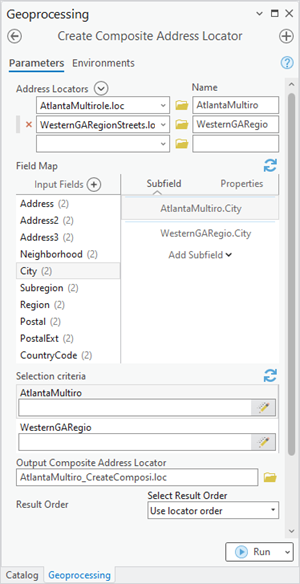
When a participating locator is added to the Address Locators text box, it is automatically given a name that appears in the Name text box. In the process of geocoding a table of addresses, the name of the individual locator the address was geocoded to stores as an attribute in the output feature class. Optionally, you can click the name and change it. The name cannot contain spaces or special symbols. The maximum length of the name is 14 characters.
The order in which the locators appear determines the order in which they are used in the geocoding process. The locator at the top of the list is used first, and so on.
- Review the values in the Field Map parameter of the tool.
Each participating locator may specify a different set of input fields for geocoding. When you add the participating locators to the tool, the input fields are automatically created and mapped. The fields and field contents are generated by the participating locators. Each of the unique input fields is listed in the Field Map parameter, and you see a list of all the input field occurrences (subfields) for each participating locator. These fields are the input fields for the composite locator.
You can review the field mappings and decide if you need to modify anything. The composite locator creates input fields with some default field names and properties. For example, in the image below in step 12, the field names Street, City, State, and ZIP are populated by two participating locators. Occasionally, you may see that two participating locators have a field that should map the same but fails to do so because it is named differently in each participating locator. For example, two locators may both have postal code information, but one may reference the data as ZIP and the other as ZIPCode. These two values should map to the same input field, but the two different names may cause them not to. The following step discusses how to move a participating locator subfield to a different input field as part of the process of field mappings.
Caution:
Do not delete any locator fields from the Field Map parameter. Composite locators created without all locator fields are invalid.
- Map the input address fields for the participating locators.
Review the input fields for each participating locator and determine the total input fields for the composite locator. These fields appear on the Create Composite Address Locator tool as the input fields for the composite locator.
Field mapping may involve moving or regrouping a participating locator input field to the appropriate input field for the composite locator. To do so, select the Input Field value that you want to modify. The subfield values appear to the right. Click the arrow to the left of the subfield value for the participating locator you want to move, select the location you want to move it to from the drop-down menu, and click the Move To Selected button. You can also move input fields up or down using the up arrow button
 or the down arrow button
  , or you can delete input fields by clicking the Delete Selected Item(s) button
  . These options appear when you click an individual input field.
The composite locator creates input fields with some default field names and properties. To view this information, click the input field that you want to view, and click the Properties tab on the right. Each field contains a name and an alias name, that is, the name that appears on the Geocode Addresses tool pane when you geocode with your new composite locator. You can modify the properties of the field by modifying the values displayed in the text boxes.
If you need to create a new input field for the composite locator, complete the following substeps:
- Click the Add New Field button
 .
. A New Field text box appears under your existing input fields.
- Type a name for your new input field.
- With your new input field selected, click the Properties tab to the right.
- Type the name of the input address field in the Name text box.
The name cannot contain spaces or special symbols. The maximum length of the name is 32 characters.
- Type any aliases in the Alias text box if you want to change the name that displays in the Geocode Addresses tool pane.
The alias name can contain spaces or special symbols.
- Specify the input field size (in characters).
- Specify if the input field is required when geocoding a table of addresses using the provided check box.
- Optionally, to add subfields to the input field, click the Subfield tab next to the Properties tab, click the Add Subfield drop-down list, and select a value from the list.
Once created, subfields can be moved and edited much like those of any other input field.
Setting selection criteria is enabled after field mappings complete. Only one selection criterion is supported for each participating locator.
- Click the Add New Field button
- Optionally, in the Selection Criteria portion of the tool, type an expression in the text box to the right of each participating locator under the Selection Criteria column.
Only one selection criterion can be added for each participating locator. An example of a useful selection criterion is "City" = 'Atlanta', which you would type directly into the text box.
- To change the output locator name and destination values, click the Browse button
 next to the Output Composite Address Locator text box.
 The Output Composite Address Locator dialog box appears.
- Specify where to store the locator, name it, and click Save.
- Optionally, specify a Result Order option.
You may want to modify this setting if you have one or more multirole locators in your composite locator or if you have one or more geocoding services in your composite locator. For more information about how Result Order functions, see Composite locator tuning tips.
- Use locator order—Participating locators are in the order they were added to the Create Composite Address Locator tool and adhere to traditional locator fallback described above.
Order by role and score—Individual roles of participating locators will be grouped and ordered from most to least precise. Results will be returned for more precise roles first followed by less precise roles, and where results are returned for different locators with the same role, results will be returned based on score. It is recommended that you use this option if you have a multirole locator and several single role locators or if you have more than one multirole locator. This automatically orders your locators and roles into a recommended, optimal fallback order.
Custom order—A customizable fallback order for participating locators allows you to insert locators between the roles of a multirole locator. Locators cannot be inserted between multirole geocode services.
- Click Run
 .
.
 next to the input categories for additional information about the input categories on the tool.
When the process finishes, the locator is added to the Locators folder in the Catalog pane. You can also find your locator in the save location you previously specified. You can add your newly created composite locator to a new or existing project where it can be used to geocode a table of addresses.
Caution:
When selecting participating locators, you can choose to reference another composite locator. However, be sure that you do not loop locators. For example, if composite locator A uses composite locator B as a participating locator, and composite locator B uses composite locator A as a participating locator, a repeating loop is created and geocoding fails.
Note:
- The maximum number of participating locators in a composite locator is 30, but it is recommended that you use no more than 10; otherwise, geocoding can be significantly slower.
- The spatial reference of the first participating locator is used as the spatial reference of the composite locator. When the locator is used, the geocode result is saved with the same spatial reference as the locator by default.
- If the participating locators in a local composite locator are created using the Create Locator or Create Feature Locator tools, the composite locator returns suggestions from those locators in the Locate pane. Participating locators created with the Create Address Locator tool do not return suggestions by a composite locator that is stored in a file folder.
- Take caution when adding a locator created with the Create Feature Locator tool to a composite locator because field mapping of the Name feature locator role field may lead to unexpected behavior. It is recommended that you use a locator created with the Create Locator tool based on the POI role instead.
- When a participating locator is a Feature, POI, or Parcel role locator that searches for assets or a single item and you want to batch geocode a mix of addresses and locations, the input table should include an Address field that contains the places, assets, parcel numbers, or addresses to be searched and mapped to the Address or Place input address field in the Geocode Table tool pane or Geocode Addresses geoprocessing tool or a single field that contains the full address, location, parcel number, or place and map it to the Single Line Input input address field.