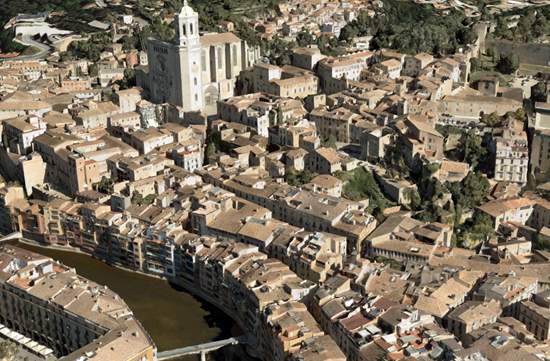
Typically, 3D mesh data is captured by an automated process for constructing 3D objects out of large sets of overlapping imagery. The result integrates the original input image information as a textured mesh including 3D objects, such as buildings and trees, and elevation information. Integrated mesh scene layers are generally created for citywide 3D mapping; they are often captured by drone and cannot be restyled.
An integrated mesh draws as a 3D layer in the 3D Layers category of a scene. When an integrated mesh layer is added to a scene, it supersedes the ground and basemap of that scene. Any layers that have an elevation property set to draw on the ground as well as on the integrated mesh. If a layer in either the 2D Layers or 3D Layers category has an offset applied or is set at a height relative to the ground, that layer will continue to draw based on the ground only. Layers can be excluded from draping on the integrated mesh using the Exclude From Integrated Mesh option on the Elevation Surface Layer tab. To access this tab, click the Ground elevation surface layer in the Contents pane to highlight it. The Elevation Surface Layer tab appears on the ribbon.
Ordering an integrated mesh in this way allows you to visualize and explore information about other layers together with the integrated mesh. For example, if you have an integrated mesh of a hiking area, you can visualize the hiking paths and points of interests together on that hike.
When sharing a web scene, all dynamic layers, such as feature layers, remain on top of the integrated mesh. Other layers, such as raster layers, continue to draw on the ground only.
You can
view attribute information about a particular feature using the Explore tool  .
The default pop-up window displays a formatted list of
attributes when a point is selected in the scene view. You can snap to the integrated mesh scene layer when snapping is enabled.
General information and display control for integrated mesh scene layers is available on the Layer Properties dialog box. To access the properties, right-click the integrated mesh scene layer in the Contents pane, and click Properties.

Visualization
Visualization and display control for an integrated mesh scene layers is available on the Integrated Mesh Layer tab. To access this tab, select an integrated mesh scene layer in the Contents pane, and click Integrated Mesh Layer. Set the minimum and maximum visibility range to use for the layer. Use the swipe functionality to visualize a scene. Drag the swipe tool to reveal layers under the chosen scene layer. By default, lighting is enabled.
You cannot change the symbology of an integrated mesh scene layer in the current release of ArcGIS Pro.
Geoprocessing tools
The integrated mesh scene layer is supported as input to various data management and analysis geoprocessing tools. Supported tools are listed on the Data contextual tab.
Share an integrated mesh scene layer
The integrated mesh scene layer can be published as a service layer and uploaded to ArcGIS Enterprise or ArcGIS Online using the Share Package geoprocessing tool.