Available with Standard or Advanced license.
On the Edit tab, in the Manage Edits group, Error Inspector  validates and fixes geodatabase topology errors individually or several at one time. It contains a table viewer for viewing and filtering errors, tabs for inspecting feature geometry, and tools for managing exceptions.
Note:
Geodatabase topologies published in a feature service can be edited in ArcGIS Pro and validated and fixed through the feature service.
To learn more about geodatabase topology rules and predefined fixes for a specific feature type, see the following topics:
- Geodatabase topology rules for point features
- Geodatabase topology rules for polygon features
- Geodatabase topology rules for polyline features
The following sections provide a basic workflow to get started validating and fixing geodatabase topology.
Validate topology
Validating topology compares feature geometry against all topology rules defined in the source geodatabase. Geometry marked as an error appears in the error table. The errors that appear in the table are filtered by the topology rule you choose on the toolbar.
Errors are symbolized on layers organized by geometry type. Edits made after validating topology are tracked and symbolized as rectangular regions on a layer name Modified Areas, Dirty Areas, or a similar name.
- On the Edit tab, in the Manage Edits group, click Error Inspector
 .
.The Error Inspector table appears.

- On the toolbar, click Validate
 .
.Features in the current map are validated against all topology rules defined in the source geodatabase.
Tip:
Topology validation tools are also available in the Modify Features pane when you enable a geodatabase topology rule on the Edit tab.
Preview and zoom to errors
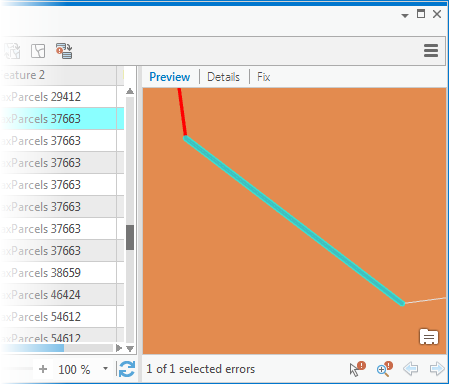
Use the Preview tab to view the feature geometry causing an error.
- On the Edit tab, in the Manage Edits group, click Error Inspector
 .
.The Error Inspector table appears.
- On the toolbar, click Validate
 .
.Features in the current map are validated against all topology rules defined in the source geodatabase.
- On the toolbar, click the Source drop-down menu and choose a source topology rule.
Topology errors appear in the error table like records.
- Click the Preview tab.
- In the error table, select an error by clicking the gray square next to the shape field.
A zoomed view of the incorrect geometry appears in the viewer.

- On the toolbar below the viewer, click Zoom to Error
 .
.The active map zooms to the error on the map.
View details about an error
Use the Details tab to view information about a feature that is causing an error.
- On the Edit tab, in the Manage Edits group, click Error Inspector
 .
.The Error Inspector table appears.
- On the toolbar, click Validate
 .
.Features in the current map are validated against all topology rules defined in the source geodatabase.
- On the toolbar, click the Source drop-down menu and choose a source topology layer.
Topology errors appear in the error table like records.
- Click the Details tab.
- In the error table, select an error by clicking the gray square next to the shape field.
Information about the feature appears on the tab.

Fix topology errors
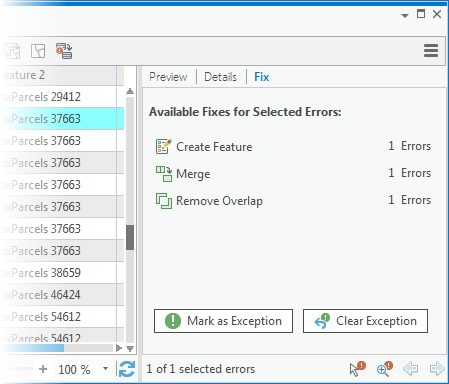
Use the tools on the Fix tab to fix topology errors and manage exceptions. If a predefined error tool is not available, use the standard editing tools to select and fix the error.
- On the Edit tab, in the Manage Edits group, click Error Inspector
 .
.The Error Inspector table appears.
- On the toolbar, click Validate
 .
.Features in the current map are validated against all topology rules defined in the source geodatabase.
- On the toolbar, click the Source drop-down menu and choose a source topology rule.
Topology errors appear in the error table like records.
- Click the Fix tab.
- In the error table, select a feature record by clicking the gray square next to the shape field.
- To select a range of feature records, you can drag the pointer up or down across the rows, or press Shift and click the last record in the sequence.
- To select multiple feature records, press Ctrl and click each record.
Tools available for the selected error appear on the tab.

- To manage exceptions, click one of the following:
- Mark as Exception
 —Removes the symbolized error on the topology layer, and the feature is ignored when you validate your edits. You can reinstate the error if you decide the feature should be modified to comply with the topology rule.
 - Clear Exception
 —Reinstates the error and symbolizes the error on the topology layer on the map.
Note:
Exceptions are a normal part of the data creation and update process. For example, an assessor geodatabase might include a rule that building features must not cross parcel boundaries. For a high-density housing complex or a commercial building, this might be permitted.
- Mark as Exception
- To fix topology errors, use one of the following methods:
- Click the appropriate fix that appears on the Fix tab for the selected error.
- To fix errors interactively, click Fix Error
 at the bottom of the tab, select the error on the map with the pointer, and use the commands that appear on the pop-up menu.
Tip:
If a geodatabase topology rule is selected for topological editing on the Edit tab, Fix Error
 is also available in the Modify Features pane.
 - If a predefined fix is not available, select and edit the features using standard editing tools.
- After fixing topology errors, click Validate
 again to confirm that your edits corrected the errors.
Keyboard shortcuts for error inspector
| Keyboard shortcut | Action | Comment |
|---|---|---|
Up arrow key and Down arrow key | Move the pointer. | Move the pointer up and down the rows in the error table. |
Ctrl+Shift+Equal sign (=) | Zoom the active map to the selected error. | This is the same as clicking Zoom To |
F | Select the primary features causing the error. | This is the same as clicking Select Features |
X | Mark the error as an exception. | This is the same as right-clicking the current row and clicking Mark as Exception |
E | Clear the exception and mark the record as an error. | This is the same as right-clicking the current row and clicking Clear Exception |
R | Show the Rules drop-down menu and enable filtering for topology rules. | This is the same as clicking Rules Note:On the context menu of an error row, this shortcut shows a rule description. |
M | Show errors in the current map extent. | This is the same as clicking Map Extent |
V | Identify topology errors and symbolize them on layers in the current map extent. | This is the same as clicking Validate |
Ctrl+U | Switch selected rows. | This is the same as clicking Switch |
Ctrl+Shift+A | Unselect all selected rows. | This is the same as clicking Clear |
Ctrl+8 | Flash the shape of the error feature in the map. | This is the same as right-clicking the current row and clicking Flash |
Ctrl+Equal sign (=) | Zoom in and center the map on the error feature. | This is the same as right-clicking the current row and clicking Zoom To |
Ctrl+Spacebar | Select or unselect the current row. | This is the same as right-clicking the current row and clicking Select/Unselect |
R | View a description and an example graphic of the rule violated by this error. | This is the same as right-clicking the current row and clicking Rule Description. Note:On the toolbar, this shortcut shows the Rules menu |
 on the toolbar.
 on the toolbar.
 on the toolbar.
 on the toolbar.
 on the toolbar.
 on the toolbar.
 .
. .
.