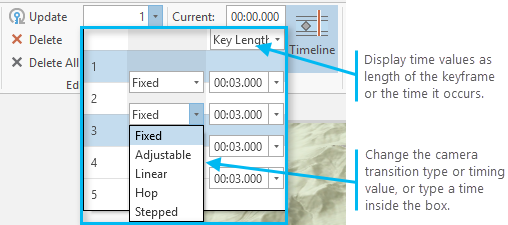
When you build an animation in ArcGIS Pro, you compile a series of keyframes, which capture properties of the view, the layers, and even time and range definitions. Each keyframe is a point along the animation path. These keyframes are listed in an easy to access menu from the top of the application in the Edit group on the Animation tab.
Whether you build your animation manually by appending a sequence of keyframes, or automatically by importing bookmarks or time/range slider properties, the keyframes are always available in the Keyframe List.

The Keyframe List is useful in many ways to your animation authoring workflow, allowing you to quickly do the following:
- View the list of keyframes and quickly zoom to a position within the animation.
- Get immediate feedback as to the location, duration, and type of keyframe being added.
- Update timing between keyframes.
- Update the camera-transition type between keyframes.
- Remove a keyframe.
Another way to view the animation's keyframes is through the Animation Timeline pane. It is more focused for editing and provides more options for displaying and interacting with your keyframes.
Note:
When importing from the time slider or range slider, the keyframes are listed with None in the transition type area because you're not animating any camera properties yet. This does not affect the timing of the animation. If you need to make a camera change for a range or time animation, you can zoom to a specific keyframe, navigate the view, and click Update  .
.
Keyframe List timing
You can view the list of keyframe timing with one of two options: Key Length or Key Time. This means you are viewing the seconds between each keyframe, or as the total time for the animation to get to that position. In both cases, the values remain editable, allowing you to update the speed at which the camera moves between each of the viewpoints.
Keyframe List editing options
The following editing options are available when using the Keyframe List:
- Choose the keyframe transition type—You can use Fixed, Adjustable, Linear, Hop and Stepped to influence how the camera travels between viewpoints.
- Insert a hold—To temporarily pause the animation, you can insert a hold keyframe by choosing the one following the one you want it to append and clicking the Hold button
 . A hold, by default, is 2 seconds.
 - Change the time for a keyframe—This will update the speed at which the camera moves between viewpoints. Learn more about how keyframe timing can be updated
- Remove a keyframe—To remove a keyframe, select it in the Keyframe List and click the Delete button
 or press the Delete key.
Tip:
- You can undo any change that impacts the animation path. This includes removing a keyframe and changing the timing of a keyframe or the curve type.
Navigate from the Keyframe List
If you need to view or update a specific keyframe, you can zoom to its location easily. Select the keyframe in the Keyframe List, and click the Zoom To button  . If you are working in the Animation Timeline pane you can double-click a keyframe from the gallery to zoom to its location.