A geoprocessing model is saved as a model tool in a toolbox. Model tools can be run like any other geoprocessing tool from the Geoprocessing pane and used in other models and Python scripts.
The idea of adding and running one model tool within another model is sometimes referred to as a submodel, nested model, or model within a model. Using one model within another model allows for large models to be divided into smaller, more easily managed models that can be reused.
To add a submodel to a model, complete the following steps:
- Create a model that performs the processing that you want to call from other models—the submodel. You will run this submodel within another model, so the submodel should be authored following best practices for a model tool, including setting the model tool's properties and parameters.
If you already have a part of a model that you want to make into a submodel, you can copy and paste the model variables and processes into a new model or group them and use the Save Group as New Model command.
- Make sure to save the model when the above steps are complete and you are ready to add the model to another model.
- Edit or create a new main model.
- Add the submodel to the main model using one of the techniques to add a tool to a model. You need to locate the submodel in the Catalog pane and drag it into the main model, unless the submodel is in a project toolbox.
Input and output data parameters of the submodel will automatically be made into variables in the main model. You can expose additional parameters of the submodel as variables in the model by right-clicking the submodel and clicking Create Variable > From Parameter > <select a parameter>.
The following are the two main reasons to use a model within a model:
- To simplify a large, complex model into smaller, more easily managed models.
- To support the use of model iterators within one area of a larger model.
Simplify a large, complex model
Embedding a model tool within another model allows for large, complex processes to be divided into smaller model units that can be better managed and easily reused in other models or scripts. These submodels can also be modified and rerun without the need to edit a large and potentially unwieldy model or rerun the entire process—if an error occurs in one submodel, make corrections to only that model, then rerun the single model instead of having to run the entire process again.

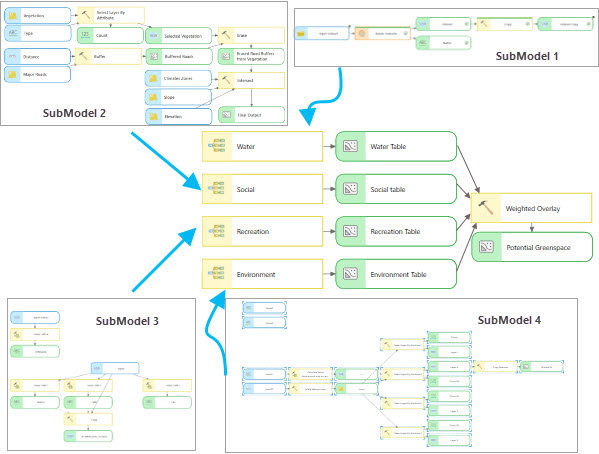
The large model above could be broken into four submodels and one main model. The smaller submodels can be added to the main model and connected to a final process. When a submodel is added to another model, the submodel's output parameters will be added as output variables.

Advanced use of model iterators
Embedding a model tool within another model also allows for advanced use of model iterators. When a workflow requires model iteration, the specific tools or processes that need to be run more than once must be separated from those tools or processes that only need to be run once.
Note:
It is a common misconception that only tools downstream of a model iterator will run multiple times. When a model contains an iterator, all processes in the model will be run multiple times.
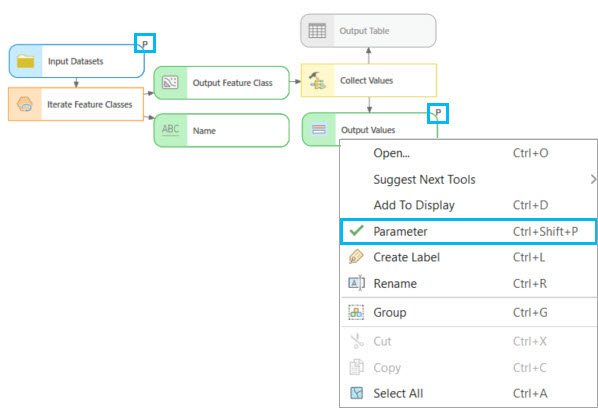
The example below is a workflow that merges a set of inputs from a geodatabase. The Merge tool accepts multiple feature classes as input to merge, but there is no automatic way to add all feature classes from a specific workspace. In this situation, the Iterate Feature Classes model iterator can be used in combination with the Collect Values tool to read through all the feature classes in a workspace and collect them into a multivalue variable. Since these two processes need to be run multiple times (iterations), they will be added to a submodel, while the Merge tool, which should only be run once, will be added to the main model and connected to the output of the submodel that contains the iterator.
The following is a step-by-step description of how the full workflow above was created. Refer to ModelBuilder vocabulary for more information about terms and techniques used below.
- Create two models: a main model and a submodel, in which the submodel is added to the main model. Add the Merge tool to the main model and the Iterate Feature Classes iterator and the Collect Values tool to the submodel.
- In the submodel, set the workspace containing the feature classes to be merged as the input for the Iterate Feature Classes iterator. To only iterate through point feature classes, set the Feature Type parameter of Iterate Feature Classes to POINT.
- Connect the Iterate Feature Classes output variable, Output Feature Class, to the Collect Values tool so the path of every point feature class in the workspace is iterated through and collected.
- Make the input workspace variable and the output of the Collect Values tool into model parameters. Rename the input workspace variable Input Datasets to ensure that the variable name is relevant and easy to understand.

- Save and close the submodel, then add it as a process to the main model. When the submodel is added to the main model, the submodel's parameters are automatically added as variables in the main model.

- Connect the output variable of the submodel as the Input Datasets parameter of the Merge tool. Make sure the Merge tool output has a valid path.