Available with Image Analyst license.
A capability of the Motion Imagery tools and video player is to export map images, video frames, and imbedded text elements to Microsoft PowerPoint. You can customize the template, or create multiple templates to match organizational standards or requirements.
Configure settings and options
Workflows for downloading the template and configuring document settings and macro options are provided below.
Download the macro-enabled template
Download the template on a system where you can enable macros and unblock security for the file. Verify with your local network or system administrators whether macros can be used on your system before attempting this workflow.
Note:
If macros are not allowed, you will receive blocked content error messages.
To download the macro-enabled template, complete the following steps:
- Download the template to your local directory: C:\ProgramFiles\ArcGIS\Pro\Resources\MotionImagery.
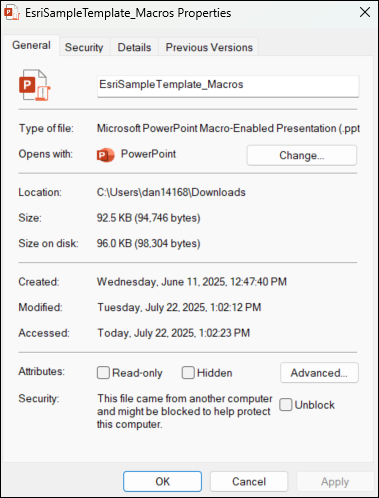
- Right-click the PowerPoint file, and click Properties.
The Template Properties dialog box appears.
- Click the General tab.
- In the Security section of the General tab, check the Unblock check box.
- Click OK.
Customize the PowerPoint options
To run the customization using the template, complete the following steps to enable macros in PowerPoint:
- Open PowerPoint.
- Click File > Options.
- Click Trust Center, and click Trust Center Settings.
The Trust Center dialog box appears.
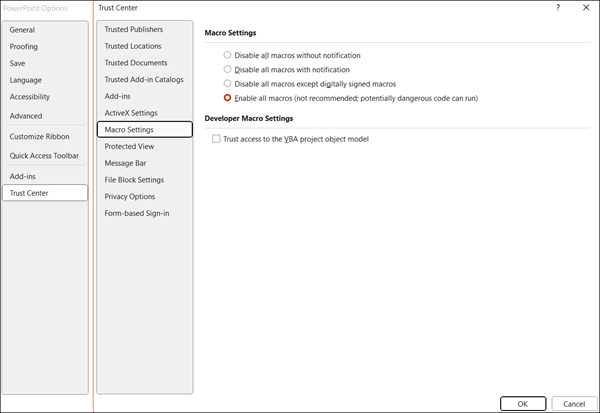
- Click Macro Settings.
- Under Macro Settings, click Enable all macros (not recommended, potentially dangerous code can run).
- Click OK to close the Trust Center dialog box.
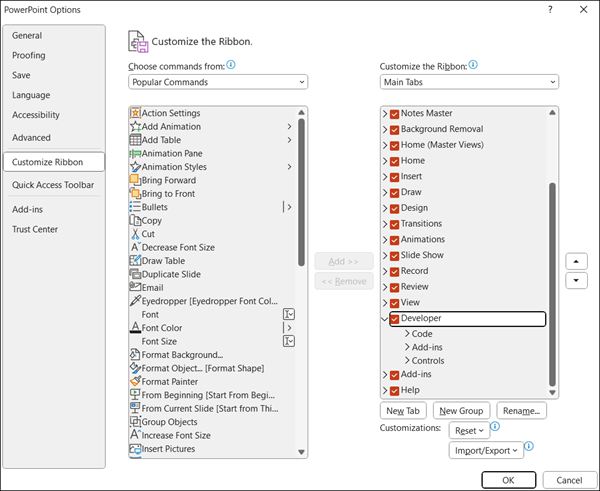
- In the PowerPoint Options window, click Customize Ribbon.
- For Customize the Ribbon, select Main Tabs from the drop-down list, and check the Developer check box.
The Developer tab is added to the ribbon.
- Click OK to close the PowerPoint Options window.
Use macros
Macros in PowerPoint are small programs written in Visual Basic for Applications (VBA) where you automate repetitive tasks, customize features, and ensure consistency across presentations. Instead of manually formatting slides, or adding elements one by one, you can record or write a macro once and run it whenever needed to save time and effort. For Motion Imagery workflows, the macros allow you to customize exported map extents, video frames, and text elements. The Macro dialog box accessed from the Developer toolbar has several macros that support geospatial video export.
To use macros, complete the following steps:
- Click the Developer tab.
- Click Macros in the Code group.
The Macro dialog box appears.
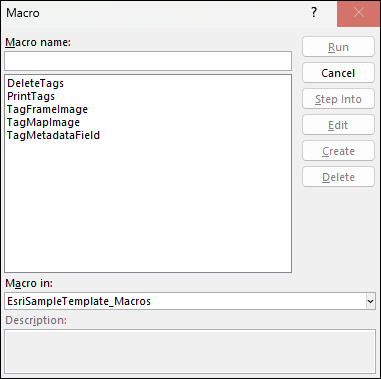
- DeleteTags—Remove macro tags from a selected image, shape, or text box.
- PrintTags—Display a list of all tags currently active in the PowerPoint presentation.
- TagFrameImage—Apply tags to a placeholder image controlling how the video frame is exported into the space.
- Full Frame—Export the full video frame regardless of the current zoom level in the video player.
- Include Graphics—Include graphics displayed in the video player in the exported image.
- Use Enhancements—Apply enhancements currently active in the video player to the exported image.
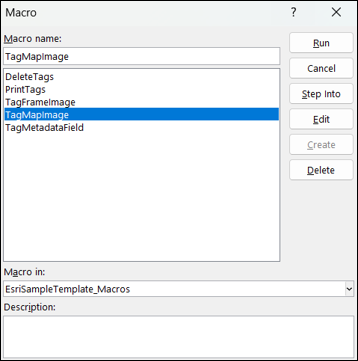
- TagMapImage—Apply tags to a placeholder image controlling how the map view is exported into the space.
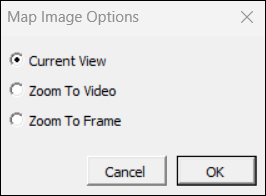
- Current View—Export the current map view.
- Zoom to Video—Export the map view zoomed to encompass the platform position and video frame outline.
- Zoom to Frame—Export the map view zoomed to encompass the video frame outline.
- TagMetadataField—Apply tags to a shape or text box indicating that it contains one or more of the metadata items.
Insert a video frame
Use the macros to imbed a video frame from ArcGIS Pro into the PowerPoint presentation. This video frame is captured when you click the export button in ArcGIS Pro.
To insert a video frame, complete the following steps:
- Add an image to the PowerPoint slide as a placeholder.
- Select the image, and click Macros on the Developer toolbar.

- In the Macro window, select TagFrameImage from the list.
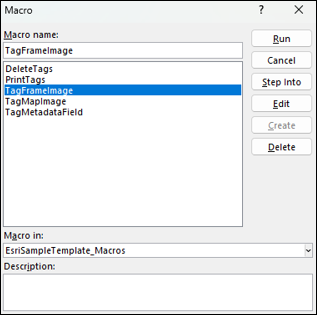
- Click Run.
- Specify the frame image option:
- Full Frame—The full video frame is exported regardless of the zoom applied in the video player.
- Include Graphics—The graphic displayed in the video player is included in the exported image.
- Use Enhancements—The enhancements applied to the frame in the video player are applied to the exported image.
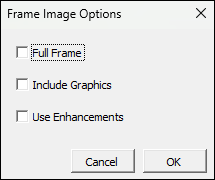
- Click OK.
Note:
If no option is specified, the portion of the frame displayed in the video player without graphics or enhancements is exported.
Insert a map frame
Use the macros to imbed a map frame from ArcGIS Pro into the PowerPoint presentation. This map frame is captured when you click the Export button in ArcGIS Pro.
To insert a map frame, complete the following steps:
- Add an image to the PowerPoint slide as a placeholder.
- Select the image, and click Macros on the Developer toolbar.
- In the Macro window, select TagMapImage from the list.
- Click Run.
- Specify a map image option:
- Current View—The current map view is exported
- Zoom to Video—The map view focused to encompass the platform position and frame outline is exported.
- Zoom to Frame—The map view focused on the frame outline is exported.
- Click OK.
Add metadata text
You can use the macros to embed any of the video metadata from ArcGIS Pro into the PowerPoint presentation. The fields that can be imbedded are found by viewing the video metadata in the video player.
To add metadata text, complete the following steps:
- Add a text box to the PowerPoint slide.
- To see the available fields, click the Display Metadata button on the side of the video player window.
Any metadata field populated in the stream can be used in the export.
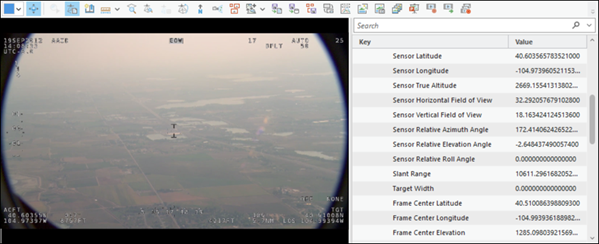
- Type the metadata field name in curly brackets in the text box.
For example, type {Sensor Latitude} to include Sensor Latitude in the template from the metadata.
- Select the text box.
- Click Macros on the Developer toolbar.
- Select TagMetadataField from the list.
- Click Run.

Additional information
You can use macros to embed video metadata from ArcGIS Pro into a PowerPoint presentation. The format can be configured to change a unit of measure and precision. Some value types, such as dates and strings, do not have convertible units.
Available metadata includes the following:
- Advanced Metadata Values—Templates are based on the unit of measure and can be configured by precision, units, formatting, or applying unit conversion.
- Format—{metadata_item_name(to_units, precision)} where to_units and precision are optional.
- Datetime Values—Examples: {Precision Time Stamp(M/d/yy)} / {Precision Time Stamp(MM/dd/yyyy HH:mm:ss.FFFFFF)}
- Coordinate Values—Examples: {FrameCorner1(MGRS)} / {Frame Center(UTM)}
- Linear Values—Examples: {Sensor True Altitude(6)} / {Sensor True Altitude(foot,12)}
- Angular Examples—Examples: {Platform Heading Angle(6)} / {Platform Heading Angle(radians,12)}