Available with Standard or Advanced license.
Error Inspector  validates feature topology in a map and includes tools and commands to review, fix, and manage the results using a table viewer. It is available on the Edit tab in the Manage Edits group, and in the Modify Features pane.
The menu bar organizes commands into three main workflow groups: Source, Filter, and Selection. Choosing a source topology and validating it symbolizes the results on dedicated map layers and displays the results in the table viewer.
As you validate, fix, and manage topology errors, consider the following:
- The Filter commands allow you to display specific types of results in the table viewer and manage them more easily.
- The Fix tab contains commands to mark or clear exceptions and apply predefined fixes for selected errors.
- The Copy command in the Selection group copies selected rows to the clipboard and allows you to paste them to external applications such as Microsoft Excel.
Geodatabase topologies published in a feature service can be edited in ArcGIS Pro and validated and fixed through the feature service.
Note:
To learn more about topology rules and predefined fixes, see the following topics:
To validate and fix topology errors, complete the following steps:
- Click the ribbon Edit tab. In the Manage Edits group, click Error Inspector
 .
.The Error Inspector table appears.
- On the menu bar, in the Source group, choose a source topology and validate it.

- Click the Source drop-down arrow and choose a topology.
- Click Validate
 .
.Alternatively, click a Validate tool in the Modify Features pane.
Errors and exceptions are shown in the table and symbolized on map layers, categorized by feature type.
- In the Filter group, choose the rules, errors, exceptions, rule types, error geometry, and map extent displayed in the table view.
Filter settings work together using Boolean AND logic. They collectively display information only if each of the filters return a result. If any of the filter settings return zero results, the table displays nothing.
Filters with enabled filter settings are highlighted blue.

- Click Rules
 , check the check boxes on the pop-up menu for the rules you want to show in the table, and click Close
  .
.To uncheck all check boxes, click Clear.

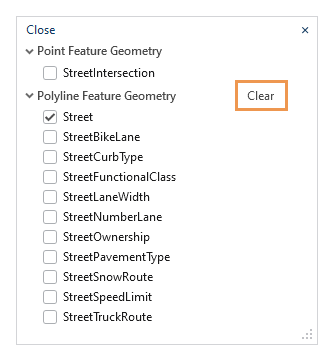
- Click Feature Classes
 , check the check boxes on the pop-up menu for the feature classes you want to show in the table, and click Close
  .
.To uncheck all check boxes, click Clear.

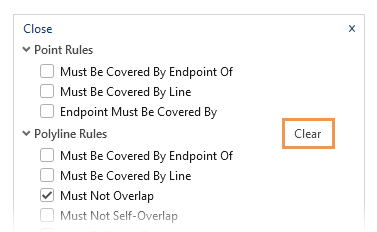
- Click Rule Types
 , check the check boxes on the pop-up menu for the rule types you want to show in the table, and click Close
  .
.Geodatabase topology rules define the permissible spatial relationships between specific feature geometry in different feature classes, or between subtypes of features.
To uncheck all check boxes for a set of rules for a specific geometry type, click Clear.

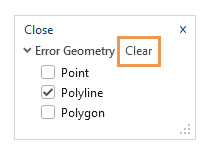
- Click Error Geometry
 , check the check boxes on the pop-up menu for the error geometry types you want to show in the table, and click Close
  .
.To uncheck all check boxes, click Clear.

- Click Exceptions
 and choose Errors, or Errors and Exceptions, or Exceptions.
 - Click Map Extent
 .
.To filter a specific area of interest, drag the map using the pointer and click Map Extent.
- Click Rules
- To select and highlight an error in the table view, click the gray square next to the Shape field.
- To select a range of error rows, drag the pointer up or down across the rows, or press Shift and click the last record in the sequence.
- To select multiple error rows, press Ctrl and click each record.
The selected rows highlight in the table view and commands in the Selection group are enabled.
- To zoom or pan to selected records, use the following commands in the Selection group.

Zoom To Selection

Zoom in and center the map on the extent of the errors in the selected rows. Alternatively, press Ctrl+Shift+Equal sign.
Pan To Selection

Center the map around the errors in the selected rows. Alternatively, press Ctrl+Shift+N.
Switch Selection

Deselect all the selected features and select all the deselected ones. Alternatively, press Ctrl+U.
Clear Selection

Deselect all selected rows. Alternatively, press Ctrl+U. To select all rows, press Ctrl+A
Select Features

Select the features that created the errors in the selected rows. Alternatively, press F.
Copy

Copy selected rows and column headers as tab-separated data to the clipboard. Exceptions are copied as True or False.
Tip:
You can paste this data to external applications such as Microsoft Excel.
- Click the Preview tab in the error viewer to display the features creating the error while leaving the map view extent unchanged.
- Click the Details tab to view information about the feature and error.
Tip:
To show the Length and Area fields in the table, click the menu button
 on the menu bar and enable Show Shape Length/Area.
 - Click the Fix tab and use the available tools to fix the selected error or to mark or clear an exception.

Available Fixes for Selected Errors
This section contains tools with defined fixes for a specific error. If a predefined fix is not available, select and edit the features using standard editing tools.
Mark as Exception

Click this command to remove the highlighted error from the topology layers, and ignore it when topology is validated. You can reinstate the error if you decide the feature needs to comply with the topology rule.
Clear Exception

Click this command to reinstate the highlighted error and symbolize it on the topology layers.
- Optionally, use the commands on the status bar below the error viewer to zoom to and fix errors in the map, or to step through errors in the table.
Zoom to Error

Zoom to the error in the map.
Fix Error

Click the error in the map and fix it using commands on the pop-up menu. The available commands vary depending on the error.

Note:
This tool is also available in the Modify Features pane.
Previous Error

If no errors are selected in the table, move the cursor to the previous row.
Next Error

If no errors are selected in the table, move the cursor to the next row.
- To confirm that your edits corrected the errors, click Validate
 on the menu bar.
Keyboard shortcuts for error inspector
| Keyboard shortcut | Action | Comment |
|---|---|---|
Up arrow key and Down arrow key | Move the pointer. | Move the pointer up and down the rows in the error table. |
Ctrl+Equal sign (=) | Zoom in and center the map on the error feature in the current row. | This is the same as clicking Zoom To Alternatively, press Ctrl+Shift+Equal sign (=) |
Ctrl+N | Pan the active map to the selected error. | This is the same as clicking Pan To Alternatively, press Ctrl+Shift+N |
F | Select the primary features causing the error. | This is the same as clicking Select Features |
X | Mark the error as an exception. | This is the same as right-clicking the current row and clicking Mark as Exception |
E | Clear the exception and mark the record as an error. | This is the same as right-clicking the current row and clicking Clear Exception |
R | Show the Rules drop-down menu and enable filtering for topology rules. | This is the same as clicking Rules Note:On the context menu of an error row, this shortcut shows a rule description. |
M | Show errors in the current map extent. | This is the same as clicking Map Extent |
V | Identify topology errors and symbolize them on layers in the current map extent. | This is the same as clicking Validate |
Ctrl+U | Switch selected rows. | This is the same as clicking Switch |
Ctrl+Shift+A | Unselect all selected rows. | This is the same as clicking Clear |
Ctrl+Shift+C | Copy selected rows to the clipboard. | This is the same as clicking Copy |
Ctrl+8 | Flash the shape of the error feature in the map. | This is the same as right-clicking the current row and clicking Flash |
Ctrl+Equal sign (=) | Zoom in and center the map on the error feature. | This is the same as right-clicking the current row and clicking Zoom To |
Ctrl+Spacebar | Select or unselect the current row. | This is the same as right-clicking the current row and clicking Select/Unselect |
R | View a description and an example graphic of the rule violated by this error. | This is the same as right-clicking the current row and clicking Rule Description. Note:On the toolbar, this shortcut shows the Rules menu |
Learn more about topology properties and common topology tasks.
 .
. .
.