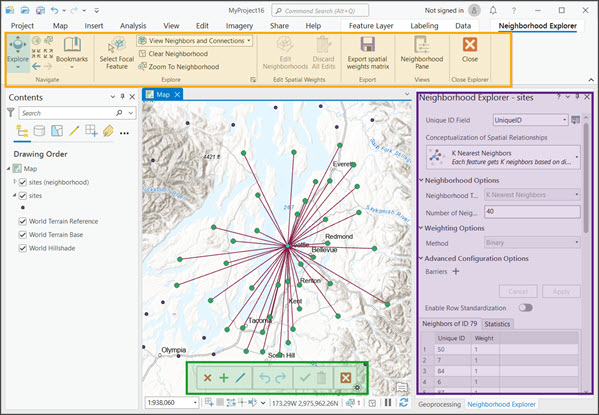
You can use Neighborhood Explorer to configure a conceptualization of spatial relationships and explore and edit the spatial relationships between features. To open a Neighborhood Explorer view, first add the layer you want to explore to the map.
Open from the Analysis ribbon
To open Neighborhood Explorer from the Analysis ribbon, complete the following steps:
- Select the layer to explore in the Contents pane.
- Click the Analysis tab to activate the Analysis ribbon.
- In the Workflows group, click Neighborhood Explorer
 .
.The Neighborhood Explorer pane and the Neighborhood Explorer ribbon appear. The name of the selected layer appears in the title of the Neighborhood Explorer pane.
Neighborhood Explorer components
Neighborhood Explorer includes a Neighborhood Explorer pane, an editing toolbar, and the Neighborhood Explorer ribbon.

Neighborhood Explorer pane
In the Neighborhood Explorer pane, you can configure the conceptualization of spatial relationships, view the neighbors of a selected focal feature, and view summary statistics for all neighborhoods.
Configure Neighborhood Explorer
To use Neighborhood Explorer, you must choose a Unique ID Field value and a Conceptualization of
Spatial Relationships option. The unique ID is used to identify and retrieve neighbors
efficiently. The unique ID field type must be integer. All integer fields
in the selected layer will be listed as
options in the Unique ID Field drop-down menu. If the feature layer
does not include an integer field that contains unique values, click the Create a Unique
ID Field button  to create
one. The Create a Unique
ID Field button opens the Calculate Field tool.
Click the Apply button to run the tool and
add a UniqueID field to the
layer.
Caution:
Before running the Calculate Field tool, ensure that the input layer does not have a selection or turn off the Use the selected records toggle button.
There are many ways to create neighborhoods for spatial data. The Conceptualization of Spatial Relationships parameter specifies how to create neighborhoods. Each option in the Conceptualization of Spatial Relationships drop-down menu will have additional parameters you can set to configure the conceptualization.
Learn more about configuring neighborhood conceptualizations
Neighbors table
You can view the neighbors and neighbor weights of a selected focal feature on the neighbors tab in the Neighborhood Explorer pane. The label of the neighbors tab includes the ID of the selected focal feature. The neighbors tab contains a table with Unique ID and Weight columns. The Unique ID column contains neighbor IDs from the specified Unique ID Field value and the Weight column contains neighbor weights. If the Enable Row Standardization toggle button is on, the table includes a Standardized Weights column with row-standardized weights.
Statistics
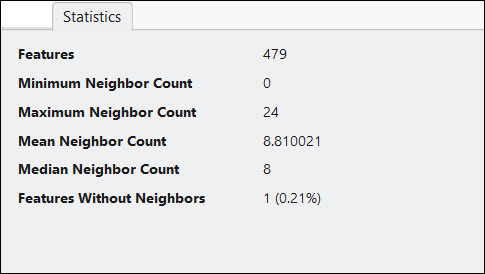
The Statistics tab displays the summary statistics of all neighborhoods. The summary statistics are populated after you run Neighborhood Explorer. When you edit neighborhoods and commit those edits, the values in the Statistics tab update.

Neighborhood Explorer ribbon
You can use the Neighborhood Explorer ribbon to open the editing toolbar, control how neighbors are visualized, and export a modified conceptualization of spatial relationships to a spatial weights matrix file.

Editing toolbar
The editing toolbar allows you to modify neighborhoods by adding, removing, and modifying neighbors. To open the editing toolbar, click the Edit Neighborhoods button  on the Neighborhood Explorer ribbon.

Open additional Neighborhood Explorer sessions
You can open multiple Neighborhood Explorer sessions. However, you can only open one session per layer in the Contents pane and you can only visualize one Neighborhood Explorer session at a time. To open a new Neighborhood Explorer session, complete the following steps:
- Select a different layer in the Contents pane.
This clears all the parameter values in the Neighborhood Explorer pane.
- Specify the Unique ID Field value, the Conceptualization of Spatial Relationships option, and any additional parameters.
- Click Apply.
A new Neighborhood Explorer session opens. You can switch between sessions by selecting the layer that was used to create the session in the Contents pane. The title of the Neighborhood Explorer pane includes the name of the active layer.
Close Neighborhood Explorer
To close a Neighborhood Explorer session, open the Neighborhood Explorer ribbon and click the Close button. This removes the group layer and closes both the Neighborhood Explorer ribbon and the Neighborhood Explorer pane.