Defense Mapping ライセンスで利用できます。
The Elevation Guide Bar surround element is a legend that defines the elevation bands displayed in the Elevation Guide map frame of a Topographic Map (TM) product. The Elevation Guide Bar accentuates the highest and lowest shape and elevation of the terrain and is a quick reference for general landforms.
注意:
The Elevation Guide map frame can be found in the layouts for TM products in the ArcGIS Defense Mapping product files folders.
The number of bands displayed in the Elevation Guide Bar depends on the differences in elevation on the map. Elevation bands are created using an elevation bands feature class that you must create using the Generate Elevation Guide Features tool before the Elevation Guide Bar surround element can be added to a TM product. The number of bands in the Elevation Guide Bar is dependent on the number of bands identified in the feature class. There can be two, three, or four bands with the following labels:
- Two bands—Low and High
- Three bands—Low, Medium, and High
- Four bands—Low, Medium, High, and Highest
注意:
The Elevation Guide Bar element is not displayed when there is only one elevation band.
You can manually set the number of bands displayed in the Elevation Guide Bar in the Element pane. If your data is from a source that does not have the Number of Bands field defined, you must manually define the number of bands in the Element pane.
Insert an Elevation Guide Bar
Once the elevation bands feature class is created with the Generate Elevation Guide Features tool and the associated Elevation Guide map frame is active, the Elevation Guide Bar element can be inserted. Complete the following steps to insert the element:
- Ensure that a layout with a map frame is open and is the active view in your project.
- Click the Insert tab.
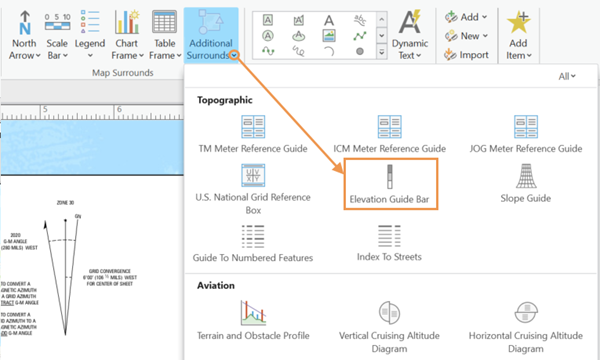
- In the Map Surrounds group, click the Additional Surrounds drop-down arrow and choose Elevation Guide Bar.

- Click the layout where you want to insert the Elevation Guide Bar.
The Elevation Guide Bar is added to the layout.
Modify the Elevation Guide Bar
You can modify the properties and appearance of the Elevation Guide Bar from the Elevation Guide Bar contextual tab, as well as the Element pane.
- Ensure that the layout that contains the Elevation Guide Bar element that you want to modify is open and is the active view in your project.
- Click the element in the Contents pane.
The Elevation Guide Bar contextual tab appears.
- Click the element's contextual tab and update the element's properties as necessary.
You can only update some of the element's properties from this tab.
- Double-click the element in the Contents pane to open the Element pane and update more element properties as necessary.
ヒント:
You can also right-click the element on the layout or in the Contents pane and click Properties
 to open the Element pane.
 - In the Element pane, click the Options tab
 and configure element options as necessary.
- Click the Map frame drop-down arrow to change the map frame associated with the element.
- Click the Layer source drop-down arrow to choose the layer that contains the elevation data for the element.
- Specify whether the element appears at a fixed height and width according to the specifications of the map product by checking or unchecking the Draw to specification check box.
If the Draw to specification check box is checked, the element cannot be resized.
- Specify whether the element automatically updates with map frame events, such as pan and zoom, based on the map frame and layer source by checking or unchecking the Update Dynamically check box.
This is unchecked by default.
- Click the Number of Bands drop-down arrow to set the number of bands displayed on the element.
- 2—Low and high bands appear in the Elevation Guide Bar.
- 3—Low, Medium, and High bands appear in the Elevation Guide Bar.
- 4—Low, Medium, High, and Highest bands appear in the Elevation Guide Bar. This is the default value.
- Optionally, adjust the element's rotation by providing a value in the Rotation text box.
- If the Draw to specification check box was not checked, specify the colors for each band in the Appearance section.
- Optionally, expand Accessibility and provide a description of the element in the Alt Text text box that assistive technologies can read when a PDF is exported.
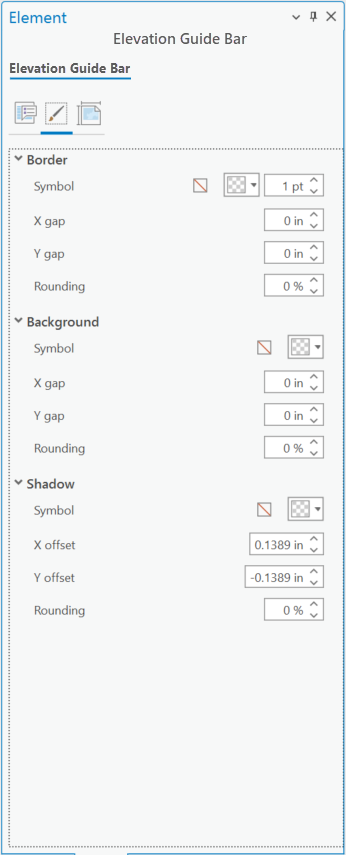
- Click the Display tab
 and set the elements appearance.
- Configure the element's border in the Border section.
- Configure the element's background in the Background section.
- Configure the element's shadow in the Shadow section.

- Click the Placement tab
 and configure the element's placement.
- Specify the element's size.
Resizing is unavailable if the Draw to specification check box on the Options tab
 is checked.
 - Specify the element's size and position.

These settings can also be set from the element's contextual tab in the Size & Position group.
- Specify the element's size.
The element is configured and modifications can continue to be made.