Scenes in ArcGIS Pro are 3D maps that can be either local (typically for small areas) or global (typically for large areas). You can share them as web scenes to your ArcGIS Online or ArcGIS Enterprise portal.
Overview
- Video length: 11:59.
- This video was created with ArcGIS Pro 3.3.
In this tutorial, you'll open a project containing a local scene. You'll convert 2D buildings to 3D, create a 3D building with editing tools, add a 3D basemap, and share the scene to your portal.
- Estimated time: 45 minutes
- Software requirements:
- ArcGIS Pro
- An ArcGIS Online or ArcGIS Enterprise account with sharing privileges
Note:
The quick-start tutorials are updated at each software release. For the best experience, use an online help version that matches your software version.
Open the project
You'll open a project that contains a scene with building footprints for a proposed mall in Cape Town, South Africa.
- Start ArcGIS Pro and sign in if necessary.
- On the start page, next to the list of recent projects, click Open another project.
Note:
If you already have a project open, click the Project tab on the ribbon. In the list of side tabs, click Open. On the Open page, click Open another project
 at the top of the page.
 - On the Open Project dialog box, under Portal
 , click ArcGIS Online
  .
.Note:
If you are signed in to ArcGIS Enterprise
 , you must set your active portal to ArcGIS Online to access the tutorial data. If you can't do this, you can download the data from a browser.
 - At the top of the dialog box, in the Search box, type Author and share a local scene v330 and press the Enter key.
- In the list of search results, click Author and share a local scene v330 to select the project package.
If there is more than one project package with this name, select the package with the Authoritative badge
 . In the Owner column, the owner name is ArcGISProTutorials. If you don't get any results, see No search results are returned.
 - Click OK.
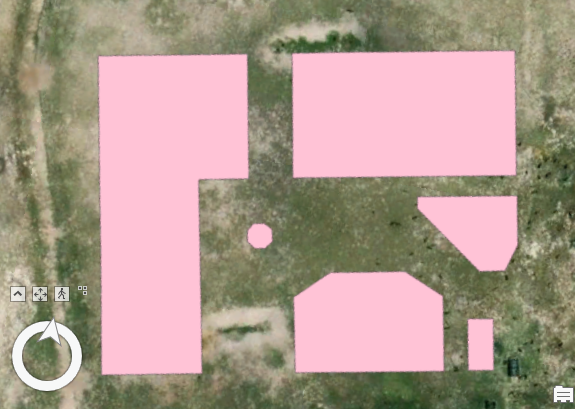
The project opens with a local scene view of building footprints for a proposed mall in Cape Town, South Africa. The scene also includes a default elevation surface layer.
Since this work takes place in South Africa, which uses the metric system, you'll confirm that the unit settings are correct.
- On the ribbon, click the Project tab.
- In the list of side tabs, click Options. On the Options dialog box, under Project, click Units.
- Expand Distance Units and confirm that the distance units are set to meters.

- Click OK on the Options dialog box.
- Click the back button at the top of the settings page.
- On the ribbon, click the View tab. In the Windows group, click Reset Panes
 and click Reset Panes for Geoprocessing.
This ensure that the Contents, Catalog, and Geoprocessing panes are open and that other panes are closed.
Extrude a layer of buildings
You'll extrude the buildings to their proposed heights. The building footprints are 2D features, so no z-values are stored in their geometry. If you know their heights from an attribute, that information can be used to extrude the buildings. Extruded features display in 3D, even though their geometry is still 2D. You will later convert the buildings to multipatch features to give them 3D geometry.
- On the ribbon, click the Map tab. In the Navigate group, click the Explore tool
 if necessary.
 - Use the on-screen navigator
 to explore the scene or use the following mouse movements:
Action Mouse movement Pan
Click and drag.
Zoom
Scroll the mouse wheel (or right-click and drag).
Tilt
Press the scroll wheel and move the mouse up and down.
Rotate
Press the scroll wheel and move the mouse from side to side.
Tip:
If you get lost and don't see your data, right-click the Building Footprints layer in the Contents pane and click Zoom To Layer
 .
.The topography displays in 3D using the values in the WorldElevation3D/Terrain3D elevation layer. However, the features in the Building Footprints layer lie flat on the surface. You'll check the layer attribute table for a height attribute you can use to extrude the buildings.
- In the Contents pane, right-click the Building Footprints layer and click Attribute Table
 .
.
The Height field stores the height of each building in meters.
- Close the table.
- In the Contents pane, confirm that the Building Footprints layer is selected. On the ribbon, click the Feature Layer tab.
- In the Extrusion group, click Type
 and click Max Height
  .
. - Click the Field drop-down arrow next to the extrusion type and click Height. Confirm that the Unit setting is Meters.

In the scene, the buildings display at the heights stored in the attribute table. Because extrusion is a 3D property, the layer moves from the 2D Layers group to the 3D Layers group in the Contents pane.
- On the Quick Access Toolbar, click Save Project
 .
.
Convert buildings to multipatch features
The extruded buildings display well in ArcGIS Pro; however, because the feature geometry is 2D, they only support 2D editing operations. To create and edit features that support 3D editing operations, you'll convert the Building_Footprints layer to multipatch geometry, which is inherently 3D. Additionally, web scenes don't support most feature extrusion types, including the Max Height type you used.
- In the Geoprocessing pane, in the search box, type Layer 3D To Feature Class. In the list of search results, click Layer 3D To Feature Class to open the tool.
- On the Parameters tab, click the Input Feature Layer drop-down arrow and click Building Footprints.
- In the Output Feature Class box, replace the default name with Buildings_3D.
Tip:
You can delete the entire path to the output feature class—it will be restored automatically.
- Check the Disable Color and Texture check box.

When the new layer is added to the map, the pink color of the Building Footprints layer will not be preserved. You'll apply different symbology to the multipatch features later.
- Click Run
 .
.The tool runs and the Buildings_3D layer is added to the scene. Both layers draw in the same space, so you see a mixture of pink and default white symbology.
Tip:
The output feature class is added to the default geodatabase. You can view the contents of the geodatabase on the Project tab of the Catalog pane. Expand the Databases container
 and expand author_and_share_a_local_scene.gdb.
 - In the Contents pane, right-click the Buildings_3D layer and click Attribute Table
 .
.In the Shape field, the geometry is MultiPatch. The descriptive attributes are the same as in the Building Footprints layer. Multipatch features don't have Shape_Length or Shape_Area fields.
- Close the attribute table.
- In the Contents pane, right-click the Building Footprints layer and click Remove
 .
. - On the Quick Access Toolbar, click Save Project
 .
.
Prepare the editing environment
The proposed plan for the mall includes six buildings that are designated as stores, dining establishments, and amenities. Recently a new building was approved that will function as a coffee stand. You will edit the Buildings_3D feature class to create the new building.
Before you begin editing, you will enable on-screen constraints, add the editing grid to your scene, and confirm that snapping is turned on. These tools will help increase the accuracy of the editing process.
- On the Map tab, in the Navigate group, click Bookmarks
 . Click the Mall bookmark.
You'll create a coffee stand feature between the luxury stores and the food court.
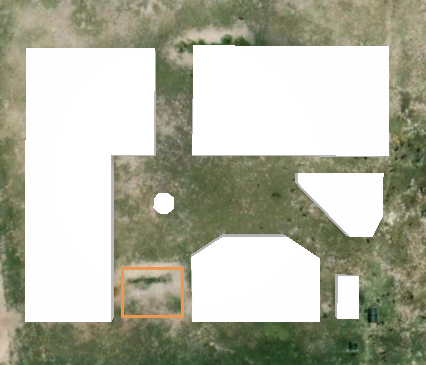
- Go to the Coffee Shop bookmark.
- Click the Constraints button
 on the status bar at the bottom of the scene view.
Constraints help you add fixed direction and distance values for your features. You will turn on the reference grid as well to help visualize the location.
- Hover over the area between the two visible buildings.
On the status bar, the elevation is around 15 meters.
Your values will be slightly different depending on the exact location of the cursor.

- In the Contents pane, double-click the scene name (Scene) to open its properties.
On the General tab, the rotation is set to -9.80. The proposed buildings, like the adjacent neighborhood buildings, are not oriented on a strict north-south axis, but the rotation makes it look as if they are. This makes editing easier.
- Click OK.
You'll turn on a reference grid and set the grid rotation to match the scene rotation.
- On the status bar, click the Grid button
 to enable the reference grid.
- Hover over the button to display the Grid pop-up menu. Make sure the check box next to Horizontal is checked. Set the Spacing to 5 m, and the Rotation to 9.8.
The grid displays partially or entirely below the surface depending on the default setting in the Elevation text box. You will set the grid elevation to be slightly higher than the average elevation around the coffee shop so that the entire grid displays as close to the surface as possible.
- In the Elevation text box, change the value to 15.4 m.
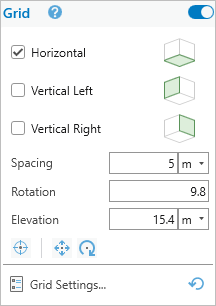
The grid now displays above the surface for the area around the feature to be created. The grid lines are faint, but you'll change their color in a moment.
- Click Grid Settings
 .
.The Editor Settings dialog box appears. The Grid tab is selected by default.
- Expand Snapping & Inference and confirm that the Snap to grid check box is checked.
- Expand Display & Visibility. Next to Grid lines, click the color drop-down arrow. On the color palette, click Black (row 10, column 1), or another color that will show up against the background imagery. Click OK.
- On the status bar, make sure that snapping is enabled.

Turning on snapping allows you to snap to the editing grid.
Create a feature
You will use a feature template to create the coffee shop feature.
- Video length: 2:33.
- This video was created with ArcGIS Pro 3.3.
- On the ribbon, click the Edit tab. In the Features group, click Create
 .
.The Create Features pane appears.
- Under Buildings_3D, click the Buildings_3D template.

The Create 3D Geometry tool
 is selected as the default editing tool for creating multipatch features.
 - Move the mouse pointer over the map.
The cursor changes to crosshairs.
- Click the intersection of the grid in the location shown below to add the first vertex.

An on-screen snap tip appears at the grid intersection when you hover over it. Note:
Your grid spacing may look different from the image, depending on the size of your scene view. It doesn't matter if your location matches the graphic exactly. However, if you make a mistake as you follow the next steps and need to start again, click Undo
 on the Quick Access Toolbar.
 - Move the mouse pointer in any direction.

As you move the mouse, a blue line connects the cursor to the last vertex you added. The constraint text box shows the distance of the line. You'll set the length to 10 meters.
- Press the Tab key to highlight the current value in the constraint text box. Type 10 and press the Enter key to fix the distance.
- Following the grid line, move the mouse pointer to the right of the first vertex. Click the intersection of the grid lines to add a second vertex.

Now that you have created the first side of the coffee shop, you will use constraints to complete a rectangle.
- Move the mouse pointer slightly away from the vertex you just added and press the Tab key. In the constraints text box, type 5 and press the Enter key.
- Following the grid line, move the mouse pointer down from the second vertex. Ensure that an angle indicator confirms that the line segments form a right angle. Click the grid intersection to add a third vertex.
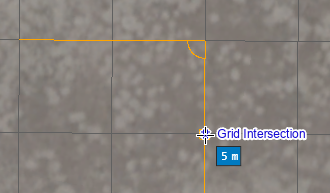
The grid spacing confirms that the constraints are working properly. The length of the first side is two grid squares, which is 10 meters, and the second side is one grid square, or 5 meters.
- Following the grid line, move the mouse pointer 10 meters to the left of the third vertex. Ensure that two angle indicators confirm that the shape is a rectangle. Double-click to complete the base of the building.

The base of the building appears as a gray rectangle. Now you must extrude it. It will be easier to see the effect if you tilt the scene.
- Click the Map tab. In the Navigate group, click Bookmarks
 . Click the Angled Editing bookmark.
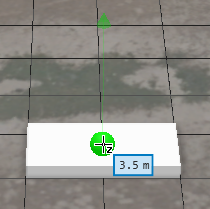
 - Hover over the shape and a green handle appears. Point to the handle until it turns red and drag it slowly upward.
Each face of a multipatch feature has its own handle, which can be used to edit the geometry. As you drag the handle, an arrow points in the direction in which the face will be extruded. In this case, it points directly up.
- While dragging the handle, press Tab and type 3.5 in the constraints box.
- Press the Enter key.

The building is now 3D and displays with a height of 3.5 meters.
- On the editing toolbar that appears near the bottom of your scene, click Finish
 .
.Note:
If the editing toolbar is turned off, press the F2 key to finish.
The new feature is selected in the scene.
- On the ribbon, click the Edit tab. In the Manage Edits group, click Save
 . Click Yes on the Save Edits prompt.
 - In the Selection group, click Clear.
- Close the Create Features pane.
- On the status bar, click the Grid
 and Constraints
  buttons to turn them off.
 - On the Quick Access Toolbar, click Save Project
 .
.
Symbolize buildings
Multipatch features can be symbolized with textures as well as colors. You'll apply a concrete texture to the buildings.
Note:
You can also use rule packages to give multipatch features a sophisticated, realistic appearance.
- On the ribbon, click the Map tab. In the Navigate group, click Bookmarks
 . Click the Mall bookmark.
 - In the Contents pane, right-click the Buildings_3D layer and click Symbology
 .
. - In the Symbology pane, next to Symbol, click the symbol (a white rectangle).

The pane displays settings for formatting mesh symbols.
- On the Gallery tab, in the search box, type buildings and press the Enter key. Expand the Procedural Symbols style, if necessary.
- Click the Multipatch Textures symbol.
You'll change the default brick texture.
- At the top of the Symbology pane, click the Properties tab. Under it, click the Layers
 tab.
tab. - Click the Texture drop-down arrow and click Concrete.

- At the bottom of the Symbology pane, click Apply.
The layer is symbolized with the concrete texture.
- Explore the mall buildings from different perspectives.
The symbology displays well in ArcGIS Pro. However, multipatch textures are not supported in web scenes unless they have been applied using the Layer 3D To Feature Class geoprocessing tool. Earlier, you ran this tool to convert 2D polygon features to multipatch geometry. Now you'll run it again to preserve the texture symbology when you share the scene to your portal.
- Make the Geoprocessing pane active.
The Layer 3D To Feature Class tool is still open with its previous settings.
- On the Parameters tab, click the Input Feature Layer drop-down arrow and click Buildings_3D.
- In the Output Feature Class box, replace the name with Concrete_Buildings.
- Uncheck the Disable Color and Texture check box.

When the box is unchecked, the symbology of the input layer will be preserved in the output layer. This ensures that the concrete texture will be applied to the buildings when you share the scene.
Note:
At the top of the pane, a banner message informs you that there are no pending edits. The message appears when a tool's input layer has been edited in the current session. (If there were unsaved edits, the message would state that.)
- Click Run
 .
.The tool runs and the Concrete_Buildings layer is added to the scene. On the map, it looks the same as the Buildings_3D layer. The Concrete_Buildings feature class is added to the author_and_share_a_local_scene geodatabase.
- In the Contents pane, right-click the Buildings_3D layer and click Remove
 .
.Because of the World Elevation 3D layer, the scene displays elevation. However, the imagery basemap is 2D and the houses in the neighborhood of the planned mall are a flat picture. You will add a 3D basemap to enhance the scene. 3D basemaps are designed for local and global scenes and include 3D layers of buildings and trees.
Note:
Your active portal must be set to ArcGIS Online in order to use a 3D basemap. If your active portal is set to ArcGIS Enterprise, you can continue using the current basemap and go to the next section.
- On the Map tab, in the Layer group, click Basemap
 . Under 3D Basemap, click Topographic.
The new basemap is composed of a 2D topographic basemap and 3D layers of buildings, labels, and trees.
- Pan and zoom around the scene to see the 3D basemap features.

- On the Quick Access Toolbar, click Save Project
 .
.
Add attribute values
In the Concrete_Buildings layer attribute table, the new coffee stand feature has null values for its attributes. You will add the values manually.
- In the Contents pane, right-click the Concrete_Buildings layer and click Attribute Table
 .
.
- In row 7, in the Name field, double-click the <Null> value. Type Coffee Stand, and press the Enter key.
- In the Type field, double-click the <Null> value, type Dining, and press the Enter key.
- In the Height field, double-click the <Null> value, type 3.5, and press the Enter key.

- On the ribbon, click the Edit tab. In the Manage Edits group, click Save
 . Click Yes on the Save Edits prompt.
 - Close the attribute table.
Set scene properties
Before sharing a map or scene to your ArcGIS Online or ArcGIS Enterprise portal, you have to change the coordinate system to match the coordinate system of your basemap. In this case, that is WGS 1984 Web Mercator. Because this coordinate system significantly distorts the spatial property of area, it is not ideal for mapping. You will make a copy of your scene to share, and keep the original in case you need to make more changes later. Before sharing the scene, you’ll set a number of scene properties, including the coordinate system.
- In the Catalog pane, on the Project tab, expand Maps
 . Right-click Scene and click Duplicate
  .
.You now have a copy of your scene. You will close and rename the original scene.
- Click Close
 on the Scene view tab.
The scene can be reopened from the Catalog pane later if more edits are needed. You will rename it and open the copy to share.
- In the Catalog pane, right-click Scene and click Rename
 . Type Local Projection and press the Enter key.
 - In the Catalog pane, right-click Scene1 and click Open Local View
 .
.The scene opens and is identical to the original.
- In the Contents pane—not the Catalog pane—double-click the scene name to open its properties.
- On the Map Properties dialog box, click the General tab. In the Name box, replace the default name with Strandfontein Mall.
- Check the Allow assignment of unique numeric IDs for sharing web layers check box.
Checking the box assigns a layer ID to each layer in the scene based on drawing order. For example, the Buildings_3D layer now has an ID of 0. The ID of each layer appears on the General tab of its Layer Properties dialog box. Layer IDs keep track of layers once they are shared to the web and maintain the integrity of web maps, web scenes, and web apps when they are modified and overwritten.
- Optionally, click Apply.
It isn't necessary to click Apply because every change you make in the Map Properties dialog box is saved when you click OK. However, clicking Apply allows you to see a change reflected immediately on the map. This is useful when you are making several changes and want to confirm the effect of a change before committing other changes.
- Click the Metadata tab and fill in the following fields as shown below. Use commas to separate tags.
- Title—Strandfontein Mall
- Tags—buildings, South Africa
- Summary—The construction site of a new mall in South Africa.
- Description—3D view of a new mall construction site in Cape Town, South Africa.
When you share the scene, this metadata appears on the web scene's item details page.
You'll set a date and time for the scene and display realistic shadows.
- Click the Illumination tab. Under Shadow, check the Display shadows in 3D check box.
- Under Illumination defined by, click the Date and time option.
- Click the calendar button
 . Set a date and a daylight time that you want.
 - Click the time zone drop-down arrow and click (UTC +2:00) Harare, Pretoria.
- Click the calendar button
- Click the Coordinate Systems tab.
The scene's current XY coordinate system is Hartebeesthoek94 Lo17 (E-N).
- Expand Layers and expand each of the three layer headings.
The layers are in different coordinate systems.
- The Concrete_Buildings layer is in the Hartebeesthoek94 Lo17 (E-N) coordinate system.
- The Buildings, Places and Labels, and Trees layers are in the WGS 1984 geographic coordinate system. These layers are part of the 3D basemap.
- The topographic basemap and elevation surface layer are in the WGS 1984 Web Mercator coordinate system.
These different coordinate systems are reconciled through on-the-fly projection so that the data aligns properly. However, when you share a local scene to the web, its coordinate system must match the coordinate system of the basemap and elevation surface layers.
At this point, the scene's current XY coordinate system has been reset to WGS 1984 Web Mercator, assuming this system is selected under Layers.

- Confirm that the current XY coordinate system is WGS 1984 Web Mercator (auxiliary sphere). Click OK.
The scene redraws in the new coordinate system.
- On the Map tab, in the Navigate group, click Bookmarks
 . Under Strandfontein Mall Bookmarks, click the Mall bookmark.
Your shadows may look different depending on the time of day you chose in the illumination settings. - On the Quick Access Toolbar, click Save Project
 .
.
Share the web scene
You're ready to share the scene to the web. You must be signed in to an ArcGIS Online or ArcGIS Enterprise portal with an account that has the privilege to publish hosted web layers.
- On the sign-in menu on the ArcGIS Pro title bar, confirm that you are signed in to a portal.

- On the ribbon, click the Share tab. In the Share As group, click Web Scene
 .
.The Share As Web Scene pane appears. On the Scene tab, under Item Details, the name, summary, and tags you added to the scene metadata are displayed.
- Modify the name to include your name or initials.
When you share a web scene, a web scene layer is created with the same name as the scene. Web scene layers in your ArcGIS organization must have unique names; giving the scene a unique name prevents potential conflicts.
- Optionally, under Location, click the drop-down arrow and choose a folder in My Content in which to store the web scene.
You can also create a folder by typing a name in the input box. If you don't specify a folder, the web scene is saved at the root level of your content.
- Optionally, under Share with, check the appropriate boxes if you want to share the scene with everyone, with members of your ArcGIS organization, or with any groups to which you belong.
- At the top of the pane, click the Content tab.
On the New Content tab
 , you see the portal content that will be created when you share the scene.
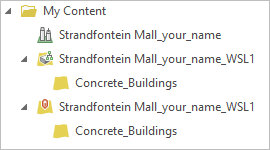
The content consists of the Strandfontein Mall web scene and the Strandfontein Mall_WSL1 scene layer. The scene layer is shared as a 3D object scene layer
 with an associated feature layer
  that supports editing and other capabilities.
 - Next to the New Content tab, click the Existing Content tab
 .
. On this tab, you see existing web layers that will be included in the scene: the elevation layer, the Buildings, Places and Labels, and Trees layers, and the Topographic basemap layer.
- At the bottom of the pane, under Finish Sharing, click Analyze to check for warnings or errors.
There shouldn't be any warnings or errors.
- Click Share.
- Optionally, click Jobs to monitor the sharing status in the Job Status pane.
When the web scene is successfully shared, a blue message appears at the bottom of the Share As Web Scene pane. At this point, you can open the web scene in Scene Viewer; however, the web scene layer is still being cached and may not draw fully. When the web scene layer finishes caching, the blue message is replaced by a green message to show that the process is complete.

- When the green success message appears, click the Manage the web scene link in the message.
A browser tab or window opens.
- If prompted, sign in to your portal to open the web scene's item details page.
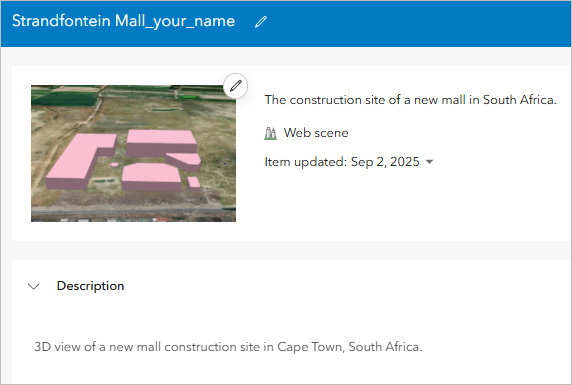
The metadata you added in ArcGIS Pro appears on the page. You can edit this information on the item details page if necessary.
- Click Open in Scene Viewer.

When the web scene opens, the buildings display with the concrete textures you applied in ArcGIS Pro.
At the bottom of the scene, the Slide Manager overlay shows slides for each of the bookmarks in your scene.
- Optionally, delete the slides.
- On the Contents (dark) toolbar, click Slide Manager
 . For Mall, click the remove slide button
  .
. - Repeat this step for the Coffee Shop and Angled Editing slides.
- On the Contents (dark) toolbar, click Slide Manager to close the pane.
- On the Contents (dark) toolbar, click Slide Manager
- Use the Scene Viewer navigation tools that appear when you hover over the scene to view the scene from different perspectives.
Tip:
The default mouse button actions in Scene Viewer are different from ArcGIS Pro. On the Settings (light) toolbar, click Settings
 to see the default actions. Optionally, click the ArcGIS Pro option to change the mouse behavior.
 - Click a few buildings to see their pop-ups.

- On the Designer (dark) toolbar, click Save
 . On the Save scene window, click Save.
On the toolbar, the Save button has a blue dot on it when there are unsaved changes in the scene.
- At the top of the page, next to the scene name, click the options button
 and click Content.
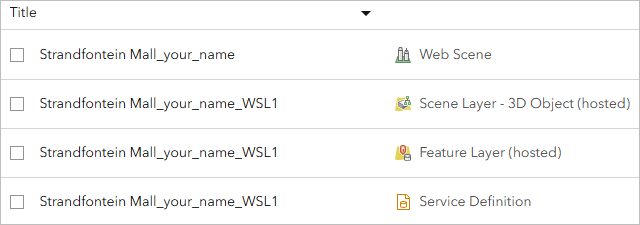
You see the content that was created when you shared the scene: a web scene, a scene layer with its associated feature layer, and a service definition, which contains publishing specifications for the scene layer. You can add the scene layer to other web scenes.
In this tutorial, you created a local scene. You extruded buildings based on their attributes and converted the buildings to multipatch features. You used editing tools to create a new feature and edit its attributes. You added metadata and changed the scene's properties. You symbolized the buildings using procedural symbology. After authoring the scene, you shared it to your portal and displayed it in Scene Viewer.
