A raster function template is like a model. A raster function template can contain one or more raster functions chained together to produce a processing workflow.
You build a raster function template using the Function Editor and the Raster Functions pane. The Function Editor is similar to ModelBuilder, except that you create your template with raster functions instead of geoprocessing tools.
In coordination with the Raster Functions pane, which provides access to the functions to build your workflows, the Function Editor comes with its own set of tools, which are available on the mini toolbar at the top of the Function Editor window.
Tools in the Function Editor
| Icon | Name | Description |
|---|---|---|
 | Pan | Move around the diagram. |
 | Fixed Zoom In | Zoom in by a fixed factor. |
 | Fixed Zoom Out | Zoom out by a fixed factor. |
 | Auto Layout | Automatically arrange the elements in the diagram. |
 | Fit to Window | Fit the entire diagram within the visible view of the window. |
 | Insert Python Raster Function | Insert a Python raster function by importing a script file (.py). |
 | Add Raster | Add an input raster dataset to the diagram. |
 | Add Constant | Add an input constant value representing a constant raster. |
 | Add Raster Variable | Add a raster variable, which is a default value that can be changed. |
 | Delete | Delete the selected elements in the diagram. |
 | Save | Save the raster function template to the Project category or Custom category section of the Raster Functions pane. |
 | Save As | Save the raster function template with a new name and location. |
 | Edit Properties | Edit the properties of the current raster function template. |
 | Raster Functions | Open the Raster Functions pane. |
Build a raster function template
The following steps show how to create, save, and use a raster function template.
Open the Function Editor
On the Imagery tab, click the Function Editor button  , which is located in the Analysis group on the Imagery tab.
A new blank Raster Function Template view opens. The template is temporary until you save it to your Project category or Custom category in the Raster Functions pane. You can resize, dock, or tile the function editor view in any position, just as you can adjust a map view.
Add raster functions
Raster functions are fundamental building blocks of your raster function template. There are many raster functions you can use for your imagery and raster related tasks. Once you know the functions needed for your task, you can add those functions to a raster function template.
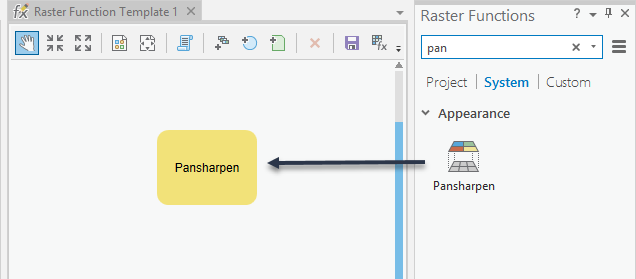
To add a function to your raster function template, drag the function from the Raster Functions pane into the template. Optionally, you can right-click any function or template and click Add to Function Editor. The raster function is added to the function template and displays as a yellow rounded rectangle.
Add raster variables
A raster function template shows a workflow with raster functions and variables connected together. The raster variable is a placeholder for a raster dataset that the end user can specify. In the workflow, you need to specify which raster functions will process each variable.
First, you need to add a raster variable  . Then you need to connect the raster variable in the template directly to a function by drawing a connection between
them. You can also connect the output of one function as input into
the next function to continue building your workflow.
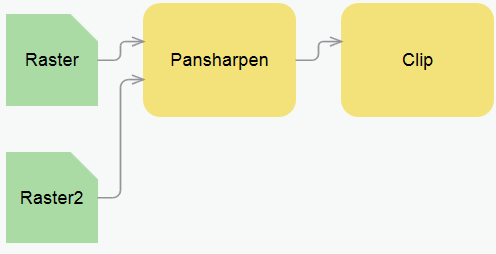
The following diagram shows two raster variables that are used in the Pansharpen function. The output of the Pansharpen function will be used as the input for the Clip function.
Resize and move elements
To resize any model element, select the element and drag any of its handles. To move any model element, select it, hover over the middle of the element until the move pointer  appears, and drag the element to a location in the template.
Change function parameters
Double-click the Pansharpen function to open the function property page. You can edit parameters on the Parameters tab. After specifying your parameters, click OK to close the Properties window. The function does not run when you click OK, it only saves the function settings.
Tip:
Another way to access the function properties is to right-click the function and click Properties.
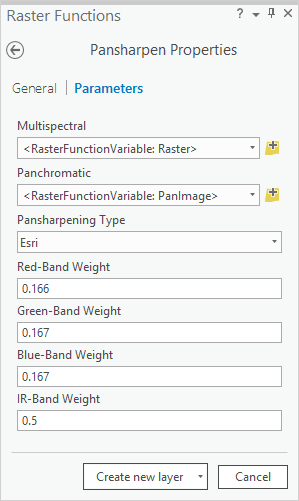
The General tab can be used to change the name or description of the function. This is useful when you create a raster function chain with multiple functions. The name of the function can be used to describe what the function does, so anyone that uses the function can understand how the function chain is used.
Expose function parameters for an end user
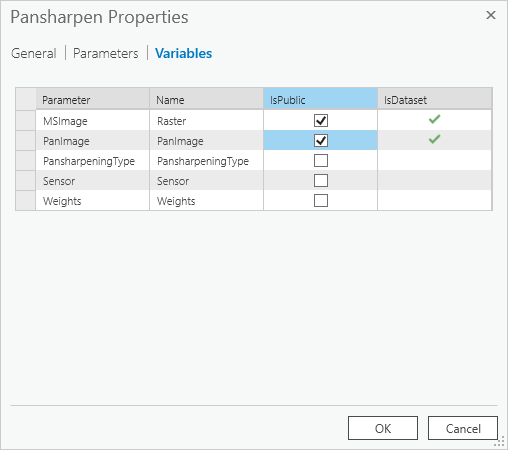
Double-click the Pansharpen function to open the function property page. You can set parameters on the Variables tab to be public. Here you can also rename things such as the variable name to provide additional context for an end user.
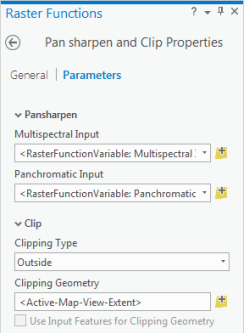
In the following screen shot, the two raster inputs will be shown to an end user. The automatically generated user interface will use the names specified in the Name field. The Name field has been edited in this example. It's not a requirement to rename the Name field, but it will be helpful to anyone that will use the template.
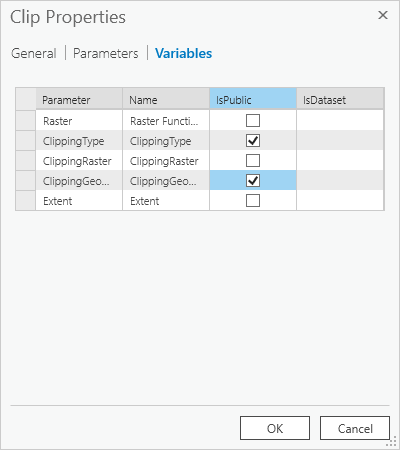
The Clip function also has Clipping Type and Clipping Geometry set to be public variables. This allows a user to change the layer used to perform the clip and determine whether to clip out the border or keep only the border.
Save the raster function template
You can save changes to any template that is
open in the Function Editor. Click Save  to save
the raster function. If you are editing an
existing template, click Save As
  to save the template with a
different name or to a different category.
When you save a raster function template, the contents of all variables and parameters are saved as well as the appearance and layout of the model diagram. You cannot save templates to the System tab of the Raster Functions pane. You must save them to the Project or Custom tab.
Apply a raster function template
When an end user opens the template, it opens to a pane showing what parameters have been set to public and will require the inputs to be specified. The following example template has four parameters set to public: two from each of the functions. Parameters are automatically grouped under each function in the chain that has public variables.
