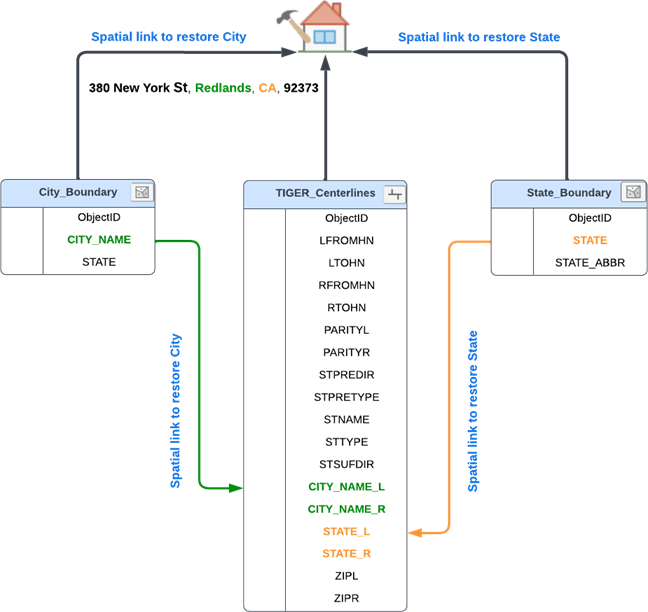
The Create Locator geoprocessing tool allows you to build a locator that combines multiple reference data layers and locator roles to create a single multirole locator to search for multiple locations at once. Creating a multirole locator also allows you to restore missing attributes in the primary address data, such as city or state as in the case for United States Census TIGER Address Range Feature street centerlines data (addrfeat.shp). The TIGER Address Range Feature street data includes the full street name in a single field and the ZIP code in another field, so searching for an address will not return a match that includes the city or state. To include the city and state in the geocode results for street addresses and enhance searches for state highways, build a multirole locator consisting of Street Address, City, and State roles. The city and state attributes are restored from the polygon data for the City and State roles using spatial linking.
The diagram below shows how the roles used to build the locator described above are connected to the TIGER data and the minimal fields that should be mapped for each role. The City_Boundary layer is used as the reference data for the City role, and the value from the CITY_NAME field is restored in the geocode result when searching for a street address. The State_Boundary layer is used as the reference data for the State role and the value from the STATE field are restored in the geocode result when searching for a street address.

Prepare streets data by splitting address field
The following workflow uses the Split Address Into Components tool to prepare the street data by splitting the full street name into individual components stored in multiple fields before building a multirole locator.
- On the Analysis tab in the Geoprocessing group, click the Tools button
 .
.The Geoprocessing pane appears.
- Select the Split Address Into Components tool.
- In the Geoprocessing pane, click the Toolboxes tab.
- Click Geocoding Tools in the list of geoprocessing toolboxes.
- Click Data Preparation in the list of toolsets.
- Click the Split Address Into Components tool in the list of data preparation tools.
- In the Split Address Into Components tool pane, click the Country or Region drop-down, and choose United States.
Select the country or region of the reference data to format if the data is outside of the United States.
- Select TIGER_Centerlines for the Input Address Data parameter.
- Select FULLNAME from the drop-down menu for the Input Address Fields parameter.
- Modify the Output Address Data parameter to rename the output data TIGER_CenterlinesSplit.
- Click Run
 .
.
Build multirole locator with spatial linking
Use the steps below to build the locator.
- Select the Create Locator tool.
- In the Geoprocessing pane, click the Toolboxes tab.
- Click Geocoding Tools in the list of geoprocessing toolboxes.
- Click the Create Locator tool in the list of geocoding tools.
- In the Create Locator tool pane, click the Role drop-down list, and choose the Street Address role.
- Click the Browse button next to the Primary Table(s) text box.
- Browse to the TIGER_CenterlinesSplit streets layer.
- In the Field Mapping portion of the tool, select the appropriate field from the Alias Name drop-down menu for each relevant field name in the Role: Street Address section to map the fields.
- Click the Role drop-down list, and choose the City role.
- Click the Browse button next to the Primary Table(s) text box.
- Browse to the City_Boundary polygon layer.
- In the Field Mapping portion of the tool, select the appropriate field from the Alias Name drop-down menu for each relevant field name in the Role: City section to map the fields.
- Click the Role drop-down list, and choose the State role.
- Click the Browse button next to the Primary Table(s) text box.
- Browse to the State_Boundary polygon layer.
- In the Field Mapping portion of the tool, select the appropriate field from the Alias Name drop-down menu for each relevant field name in the Role: State section to map the fields.
- Specify a name for the locator in the Output Locator parameter.
- Select English from the Language Code drop-down menu.
- Click Run
 .
.
The workflow above describes how to build a locator using TIGER centerline data that has missing administrative zones (city, state, neighborhood), but the steps can be applied to building a locator using data for any of the primary locator roles (Point Address, Street Address, Parcel, POI, Distance Marker, Distance Range) that are missing zones.
Access TIGER/Line shapefile data and TIGER/Line shapefile technical documentation.