ArcGIS Pro has a common navigation experience between map and scene views. When working with 3D content—such as cities, surfaces, lidar, and subsurface data—you will be creating and exploring scenes, which require you to manipulate the perspective of the view in 3D. These skills may not be naturally inherent to you if you are used to only working in a map.
A series of functionality is built into one primary tool, the Explore tool  . This tool is used in all views for 2D and 3D navigation; however, there is added functionality for 3D, including rotate and tilt.
3D navigation tasks include panning to a particular study area, zooming to a selected feature, or interactively roaming through your data. However, you will often want to navigate while selecting, measuring, or editing your features. This can be done by combining keyboard shortcuts with the Explore tool.
Standard navigation versus planar navigation in 3D
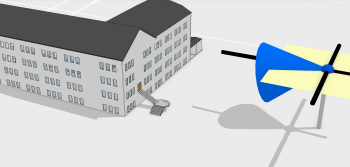
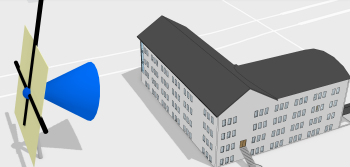
With standard 3D navigation, you can move and orient the camera in any direction at any time. Panning through the scene in this state moves the camera physically through the geography of the scene, adjusting the X,Y location of your viewpoint in a similar way to panning across a 2D map. This is the default navigation experience.
Optionally, you can use planar navigation mode, where the camera is constrained to a single plane to limit the viewing angle and distance. Panning through a scene in this state feels like moving the camera across the screen display. Planar navigation is a useful way to explore content with a one-dimensional non-horizontal orientation such as the side of a building or a geologic rock face. Use planar navigation by checking Planar Navigation in the Explore tool drop-down menu on the Map tab.


Use your mouse buttons with the Explore tool
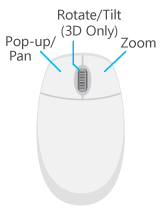
When using the Explore tool for map or scene navigation, your mouse buttons control the built-in functionality to navigation tools commonly used.
- Left mouse button—A single click allows you to identify features with an instant pop-up window. Drag to pan around the view. In standard navigation, dragging pans across the physical geography. In planar navigation mode, panning is across the screen's display.
- Right mouse button—Drag to zoom in and out continuously.
- Wheel button—Drag to tilt your view or rotate around the point you clicked. Rotate the wheel to zoom in and out.

How does navigation in 3D work?
All the 3D navigation methods operate by manipulating the view in x,y,z. Consider it like a helicopter that hovers in place in the sky but can still turn to get a view in any direction. You can also fly the helicopter forward, backward, up, and down to get a closer look (that is, zoom in).
Become familiar with navigating in 3D
To help you become familiar with navigating a 3D environment, try sampling different datasets, especially elevation data or data with 3D symbology so you have the opportunity to explore a more realistic 3D view.
You can also try the Navigate maps and scenes tutorial to familiarize yourself with how to use the mouse buttons with the Explore tool to manipulate the 3D view. It allows you to test your skills with tilt, rotate, and roam, as well as various keyboard shortcuts that can help you with navigation. For example, you can press B to look around, and you can access the Explore tool at any time by holding C when you are in another task, such as selecting or editing features. This is a convenient way to stay working in the view, alter the perspective, and continue to make edits or modifications.
Navigate underground
Below-ground navigation is disabled by default for the layers in a scene to avoid navigating underground accidentally. If a scene contains underground data such as geology or pipelines, enable this capability. In the Contents pane, highlight the Ground elevation surface. On the Appearance tab, in the Surface group, check Navigate Underground.
To navigate underground with higher precision, consider using the on-screen navigation control.
Task-based navigation in 3D
You can also navigate the 3D view without interactive tools using the options below. The difference is that you are not actively navigating the view with the mouse; rather, you click a button or use a menu option to perform a method of navigation.
- Zoom to the full extent of your data—Press the Insert key or click Full Extent
 on the Map tab.
 - Zoom to the extent of one or more layers using the layer's context menu—Right-click the layers in the Contents pane.
- Use a selection query such as Select Layer By Attribute and zoom to the selection set—Click the selection results listed at the lower right of the view or click Zoom to Selection
 on the Map tab. Zooming to a single selected feature will zoom
to its full geometry, however, when zooming to a single selected point, the view will zoom in a fixed percentage.
 - Create and consume a set of bookmarks for the 3D view so you can navigate quickly to saved extents.
- Adjust the 3D height above ground by typing a value in the height control at the bottom of the view.
- Use the Locate tool search results.
Change elevation units
When working with a scene, the height list in the bottom corner of your view displays your viewing height relative to the ground.

Note:
Elevation units are derived from the units for the project. Click Projects and click Options, then select the Units page. To add a new unit, click <Select Unit Code> and choose from the list of all available units. To remove, format, or make a unit the default, right-click the unit.