插图

使用方法
该工具旨在结合生成边匹配链接工具使用。该工具以生成边匹配链接工具创建的输入链接要素为指导,在空间上调整输入线的形状,这样输入线便可与沿着边缘区域的相邻线要素进行正确连接。输入链接要素必须具有 SRC_FID 和 ADJ_FID 字段。
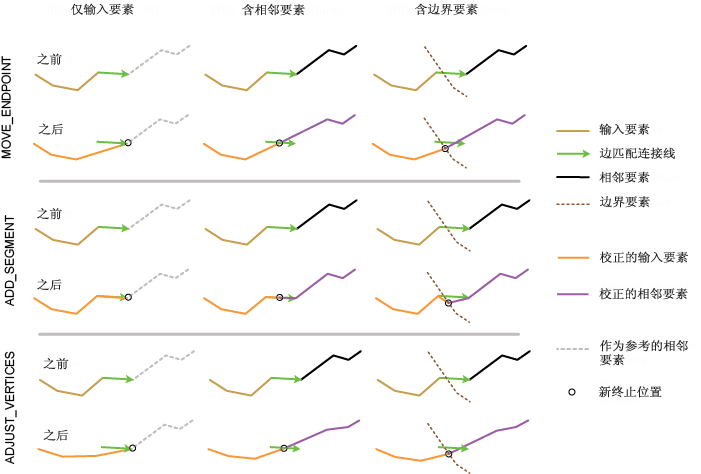
该工具从边匹配链接获取新的连接位置,然后对相应要素进行修改,使其端点连接到新的位置。根据所提供的输入(输入要素、相邻要素和边界要素),相应地确定新的连接位置,并调整相关要素。此调整可确保连接匹配的要素,如下所述:
- 如果仅提供输入要素,则边匹配链接的端点将视为新的连接位置。对边匹配链接相关的输入线(即要素 ID 与链接的 SRC_FID 值相匹配)进行调整,从而使输入线的端点位于链接端点处。这样可确保输入线与所需相邻要素互相连接,这些要素应该已参与边匹配链接的生成。
- 如果同时提供输入要素和相邻要素,则边匹配链接的中点将视为新的连接位置。将同时对相关的输入线和相关的相邻线(即,其要素 ID 与链接的 ADJ_FID 值相匹配)进行调整,从而使其端点连接到链接的中点。
- 如果指定边界要素,则该工具将距离边匹配链接中点最近的边界位置用作新的连接位置。输入要素和相邻要素(如果指定)都会经过调整,从而使这些要素的端点连接到计算出的边界位置。
Method参数具有三个边匹配选项用来调整要素。如上所述,每个选项仅适用于输入要素,或者同时适用于输入要素和相邻要素。
- 移动端点(Python 中的 MOVE_ENDPOINT)- 将输入线的端点移动到新的连接位置。
- 添加段(Python 中的 ADD_SEGMENT)- 在输入线端点处添加直线段,从而使输入线端点位于新的连接位置。
- 调整折点(Python 中的 ADJUST_VERTICES)- 将线端点调整至新的连接位置。同时也会对其余折点进行调整,从而使这些折点的位置变化朝着线的另一端逐渐减少。
警告:
此工具会修改输入数据。有关详细信息以及避免数据被意外更改的策略,请参阅修改或更新输入数据的工具。
注:
所有输入必须处于同一坐标系。
语法
arcpy.edit.EdgematchFeatures(in_features, in_link_features, {method}, {adjacent_features}, {border_features})| 参数 | 说明 | 数据类型 |
in_features | 要进行调整的输入线要素。 | Feature Layer |
in_link_features | 表示边匹配链接的输入线要素。 | Feature Layer |
method (可选) | 仅将输入要素或同时将输入要素与相邻要素调整至新连接位置的边匹配方法。
| String |
adjacent_features (可选) | 与输入要素相邻的线要素。在经过指定的情况下,输入要素与相邻要素会调整为在新连接位置相连接,新连接位置将是边匹配链接的中点或与边界要素的链接中点距离最近的位置(如果指定)。 | Feature Layer |
border_features (可选) | 表示输入要素与相邻要素之间边界的线要素或面要素。指定边界要素时,输入要素与相邻要素都会调整至在距离边界要素的链接中点最近的新连接位置相连接。 | Feature Layer |
派生输出
| 名称 | 说明 | 数据类型 |
| out_feature_class | 更新后的输入要素。 | 要素图层 |
代码示例
以下 Python 窗口脚本演示了如何在即时模式下使用 EdgematchFeatures 函数。
import arcpy
arcpy.env.workspace = "C:/data"
arcpy.EdgematchFeatures_edit("cityA_Roads.shp", "em_Links.shp"
"MOVE_ENDPOINT")以下独立 Python 脚本演示了如何在脚本环境中应用 EdgematchFeatures 函数。
# Name:        EdgematchFeatures_example_script2.py
# Description: Performs edgematching spatial adjustment using links produced by
#              GenerateEdgematchLinks. The links go from input features to adjacent
#              features. The links are then checked for intersecting conditions, which
#              might not be desired; they are finally used to adjust input features
#              (a copy is made) to connect with the matched adjacent feautures.
# Author:      Esri
# -----------------------------------------------------------------------

# Import system modules
import arcpy
from arcpy import env

# Set environment settings
env.overwriteOutput = True
env.workspace = r"D:\conflationTools\ScriptExamples\data.gdb"

# Set local variables
inFeatures = "roads1"
adjFeatures = "roads2"
gelOutput = "gelinks_out"

search_distance = "200 Feet"
match_fields = "NAME ROAD_NAME"

qaLocations = "qa_locations"

# Generate rubbersheet links
arcpy.GenerateEdgematchLinks_edit(inFeatures, adjFeatures, gelOutput, search_distance, match_fields)

# ====================================================================================
# Note 1:  The result of GenerateEdgematchLinks may contain errors; see tool reference.
#          Inspection and editing may be necessary to ensure correct links before using
#          them for edgematching.
#
#          One of the possible errors are undesired intersecting or touching links.
#          Their locations can be found by the process below.
# ====================================================================================

# Find locations where links intersect or touch; the result contains coincident points
arcpy.Intersect_analysis(gelOutput, qaLocations, "", "", "POINT")

# Delete coincident points
arcpy.DeleteIdentical_management(qaLocations, "Shape")

# ====================================================================================
# Note 2:  At this point you can manually inspect locations in qaLocations; delete or
#          modify links as needed.
# ====================================================================================

# Make a copy of the inFeatures for edgematching
inFeature_Copy = inFeatures + "_Copy"
arcpy.CopyFeatures_management(inFeatures, inFeature_Copy)

# Use the links to adjust the copy of the input features
arcpy.EdgematchFeatures_edit(inFeature_Copy, gelOutput, "MOVE_ENDPOINT")许可信息
- Basic: 否
- Standard: 否
- Advanced: 是