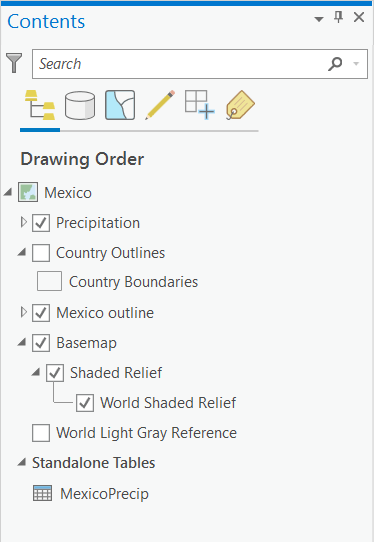
The layers and tables in a map or scene are listed in the Contents pane. Use this pane to manage the display of layers, organize content into groups, and control other layer properties.

Under View, in the Windows group, click Contents  to reopen the pane if necessary.
Use the tabs at the top of the Contents pane to view the contents of the map or scene in different ways:
Drawing Order  | Arrange the layers in the order in which they display on the map. Layers at the top of the list draw above those below them. Drag a layer to position it in a different order in the list. Use the check box next to each layer to control visibility. The drawing order of the layers and tables in the pane is preserved each time the project is saved. You cannot return to a prior state of the drawing order within a session. Tip:Press Ctrl while clicking to check or uncheck visibility for all layers simultaneously. In a scene, use the drawing order to organize layers into the 2D Layers or 3D Layers category. |
Data Source  | Group and manage layers and tables by their data sources. |
Selection  | Organize which layers allow selection. When a selection is made, the number of features selected is shown next to the layer name. Some layers, such as raster layers, do not allow interactive selection. These layers are listed without a selection check box on this tab. |
Editing  | Organize which layers and tables can be edited. |
Snapping  | Organize which layers can participate in snapping while working with tools that support snapping, such as those for editing and measuring features. |
Labeling  | Organize the visibility of label classes for each layer. Expand each layer to view the label classes, duplicate label classes, reorder them, access the labeling properties for each label class, copy and paste the labeling properties between label classes, and change label properties for multiple label classes at the same time. Click the feature layer to select all of its label classes. |
Filter and search the Contents pane
Maps and scenes that contain many layers and tables can get unwieldy to manage. Use filtering and searching to better organize and manage these items.
Use the Search box at the top of the Contents pane to search for items by name.
Click the Filter button  to limit the list in the Contents pane to only items that meet certain criteria. The filters available in a map differ depending on the contents or settings of the map. Some possible filters are listed below:
- All layers (this is the default)
- Visible layers
- Not visible layers
- Layers with a visibility range set
- Active definition queries
- Stand-alone tables
- Empty feature layers
- Time-enabled layers
- Range-enabled layers
- Layers with display filters enabled
Additional layer management
There are many commands and actions available from the context menus on the Drawing Order tab  of the Contents pane while viewing the layers. Right-click a layer or the map or scene to access these.
Layer properties and commands
These commands on the context menus of layers differ by the type of layer, but the following are a few common commands used with feature layers:
- Set layer properties and metadata
- Group and ungroup layers
- Choose the layer symbology
- Enable labeling and set labeling properties
- Set selection options
- Open the attribute table
Map and scene properties and commands
Right-click the name of the map or scene in the drawing order list to access commands related to the whole map or scene, including the following:
- Set the map properties and metadata
- Reorder layers
- Set labeling properties
- Set a reference scale