You can view details for the entities and relationships in a knowledge graph using the investigation view's details panel.
View details for an entity
When you select an instance of an entity in the investigation's contents list, the details panel provides in-depth information on different tabs that list all properties of the entity, the relationships in which it participates, documents describing it, and provenance records documenting where information about the entity originated. A customizable Overview tab provides a summary of important information about the entity. Collectively, the information in the details panel can help you understand the selected entity's context.
When many entities are selected, the Overview tab does not summarize information for all selected entities. However, other tabs display values that all selected entities have in common. For example, on the Properties tab, if all selected Vehicle entities have the same value for the year property, that year is displayed. Text such as (Different Values) appears if at least one selected entity has a different value for that property.
- Click an entity type in the Contents pane and click an entity in the contents list to view information about it in the details panel.
The display expression and entity type are shown at the top of the details panel. For example, if the type of entity represents a person, a display expression might show the person's name. Under the display expression, the Overview tab is selected in the details panel. By default it lists all properties of the selected entity, but it can be customized for each entity type to display a suitable summary.
- Resize the investigation view's details panel so you can see both the panel and the contents list by dragging the divider between them.
You can also use the buttons on the divider to use all the space in the investigation view for either the details panel or the contents list.

- Click the Properties tab in the details panel.
The Properties tab lists all properties of the selected entity. For example, an entity of type Person might have properties such as first name, last name, birth date, height, and phone number. Property names appear in the Names column, the data type of the property appears in the Type column, and property values appear in the Values column. If the person's height is unknown and therefore a value has not been set for this property, the text <Null> appears in the Values column.

- Click the Relationships tab in the details panel.
All relationships defined between the selected item and other entities in the knowledge graph are listed. Each relationship's type appears in the Relationship column. The direction of the relationship appears in the Direction column. The entity with which the selected item is associated is shown in the Entity column.
For example, if the selected entity has the type Person, it might have a relationship such as HasVehicle. The direction would be forward
 from the person to the car, and an expression identifying the car entity would appear in the Entity column.
Similarly, if the selected entity has the type Vehicle, it might have multiple HasVehicle relationships listed in various rows where each row identifies a co-owner of the car. The direction would be backward
 from the person to the car, and an expression identifying each Person entity would appear in the Entity column for the appropriate row.
 - To get more information about a relationship or a related entity, hover over the relationship in the Relationship column or the entity in the Entity column.
An Open button
 appears.
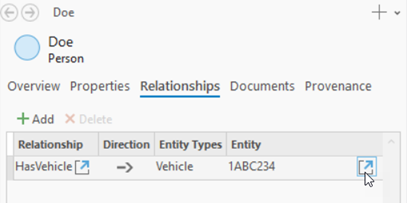
- Click the Open button
 for the relationship or related entity.
Details for the relationship or related entity appear in the details panel. The location bar updates at the top of the panel to indicate how you got there. For example, if you started with a Person entity, and you opened the related Vehicle entity to get more information about the car, the location bar shows the display name for the original entity, the relationship that was traversed, and the display name for the related entity.
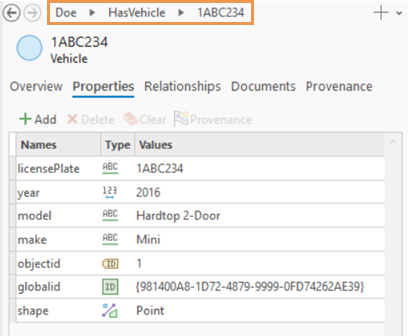
- Click an entry in the location bar at the top of the details panel to see details for a relationship that was traversed or a related entity.
In the above example, you would click the HasVehicle relationship to see the relationship's details.
Properties of the entity or relationship are displayed in the details panel. The location bar is updated to show where you currently are with respect to the selected item in the investigation's contents list.

- Click the Back button
 to return to the description of the entity selected in the contents list.
The Forward button
 becomes enabled, allowing you to retrace your steps.
 - Click the Documents tab in the details panel.
All documents associated with the currently selected entity are listed. Each document's file name appears in the Name column, and the document's type appears in the Type column.
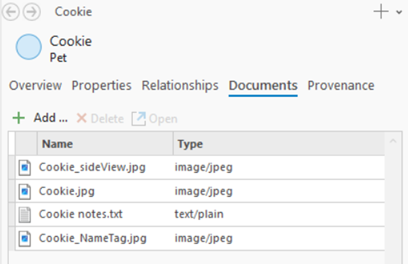
- Click a row for one of the documents in the list to select it.
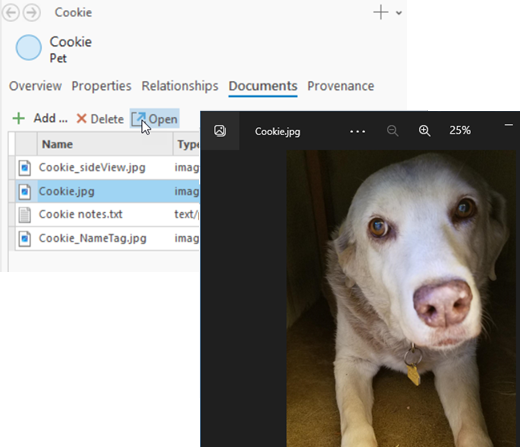
- Click the Open button
 at the top of the list to open the document and view its contents.
The document opens in a suitable application as determined by the Windows operating system.
- In the investigation's details panel, click the Provenance tab.
All provenance records associated with the currently selected entity are listed. You can see the properties of each provenance record in this list.
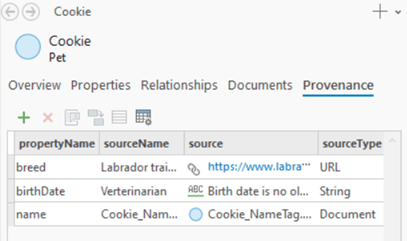
- Right-click a provenance record and click Open Provenance Source
 .
.The website or file that is the source of information stored in one of the entity's properties opens in a suitable application.

Tip:
If it takes too long to list all of an entity's properties, relationships, documents, or provenance records, you can stop building the list by clicking the busy indicator at the bottom of the details panel. When ArcGIS Pro is finished generating the table, the busy indicator stops and you see a Refresh view button  .
.
View details for a relationship
When you select an instance of a relationship in the investigation's contents list, the details panel lists all the properties of the relationship and lists the entities with which it is associated. If many relationships are selected, values are displayed in each position if all selected relationships have the same value. Text such as (Different Values) appears if any selected relationship has a different value.
While viewing the details of a relationship, you can further explore the entities it is associated with to better understand its context.
- Click a relationship type in the Contents pane, and click a relationship in the contents list to view information about it in the details panel.
The display expression and relationship type are shown at the top of the panel. Under the display expression, the Overview tab is selected in the details panel. By default, it lists all properties of the selected relationship, but it can be customized for each relationship type.
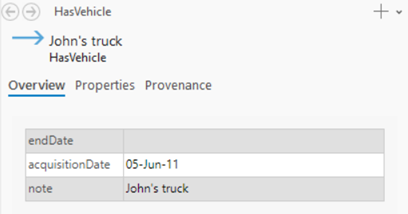
- Click the Properties tab in the details panel.
The definition of this relationship appears in the table at the top. The entity from which the relationship originates is identified in the Origin column, and the entity that is the target of the relationship is identified in the Destination column. For example, a relationship of type HasVehicle might be defined with the origin as a Person entity to the destination as a Vehicle entity.
Properties of this relationship are listed in the table at the bottom. For example, a HasVehicle relationship might have properties such as acquisition date, end date, and notes. Property names appear in the Names column. The data type of the value appears in the Type column. Property values appear in the Values column. If a property's value is unknown and therefore a value has not been set, <Null> appears in the Values column.

- To get more information about the entities connected by the relationship, hover over an entity in the Origin or Destination column.
An Open button
 appears.
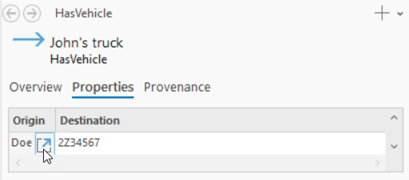
- Click the Open button
 for a related entity.
Details for the related entity appear in the details panel. The location bar across the top of the panel indicates how you got to the current item from the item selected in the investigation's contents list. For example, if you start with a HasVehicle relationship, and you open the related Person entity to get more information about the owner of the car, the location bar shows the original relationship's type and the display name for the related entity.

- Click the Back button
 to return to the description of the original relationship that is selected in the contents list.
The Forward button
 becomes enabled, allowing you to retrace your steps.
 - In the investigation's details panel, click the Provenance tab.
All provenance records associated with the currently selected relationship are listed. You can see the properties of each provenance record in this list.
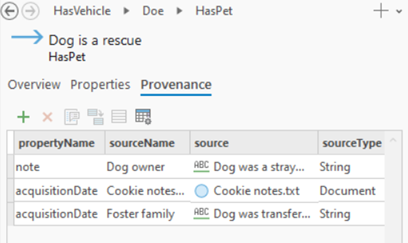
- Right-click a provenance record and click Open Provenance Source
 .
.The website or file that is the source of information stored in one of the relationship's properties opens in a suitable application.
Tip:
After opening a related entity in the details panel, you can continue exploring other relationships and related items. The location bar will continue to be updated. You can use the location bar to go back, change directions, and walk back to the original selected item or return to a related item you explored before.
Add custom display columns to the investigation
If many entities or relationships of the same type are selected in the investigation, the details panel shows all property values that they share. However, the details panel only shows properties that are common to all selected entities and relationships in the investigation. If the selected entities or relationships have different types, the objectid and globalid may be the only properties shared by the types.

It can be more productive to compare property values directly in the investigation's contents list for many entities and relationships at the same time. Display columns allow you to view and contrast property values for all items in the contents list. Different types can have different names for the same property—you can show these values in the same column.
To add a display column, complete the following steps:
- On the Investigation tab on the ribbon, in the Display Columns group, click Display Columns
 .
.The Display Columns pane appears.
- Click the Add Display Column button
 .
.A row is added to the Display Columns list, and the default name for the new column is immediately editable.
- Type a name for the display column and press the Enter key.
For example, type Name.

- Under the Data Model Properties heading, click the expander for entity types and relationship types to list their properties.
- When there are many types and each type has many properties, filter the list of entities and relationships to find the property you are looking for. Under the Data Model Properties heading, click in the Search text box and start typing the name of the property you want to find.
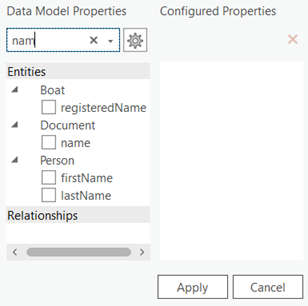
- For each entity type and relationship type, check the property whose values will appear in the display column for all types to which the display column should apply.
For example, if the knowledge graph had entity types for Boats, Automobiles, and Motorcycles and all have a Model property, check the property for all entity types to show the Model value in the same display column. The selected properties can have different names.

- Click Apply.
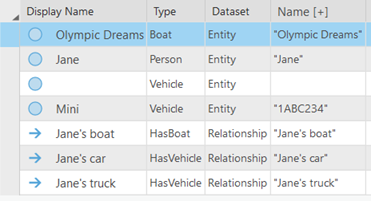
The new display column appears in the contents list. Entities of the appropriate types will show the selected property values in the display column. For example, if boat and automobile entities appear in the contents list, the Model display column will show values for each boat and automobile with this property.
Customize the details panel
When you select an instance of an entity or a relationship in the investigation's contents list, the details panel provides full access to all information known about the item that is recorded in the knowledge graph. You can configure display elements and customize which properties appear in the list.
Customize the Overview tab
The Overview tab can provide a short summary of important information about the selected entity or relationship. The Overview tab is essentially the same as a map's pop-up embedded in the investigation. By default, it lists all properties of the selected graph item, but it can be customized for each entity or relationship type in the same manner as a pop-up. Element choices are listed as buttons at the top of the pane.
You can add and configure elements to display content as standard text, a hyperlink, or formatted with HTML code, with added images. You can also define ArcGIS Arcade expressions to generate the content that is displayed, including using Arcade to query the knowledge graph and show information associated with the selected entity or relationship.
- Right-click an entity type or a relationship type in the investigation's Contents pane and click Configure Overview
 .
.The Configure Overview pane appears.
- Add and arrange elements on the Overview tab to change the information that is displayed and how it is presented.
- Click an element type at the top of the pane to add it to the bottom of the pop-up definition list.
- Click an element type and drag it to a specific vertical position.
- Click the Remove pop-up element button
 to delete an element.
- Edit an element's properties.
- Double-click an element.
- Click the Edit pop-up element button
 .
.
Customize the information presented on the Overview tab in the same manner as you customize a pop-up for a map.
- When you finish editing the properties of an element, click Back
 .
.Your changes for this element are committed and you return to the home page in the Configure Overview pane.
- To see your changes on the Overview tab, click the Refresh View button
 at the bottom of the investigation's details panel.
Customize the Properties tab
The Properties tab lists all properties for the selected entity or relationship. An entity or relationship can have many properties. You can configure which properties are visible and the property order. You can save the Properties tab configuration for all investigations that share the knowledge graph service.
- In the Contents pane, on the Investigation tab, select an entity or relationship type.
- In the details panel, click the Properties tab.
- Click the Configure properties button
 .
.The Configure properties dialog box appears.
- On the Configure properties dialog box, check the properties you want to see and uncheck the properties you want to hide.
- To change the order in which the properties appear, click a property and click the arrow buttons on the side of the Configure properties dialog box to move the property up or down in the list. Optionally, click a property and drag it to a different position in the list.
- Click OK.
Only properties that were checked on the Configure properties dialog box appear in the list.
- On the Investigation tab, in the Manage group, click Save Default Properties
 to save the properties tab layout to the knowledge graph service.
 - Optionally, on the Investigation tab, in the Manage group, click Manage Default Properties
 to delete the properties tab layout from the knowledge graph service.
Customize the Provenance tab
A provenance record can have many properties. You can configure which columns appear on the Provenance tab to see only the properties you need and change property column order. You can save the provenance property configuration for all investigations that share the knowledge graph service.
- In the Contents pane, on the Investigation tab, select an entity or relationship type.
- In the details panel, click the Provenance tab.
- Click the Configure properties button

The Configure properties dialog box appears.
- On the Configure properties dialog box, check the provenance record properties you want to see and uncheck the properties you want to hide.
- To change the order in which the properties appear, click a property and click the arrow buttons on the side of the Configure properties dialog box to move the property up or down in the list. Optionally, click a property and drag it to a different position in the list.
- Click OK.
Only properties that were checked on the Configure properties dialog box appear in the list.
- On the Investigation tab, in the Manage group, click Save Default Properties
 to save the provenance properties layout to the knowledge graph service.
 - Optionally, on the Investigation tab, in the Manage group, click Manage Default Properties
 to delete the provenance properties layout from the knowledge graph service.