Most of the usual workflows for working with network diagrams are detailed in this section. It is aimed at users whose profile is authorized to edit network diagrams.
Complementary concepts are described below.
Privileges of the database and portal owners when working with a utility network or trace network in an enterprise geodatabase
When working with a utility network or trace network in an enterprise geodatabase, the database network owner—database utility network owner or database trace network owner—is the only user who can configure the network rules, define subnetworks, and so on. In addition, the connected portal account must be the portal network owner—portal utility network owner or portal trace network owner—during any diagram template configuration task. For network diagrams and diagram templates, the portal network owner and database network owner also have some exclusive privileges.
Network diagrams and the default version
When working with a utility network or trace network in an enterprise geodatabase, usual workflows consist of creating versions based on Default and working on these versions.
In all cases, when the Default is protected, standard connected portal profiles must create a new version and change to this version before producing diagrams and editing them.
The portal network owner and users with administrative rights are the only connected portal profiles who can make edits in the protected Default version.
Delete diagrams
For stored diagrams, standard connected portal profiles can delete diagrams they own and public diagrams created by others. The portal network owner can delete any diagram in the databases. In addition, the portal utility network owner is the only user who can delete subnetwork system diagrams related to utility networks.
A temporary diagram is created each time a user generates a diagram. Regardless of whether this temporary diagram is stored or discarded, even if it will no longer be accessible to users, it is persisted in the temporary diagrams table. To clear the diagram dataset and reduce the size of the database, it is recommended that you regularly run the Purge Temporary Diagrams tool. This operation can be performed by the portal network owner only, and it must be run through a database connection .sde file that connects to the default version using the database network owner credentials.
Diagram template configurations
When working with a utility network or trace network in an enterprise geodatabase, the portal network owner is the only user who can create and edit diagram templates. They must use a database connection .sde file that connects to the default version using the database network owner credentials.
Work with historical moments
When you are consuming a utility network or trace network service and connected to a historical moment, you can do the following:
- Generate temporary diagrams, which open in a new diagram map in the same way as when you work at the current moment.
- Search for stored diagrams that existed at this moment and open them.
However, you cannot edit these diagrams—for example, apply a layout, overwrite their content, or extend them—or store them.
Generate network diagrams or open stored diagrams at a historical moment
Before generating or opening diagrams at historical moments, complete the following steps:
- Start ArcGIS Pro and open a utility network or trace network project.
- Open a map that references the utility network or trace network service layer, or create a map and add the utility network or trace network service layer to it.
- Click the List By Data Source tab
 in the Contents pane.
 - If the utility network or trace network layer references a specific version, switch to Default as described below:
- Right-click the data source entry and click Change Version.

- On the Change Version dialog box, click sde.Default at the top of the versions list and click OK.
- Right-click the data source entry and click Change Version.
- Connect to the specific moment:
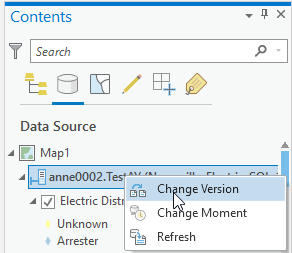
- Right-click the data source and click Change Moment.
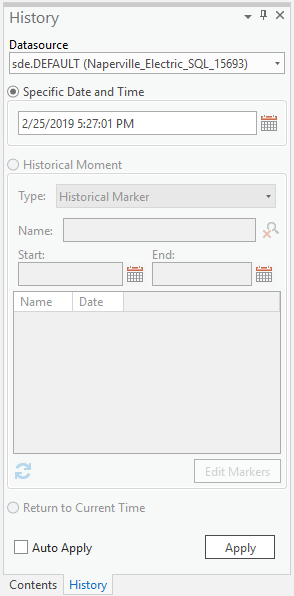
- In the History pane that appears, use the Specific Date and Time or Historical Moment control to specify the moment.

- Click Apply.
- Close the History pane.
- Complete one of the following workflows:
- Generate a diagram at the specified moment
- In the map, select the network feature or features you are interested in.
- Ensure that the utility network or trace network service layer is selected in
the Contents pane. On the Utility Network or Trace Network tab on the ribbon, click the New
 drop-down arrow in the Diagram group, and click the
template item from the list of templates.
- Open a stored diagram at the specified moment
- On the Utility Network or Trace Network tab on the ribbon, click Find
 .
. - In the Find Diagrams pane that appears, set the appropriate options.
- Click Refresh
 at the bottom of the pane to refresh the diagram list.
 - Do one of the following:
- Double-click the diagram item you are interested in.
- Click the diagram item you are interested in so it appears checked in the list, right-click it, and click Add To A New Diagram Map
 in the context menu that appears.
- On the Utility Network or Trace Network tab on the ribbon, click Find
A new diagram map view opens. It references one of the following:
- A temporary diagram based on the selected network features as they were at the specified past moment
- A stored diagram as it was at the specified past moment
- Generate a diagram at the specified moment