Available with 3D Analyst license.
A terrain dataset is built from multiple data sources such as lidar mass point collections, 3D breaklines, and 3D based survey observations. The data sources used to create terrain datasets are managed as a set of integrated feature classes in a geodatabase feature dataset. Building a terrain dataset to efficiently visualize and store a large amount of source measurements can be a lengthy process. The Create Terrain wizard guides users through the entire workflow from start to finish to build a terrain dataset.
The following must be prepared prior to using the Create Terrain wizard:
- A feature dataset, which must reside within a geodatabase and one or more feature classes containing source measurements that reside in the same feature dataset. Some examples of such data may include the following:
Point elevation measurements. For example, lidar points or spot elevations.
Breaklines Lines representing linear discontinuities in elevation. For example, contour lines or rivers.
Polygons that define the area for which the terrain is to be constructed.
Replace polygons Replace polygons describe areas of constant height.
Erase polygons Erase polygons that define voids in the terrain.
- The Average point spacing of the lidar point cloud measurements. If the point spacing is not known, the LAS dataset or the Point File Information geoprocessing tool can provide a point spacing for the supplied data files.
- The height source for each feature class.
- The surface feature type of each feature class.
Import terrain dataset source measurements
One of the most important processes when creating a terrain dataset is to import source measurements correctly into a geodatabase feature dataset. Terrain datasets can be generated from several different types of data. This data can include lidar and sonar points, breaklines and points derived from stereo photography, and other forms of survey data. The feature class geometry types supported for terrain datasets include points, multipoints, lines, and polygons. The ASCII 3D To Feature Class and LAS To Multipoint are the two geoprocessing tools offered to import terrain point source data into desired feature classes.
Start the Create Terrain wizard
The Create Terrain wizard is opened from the Catalog pane.
- From Folders, navigate to the location of the feature dataset where the terrain dataset will reside.
- Right-click the feature dataset, select New, and then select Terrain Dataset.

The Create Terrain wizard opens.
Set terrain characteristics
Once the Create Terrain wizard opens, the Terrain Characteristics page will appear. On the Terrain Characteristics page, you can select which feature classes will be used to build the terrain, a terrain name, and additional properties.

- Enter a name for the terrain dataset in the Output Terrain Dataset Name text box.
- Enter an average point spacing for the masspoints in the Average Point Spacing text box.
- Optionally, expand the Optional Settings section.
- Set the Overview Point Limit value.
The overview terrain is the coarsest representation of the terrain dataset and is intended for fast drawing at small scales. The default is a 50,000 point limit when drawing the terrain dataset as an overview terrain.
- Set the Triangulation Method option to either Delauney or Constrained Delauney.
The default is Delauney.
- Select the feature classes that will be used to build the terrain from the Participating Feature Classes section. Alternatively, use the Select all check box to use all of the listed feature classes.
The feature classes within the feature dataset where the terrain dataset is created are listed in the section.
- Select Next.
Define surface features
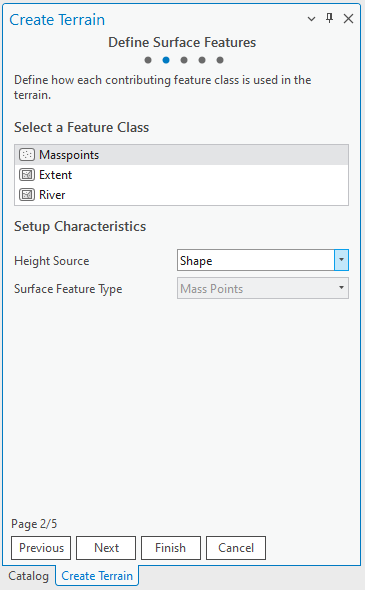
On the Define Surface Features page, you can define how each contributing feature class is used by the terrain dataset. Select each feature class from the Select a Feature Class section, and select the Height Source option and Surface Feature Type option for each contributing feature class.
The Surface Feature Type option defines the role the feature class will play in defining the terrain dataset surface. There are mass points, breaklines, and several polygon types. Point and multipoint feature classes can only be represented as Mass Points. Polyline and polygon feature classes can be represented as breaklines, clip polygons, erase polygons, replace polygons, and mass points. Breaklines and polygons also have hard and soft qualifiers. These indicate to the natural neighbors interpolator whether the surface crosses over the features smoothly (soft) or with a potentially sharp discontinuity (hard).

- Select each feature class from the Select a Feature Class section.
- Select the Height Source and Surface Feature Type options for each contributing feature class.
- Select Next.
Define the pyramid type
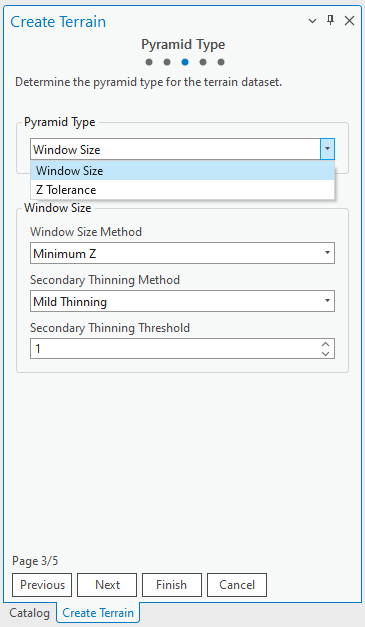
The Pyramid Type page defines the pyramid type to use to build the terrain dataset. Pyramids allow the creation of a multiresolution TIN-based surface, which improves overall efficiency. They are used as a form of scale-dependent generalization of the mass points data. Two pyramid types exist: z-tolerance and window size. The z-tolerance pyramid type uses vertical tolerance in the definition of the terrain surface resolution. Each pyramid level is a vertical accuracy approximation of the full-resolution data. Using the window size pyramid type, the resolution is defined by equal-area windows at each pyramid level scale range, controlling the horizontal sample density. While a z-tolerance pyramid has the benefit of a controlled vertical accuracy for each level of detail, it can be time consuming to compute. The creation of a window size pyramid is generally much faster. Window size pyramids are also better to use with any above ground lidar data.

- Select either Window Size or Z Tolerance from the Pyramid Type drop-down menu to define the terrain pyramid levels.
- If the window size pyramid type is selected, indicate the Window Size Method selection method to be used in the selection of the data point in each window.
- Optionally, if the window size pyramid type is selected, indicate whether further point thinning is required using the Secondary Thinning Threshold option.
The Secondary thinning method is used to further thin mass points over relative flat surfaces. A thinning threshold is required to specify the maximum difference in z a point can be from the selected window size point to be thinned out of the terrain.
- Click Next.
Set pyramid properties
The terrain pyramid levels are created for a terrain dataset on the Pyramid Properties page. The column indicating Start Scale is a reference scale threshold. A pyramid level is used to represent a terrain dataset between its start scale and the reference scale of the next coarsest level. The column indicating the pyramid type will change depending on the identified pyramid type. In the example below, it is a Window Size pyramid type. A set of pyramid levels are initially displayed based on the input average point spacing.
Minimum and maximum resolution bounds are used for feature classes added as polyline or polygon surface feature types. They define the range of pyramid levels at which the features will be enforced in the surface. You provide the resolution thresholds, given in the resolution of the terrain dataset's pyramid levels.
Groups are used to define multiple levels of detail for line and polygon features. Since terrains do not have an automated way of generalizing lines and polygons, you must do this up front and tell a terrain, through group definition, how the features should be used. For example, high and low detail lake or river shoreline data.
Note:
The resolution bounds for feature classes within the same group are not allowed to overlap.

- Evaluate the default pyramid levels that have been defined.
- Use the Add, Delete, and Reset buttons to define the pyramid levels.
- Select any Resolution Bounds options for the line and polygon features.
- Set any groups by pressing the Shift key while selecting the feature classes to be added to the group.
- Once they are highlighted, select the Group button. Use the Ungroup and Reset buttons to make any changes.
- Click Next.
Summary
The summary page displays the settings that are to be used to build the terrain dataset. Evaluate the selected settings for the terrain. If modifications are required, click Previous to go back and change anything. If the terrain is ready to be built, click Finish to open the Build Terrain geoprocessing tool.
