The Transfer Attributes tool  can be used to transfer only geometry from a source feature to a target feature and preserve the target feature attributes. This tool is available in the Modify Features pane.
When you transfer feature geometry, consider the following:
- Only matching geometry types are transferred.
- When you finish an edit, the resulting new shape is drawn coincident with the source feature.
For steps to replace feature geometry with sketch geometry, see Replace feature geometry.
To transfer feature geometry, complete the following steps:
- Open the map containing the features to be edited, or add the layers to the map.
To learn more about adding layers, see Add layers to a map or scene.
Tip:
Before editing, confirm the layers you are editing are editable, definition queries and scale ranges correctly display features, snap settings add efficiency and accuracy to your workflow, and the coordinate system assigned to the active map is suitable for the type of edits you're performing.
For a basic checklist of settings, see Configure settings for editing.
- On the ribbon Edit tab, click Modify
 in the Features group.
The Modify Features pane appears.
- Click the Transfer Attributes tool
 .
.To find the tool, expand Attributes, or type Transfer in the Search text box.
The tool opens and the pointer changes to the cross cursor.
- Click the Editing Options button
 , and choose Field Mapping
  .
.Alternatively, on the ribbon Edit tab, in the Manage Edits group, click Editor Settings
 .
.The Editor Settings dialog box appears.
- Click the Field Mapping side tab.
- Click the Target drop-down arrow and choose the layer for the feature you are editing.
- Click the Source drop-down arrow and choose the layer for the feature containing the geometry to be transferred.
- Click Clear
 .
.All field settings are removed.
- Click the Fields tab.
- Click the Shape field drop-down arrow and choose Shape.

Tip:
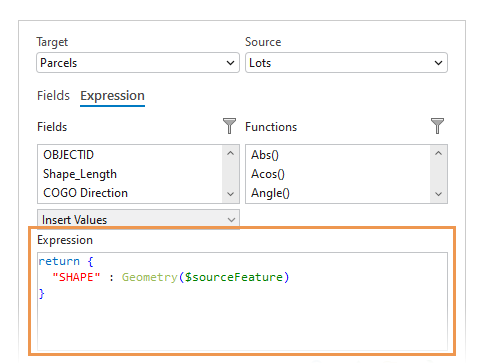
Click the Expression tab to confirm field mapping is correctly returning only the Shape field from the source feature, for example: return { "SHAPE" : Geometry($sourceFeature)}.

- Click OK.
The dialog box closes.
- Click the source feature in the map containing the geometry to be transferred.
- Click the target feature you are editing.
To transfer the geometry to multiple features, press Shift as you click a target feature.
The new shape is drawn coincident with the source feature and is the currently selected feature.
Tip:
To move the new feature, click the Move tool  in the Modify Features pane. On the ribbon Edit tab, in the Manage Edits group, confirm that topological editing is set to No Topology
  .
.