Available with Location Referencing license.
Web maps can be authored from LRS- and Version Management Service-enabled services published using ArcGIS Pro. You can add route network, event, centerline, calibration point, and redline data layers to a web map. In a web map, you can also zoom to a particular extent, choose a basemap, include a description, and save the web map for use in an experience that contains Location Referencing widgets in ArcGIS Experience Builder.
The version management capability allows you to do the following when editing feature services (also called web feature layers):
- Creating, modifying, deleting, and switching to a feature service version
- Reconciling and posting edits from a child version to the default version
- Undoing, redoing, saving, and discarding individual edits made on a feature service version in an edit session
Version management comparison
| Purpose of sharing data | Required publishing capabilities | Geodatabase connection type |
|---|---|---|
For multiuser editing scenarios when data is accessed directly from an enterprise geodatabase—also known as traditional versioning | Feature Layer, Linear Referencing | Traditional |
For multiuser editing scenarios when data is accessed through feature services with undo and redo capabilities—also known as branch versioning | Feature Layer, Linear Referencing, Version Management | Branch |
To perform editing activities using a feature service, turn on the version management capability when publishing data.
Prepare data
Sharing web layers with the linear referencing and version management capabilities requires data preparation.
- Perform all data loading using ArcGIS Pro before changing the geodatabase connection type and registering as versioned.
- Depending on the data, do one of the following:
- If the data is not versioned, proceed to step 3.
- If the data is traditionally versioned, unregister each feature class and table as versioned. In ArcGIS Pro, right-click each feature class or table in the Catalog pane and click Manage > Unregister As Versioned.
- Right-click the geodatabase in the Catalog pane and click Geodatabase Connection Properties.
The geodatabase connection must be explicitly set to the branch versioning connection type.
- Ensure that all of the data layers in the database have the following:
- Global IDs, except the locks table.
If Global IDs are not present, right-click a feature class or table in the Catalog pane and click Manage. On the Manage tab on the Feature Class Properties or Table Properties dialog box, check the Global IDs check box.
- Editor tracking enabled with UTC time, except the locks table.
Note:
Check other requirements before registering data as branch versioned.
- Global IDs, except the locks table.
- Register the following items in the LRS geodatabase as branch versioned:
- Feature dataset that contains the LRS
- Minimum schema feature classes
- LRS Networks
- Events
- Intersections
- Centerline Sequence table
- LRS_Edit_Log table
- Enable time on the LRS data layers on a layer-by-layer basis or enable time for all the LRS layers in a map at once.
Note:
Once the data is published, you cannot set time filters for layers.
Publish data
After preparing the data, you can publish it to your organization's portal as a web layer using the following steps:
- Sign in to ArcGIS Pro with your portal credentials.
It must be a portal with a federated ArcGIS Server site.
- Create a map in an ArcGIS Pro project and add the appropriate routes, event layers, calibration points, centerline, and optionally, a redline layer.
- Right-click the map in the Contents pane and click Properties.
- On the Map Properties dialog box, on the General tab, check the Allow assignment of unique numeric IDs for sharing web layers check box, and click OK.
Note:
By default, layer IDs are not preserved when authoring a map. If the layer order in the Contents pane changes when overwriting the web layer, web layers may point to the wrong data sources. As a best practice, manually assign layer IDs before publishing if you intend to overwrite the web layer or service in the future. Otherwise, service sublayer IDs can potentially change when the web layer or service is overwritten, causing disconnections in web applications that reference the service sublayer.
- To share a web feature layer, do one of the following:
- Share all usable layers in the map as a web layer. On the Share tab, in the Share As group, click the Web Layer drop-down arrow, and click Publish Web Layer
 .
. - Share selected layers in the map or scene as a web layer. Select the layers in the Contents pane, right-click any selected layer, point to Sharing, and
click Share As Web Layer
 .
.
The Share As Web Layer pane appears.
- Share all usable layers in the map as a web layer. On the Share tab, in the Share As group, click the Web Layer drop-down arrow, and click Publish Web Layer
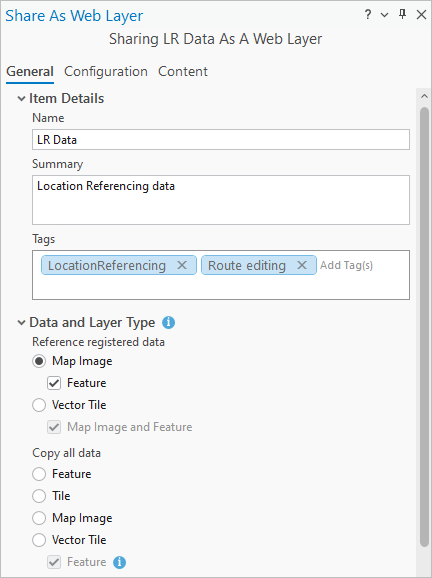
- Provide a name for the web layer.
- Optionally, complete the Summary and Tags fields.
You can enter a maximum of 128 tags.
- Expand Data and Layer Type, and under Reference registered data, click Map Image and check the Feature check box.

- Under Location, choose where to share the data under Portal Folder.
You can share the data to the root folder or create a folder.
- Use the Server and Folder drop-down menus to specify the federated server where the service is published and the folder where it is stored.
Optionally, create a folder.
By default, the service is stored in the root folder of the server.
Note:
The Server and Folder options appear only if you are sharing a web feature layer that references registered data to ArcGIS Enterprise. In this case, you can also click the Data Stores button
 to open the Manage Registered Data Stores pane. Use this pane to register geodatabases and folders with federated servers.
 - Under Sharing Level, specify how the web layer will be shared:
- Owner—Only the owner (and organization members with privileges to view content owned by other members) can access the item. This is the default option.
- Organization—Share your content with all authenticated users in your organization. This option is available when you are signed in with an organizational account.
- Everyone (public)—Share your content with the public. Anyone can access and see it.
- Optionally, under Groups, select groups to which you belong to share your content with their members.

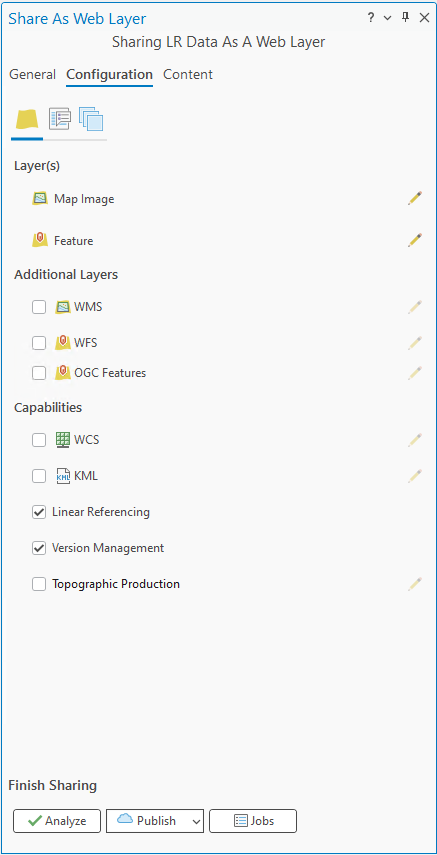
- Click the Configuration tab.
- In the Capabilities section, check the Linear Referencing and Version Management check boxes.

- Click Analyze to check for errors and issues.
You must resolve all errors before you can complete the publishing process.
Note:
Analyzers are used to validate the branch-versioned dataset when publishing as a feature service. The following conditions apply:
- If Version Management is enabled under Capabilities, all layers must be of the same registration type.
- All data must belong to a branch workspace.
- All data must be published from the default version.
- The connected geodatabase user must be the owner of the data.
- Definition queries must not be present.
- All fields must be visible.
- All event layers in configured attribute sets must be present in the map.
Note:
Disregard the warning messages about a layer's data source being z-aware or m-aware.
- Once validated, click Publish to share the web layer.
The layers are published as a feature service with the linear referencing and version management capabilities. ArcGIS Pro users with portal credentials can now create child versions of your feature service and start editing.