The Multipatch Texture tool  applies a color or an image as a texture to one or more faces of an existing multipatch or 3D object feature. This tool is available in the Modify Features pane.
When you apply a texture or color, consider the following:
- Applied colors and textures are saved with the feature.
- If the vertices of a face are edited later, the applied color or texture conforms to the new shape.
- This tool is intended for geodatabase multipatch or 3D object features. Colors or textures can't be saved with multipatch shapefiles.
To apply a color or texture to an existing multipatch or 3D object feature, complete the following steps:
- Open a scene containing the multipatch or 3D object feature you are editing.
Alternatively, add the layer containing the feature to the active scene.
- Configure settings for editing.
Specify which layers can be edited, confirm that the coordinate system assigned to the active map is suitable for the type of edits you're performing, and enable the snap agents that allow you to work effectively with the multipatch or 3D object features you are editing.
- On the Edit ribbon tab, click Modify
 in the Features group.
The Modify Features pane appears.
- Click the Multipatch Texture tool
 .
.To find the tool, expand Reshape, or type Texture in the Search text box.
The Multipatch Texture tool appears in the pane.
- Click the Select a feature tool
 , and select the multipatch or 3D object feature.
If features are currently selected, the selection tool displays Change the selection.
To refine the selection in the selection view, right-click a feature and click Unselect
 or Only Select This
  .
.The tool parameters appear when only one feature is selected.
- To load a color, click the color drop-down arrow and choose a color.
Loading a color clears the viewer if a texture is loaded.
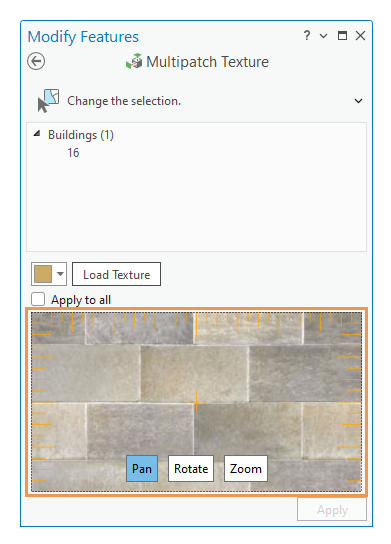
- To load a texture, click Load Texture, browse to the image file and click Open.To customize how the texture is applied, click and enable Pan, Rotate, or Zoom and drag the pointer across the viewer.

- Click the faces to you which the color or textured is to be applied.
Alternatively, check the Apply to all check box to select all faces of the feature.
Tip:
Hover over a face to display a preview of the color or texture.
- Click Apply.
- Click Finish
 on the toolbar, or press the F2 key to add the roof and finish the feature.