The instructions below describe how to set up the 3DTV active shutter InfraRed (IR) 3D vision kit for stereo mapping in ArcGIS Pro. These instructions are based on the Windows 10 operating system.
Requirements and prerequisite
The following hardware, software, and devices are required:
- ArcGIS Pro (Standard) 2.4 or later installed and licensed
- ArcGIS Image Analyst extension, activated
- A 3D stereoscopic monitor that supports a minimum refresh rate of 120Hz, connected to the computer system
- A desktop computer with a Quadro graphics card that supports stereoscopic viewing and has a 3-pin mini-Din connection embedded or connected using a bracket.
See Set up the NVIDIA Quadro GPU and 3D monitor for stereoscopic mapping for instructions.
- 3DTV Corp Generation 2 (Gen 2) multi-protocol IR emitter
- 3DTV Corp Model-N 3D glasses
Before starting the steps below, charge the 3DTV 3D Model-N glasses using the USB cable that's included with the glasses.

Set up and configure the 3DTV stereoscopic viewing components
To configure and set up the 3DTV Corp active shutter IR 3D vision kit, complete the following steps:
- Ensure that the computer is powered off.
- Connect the Gen 2 IR emitter to the graphics card mini-pin port at the back of the computer.
- Ensure that the monitor is connected to the CPU using the display cable and the dual link DVI-D cable that supports stereoscopic display.
- Turn on the computer and monitor.
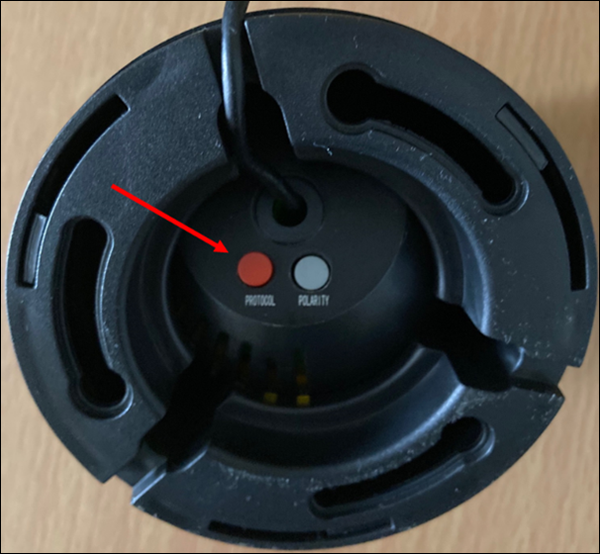
Once the computer is turned on and a 3D signal is being received from the graphics card, a red light in the center of the Gen 2 IR emitter indicates that it is receiving power.
- Press the Protocol button on the underside of the emitter once to change the LED color from red to orange.
This synchronizes the emitter with the Model-N 3D glasses.

- Turn on the Model-N 3D glasses using the switch on the upper part of the glasses arm.
The glasses and emitter are now ready for use once you enable ArcGIS Pro for stereo viewing.
Enable stereo viewing in ArcGIS Pro
To enable stereo viewing inArcGIS Pro, turn on the appropriate stereo mode, which is dependent on the type of stereo hardware you use:
- Start ArcGIS Pro.
- Click the Project tab, and click Options.
- On the Options dialog box, click the Display tab.
- For Stereoscopic mode, choose 3D shutter glasses.
- Click OK.
The project restarts with the new settings enabled. Your computer system, the 3D vision kit, and ArcGIS Pro are now ready for working in 3D stereographic mode.