Relationships can exist between spatial objects, nonspatial objects, or between spatial and nonspatial objects. Optionally, when creating a relationship class, you can specify whether the relationship class will be attributed. An attributed relationship class can store additional attributes and details about the relationship itself.
You can create an attributed relationship class using the Create Relationship Class or the Table To Relationship Class geoprocessing tool in ArcGIS Pro. 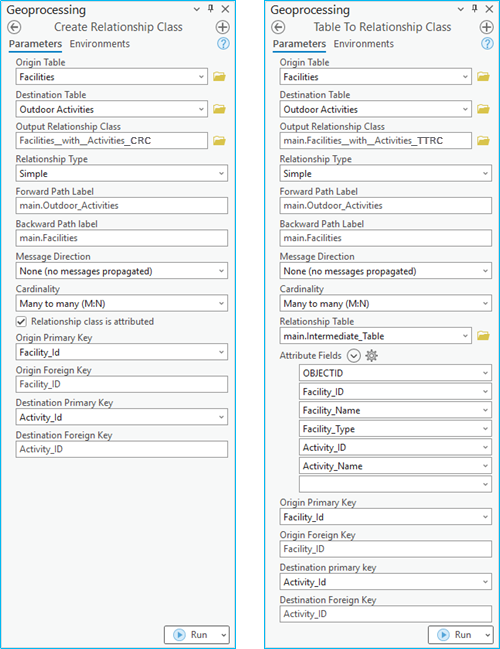
After reviewing each geoprocessing tool, the Create Relationship Class and Table To Relationship Class tools are nearly identical. Both tools create a relationship class, allow you to set the relationship class type and cardinality, and designate the primary key and foreign key fields.
However, these tools differ in the parameters used when creating an attributed relationship class.
The Create Relationship Class tool can create an attributed or nonattributed relationship class. The intermediate table is created when using this tool to create an attributed relationship class. However, it only contains the required fields, and is not populated, as ArcGIS does not map the associations between origin and destination objects. Using this tool to create an attributed relationship class means manually populating the intermediate table.
Here is the additional parameter included with the Create Relationship Class tool:
- Relationship class is attributed—When this parameter is checked, an intermediate table is created for you, though it will only generate the required fields.
Note:
Relationship class is attributed is an optional parameter in the Create Relationship Class tool and only needs to be checked if creating an attributed relationship class.
- Relationship class is attributed—When this parameter is checked, an intermediate table is created for you, though it will only generate the required fields.
The Table To Relationship Class tool creates an attributed relationship class. The intermediate table for this attributed relationship class is populated based on the selected attribute fields from an existing relationship table. These selected attribute fields contain extra relationship attributes beyond those required when creating a nonattributed relationship class. They are used to store attributes of the relationship itself that are not attributed to either the origin or destination class. For example, in a relationship class between parcels and owners, in which owners own parcels and parcels are owned by owners, the percentage of ownership each particular owner has could be stored as a relationship attribute.
Here are the additional parameters included with the Table To Relationship Class tool:
- Relationship Table—An existing table containing attributes that will be added to the relationship class.
- Attribute Fields—The names of the fields present in the Relationship Table containing the attribute values that will be added to the intermediate table in the attributed relationship class.
Note:
Relationship Table and Attributes Fields are required parameters when using the Table To Relationship Class tool. The attributes and attribute fields will be added to the newly created attributed relationship class as the intermediate table.
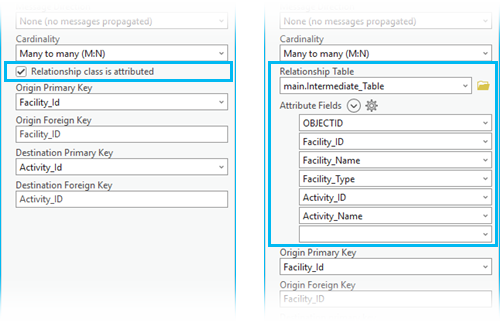
Before starting to create an attributed relationship class, review the considerations for geodatabase relationship classes in Prepare to create a relationship class.
Follow these steps to create an attributed relationship class using the Create Relationship Class tool:
Tip:
- Relationship classes are supported in file, mobile, and enterprise geodatabases. To create an attributed relationship class, you can right-click an existing geodatabase or a feature dataset within a geodatabase. If creating a relationship class in an enterprise geodatabase, you must connect to the enterprise geodatabase as a user with privileges to create data in the database.
To learn more about attributed relationship classes and see how they can be applied to a real-world scenario, see the Explore a many-to-many relationship class ArcGIS blog article. This blog provides a more in-depth review of the workflow steps and includes the data needed to create a many-to-many relationship class to help maintain park data validity.
- Start ArcGIS Pro and open an existing ArcGIS Pro project, or begin without a template.
- In the Catalog pane, right-click an existing geodatabase and click New from the context menu.

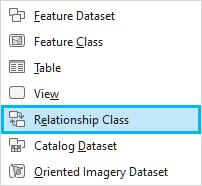
- Select Relationship Class
 .
.
The Create Relationship Class geoprocessing tool dialog box appears with default settings.

Note:
Alternatively, the Table To Relationship Class tool can be used to create a relationship class using an existing intermediate table that contains relationship attributes.
- For Origin Table, you can select a dataset from the list or use the browse button to select it.

- For Destination Table, you can select a dataset from the list or use the browse button to select the dataset.

- For Output Relationship Class, click the browse button
 and browse to the geodatabase where the relationship class will be stored. For Name, provide a name for the relationship class and click Save.
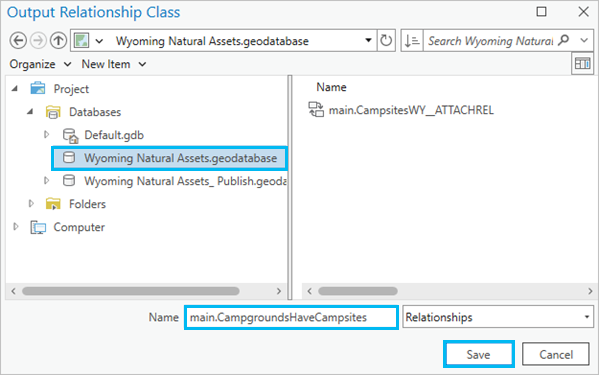

For this example, the origin and destination tables are located in a mobile geodatabase named, Wyoming Natural Assets.geodatabase. Therefore, the relationship class must also reside in this same mobile geodatabase. Since the mobile geodatabase (.geodatabase) is built on top of SQLite, the "main" prefix is automatically added to the relationship class name to indicate that it belongs to the main schema, the default schema for an SQLite database.
- For Relationship Type, select Simple.

To learn more about the differences between a simple and composite relationship class, see Geodatabase relationship class types.
- Type labels for the Forward Path Label and Backward Path Label parameters for this relationship class.

The Forward Path Label parameter describes the relationship as it is navigated from the origin class to the destination class. In contrast, the Backward Path Label parameter describes the relationship when navigated in the opposite direction, from the destination class back to the origin. See Create Relationship Class tool parameters to learn more about these labels.
- Select None for Message Direction since you are creating a simple relationship class.

The Message Direction parameter describes how messages are passed between related objects. This parameter is applicable if you want to implement custom cascade update or delete behaviors for the relationship class. See Create Relationship Class tool parameters to learn more about the effects of setting the Message Direction parameter for a simple versus a composite relationship class.
- For Cardinality, select the cardinality option appropriate for the data participating in your relationship class.

The cardinality for a relationship class describes how many objects in the origin are related to how many objects are in the destination. Supported Cardinality options for an attributed relationship class are as follows:
- One to one (1:1)—Each row or feature in the origin table can be related to zero or one row or feature in the destination table. This is the default setting.
- One to many (1:M)—Each row or feature in the origin table can be related to one or more rows or features in the destination table.
- Many to many (M:N)—Multiple rows or features in the origin table can be related to multiple rows or features in the destination table.
- Depending on the tool you are using, complete the following:
- If you use the Create Relationship Class tool, check the box next to the Relationship class is attributed parameter.
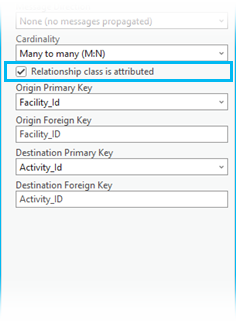
If you are using the Table To Relationship Class tool for the Relationship Table parameter, browse
 to the location where an existing table containing the attribute values that pertain to the relationship class resides.
 Tip:
In an attributed relationship, the Relationship Table must have fields that act as foreign keys to the origin and destination feature classes or tables. These foreign keys relate to the primary keys on the origin and destination feature class or table primary keys.For Attribute Fields, select the names of the fields from the Relationship Table parameter that contain the attribute values you want to add to the relationship class. The fields must be present in the Relationship Table parameter value and will appear in the intermediate table.

- If you use the Create Relationship Class tool, check the box next to the Relationship class is attributed parameter.
- Specify the fields below that the attributed relationship class will use as key fields to map values between the Origin Foreign Key and Destination Foreign Key
fields in the intermediate table, with the Origin Primary Key and Destination Primary Key of the related origin tables or feature
classes.
Origin Primary Key—For many-to-many or attributed relationship classes, this is the field in the origin table that links to the Origin Foreign Key field in the intermediate table.
Origin Foreign Key—For one-to-many or attributed relationship classes, this is the field in the intermediate table that links to the Origin Primary Key field in the origin table.
- Destination Primary Key—The field in the destination table that links to the Destination Foreign Key field in the intermediate table. This value is required for many-to-many or attributed relationship classes.
- Destination Foreign Key—The field in the intermediate table that
links to the
Destination Primary Key field in the destination table. This value is
required for many-to-many or attributed relationship classes.
Note:
The key fields may have different names but must be of the same field data type and contain the same kind of information, such as parcel IDs. Fields of all data types, except binary large object (BLOB), date, and raster, may be key fields.
- Click Run to create the attributed relationship class.
Note:
You can click the Run drop-down menu and select Schedule Run to run the tool later and, optionally, with recurrence.

Learn how to review and populate an attributed relationship class table