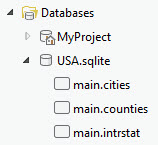
You can connect to an SQLite database or GeoPackage file in ArcGIS Pro to create maps and perform spatial analysis on your data. SQLite databases and OGC GeoPackage files support a single-user connection. Both use a simple data model and are contained in one file, which can be advantageous for the exchange of data between software packages. For example, SQLite databases can be useful on mobile devices with limited connectivity to exchange data with a server when connectivity is reestablished. For more information on SQLite databases, visit the SQLite website.
You can store spatial information in an SQLite database using the Esri ST_Geometry spatial data type, SpatiaLite, or use the OGC GeoPackage spatial storage format. OGC GeoPackage files are interoperable across many environments and are useful on mobile devices. See the section on creating a GeoPackage that conforms to the OGC specification.
Connect to an SQLite database or GeoPackage
You can access an SQLite database or GeoPackage file through a folder connection, or you can add the database or file to the project, similar to how you access a file geodatabase.
When you use a folder connection, you can see and work with all supported files stored in that folder. If you only want to see and work with the database or GeoPackage and not other items stored in the same folder, add the SQLite database or GeoPackage directly to the project.
Follow these steps to add a SQLite database or GeoPackage to your project:
- Connect to a folder that contains the SQLite database or GeoPackage that you want to use.
- In the Catalog pane, browse to the folder to which you connected in the previous step.
- Right-click the SQLite database or GeoPackage and click Add to Project
 . The SQLite database or GeoPackage appears in the Catalog pane under the Databases category.
 - Browse to the SQLite database or GeoPackage to start using its items.

Tip:
If you do not want to add the database or GeoPackage to the project, you can use the contents of the database directly from the folder connection.
Add data to the map
To add data from an SQLite database or GeoPackage to the map, use the Add Data button  on the ribbon or drag the feature class or table onto the map from the Catalog pane.
- Click the
Add Data button
 on the Map tab on the ribbon.
 - Browse to the SQLite database or GeoPackage when the Add Data dialog box appears.
- Click the table or feature class that you want to add to the map.
- Click Select.
Tip:
Alternatively, if you already added the SQLite database or GeoPackage to the project, you can right-click the feature class or table and choose Add to Current Map to add the data to the current map or Add to New Map to add the data to a new map in the project.
Work with data in fields view
Use fields view to do the following in a table or feature class in SQLite or a GeoPackage:
- View field names.
- View field data types.
- Determine if a field allows null values.
- View text field lengths.
- Add fields.

Tip:
If you open fields view from the layer in the Contents pane, you can modify the layer properties, such as visibility, field alias, or number format.
You cannot drop or rename a field in a table in an SQLite database or GeoPackage.
Create an SQLite database or GeoPackage
To create an SQLite database or GeoPackage in ArcGIS Pro, use the Create SQLite Database geoprocessing tool.
- Open the Geoprocessing pane by clicking the Tools button
 on the Analysis tab.
 - In the search box, type Create SQLite Database.
- Open the Create SQLite Database tool and fill in the parameters as desired.