As you explore entities and relationships in a link chart associated with a knowledge graph, connections that exist between entities of interest may not be apparent because entities and relationship between the entities of interest are not present on the link chart. Operations allow you to add the missing graph items and reveal how entities are connected to each other.
You can use one of the following options to add graph items to a link chart to show how entities are associated:
- The Connect button
 allows you to add relationships that directly connect two entities present in the link chart.
 - The Find Paths button
 allows you to add both entities and relationships that exist along the shortest paths that connect two entities present in the link chart. Entities and relationships along the shortest paths are selected.
 - The Filtered Find Paths button
 allows you to add entities and relationships that exist along shortest paths that connect two specific entities and satisfy all specified conditions.
 - The Find Between button
 allows you to identify entities that are directly connected to two or more selected entities in the link chart. Entities and the relationships that connect them to the selected entities are added, but only the identified entities are selected.
These operations are detailed in the sections below.
Whichever option you choose, the analysis is performed and the appropriate graph items are added to the link chart. If Group Mode is turned on, a postprocess searches for and groups any new relationship sets that exist in the link chart with the added content.
Connect associated entities
When you add a relationship to a link chart, the relationship is added along with its origin entity and its destination entity. However, when you add entities to a link chart, their relationships and related entities are not added automatically. Two entities may participate in a relationship that exists in the knowledge graph but where the relationship is missing in the link chart. The Connect operation adds these missing relationships. Only single relationships that exist between two entities on the link chart are added.
If one entity is selected in the link chart, the Connect operation evaluates all relationships of all types in which it participates. Each relationship is then evaluated against the link chart to determine whether the entity at the other end of the relationship, either the origin or the destination, is also present in the link chart. If both entities are present in the link chart and the relationship isn't present, the missing relationship is added to the link chart.
When many entities in the link chart are selected, the same process applies. All selected entities are evaluated and any missing relationships between the selected entities and other entities in the link chart, including unselected entities, are added. If no entities are selected, all pairs of entities in the link chart are evaluated to determine whether relationships are missing between them.
To add relationships that are missing between two entities present in the link chart, complete the following steps:
- In a link chart, select the entities you want to evaluate to determine whether any relationships are missing. Alternatively, clear an existing selection to evaluate all entities in the link chart for missing relationships.
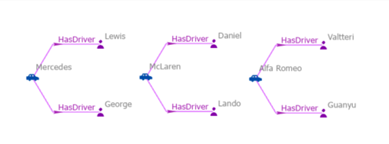
- On the Link Chart tab on the ribbon, in the Scope group, click the Connect button
 .
.Missing relationships are retrieved from the knowledge graph and added to the link chart. The existing layout of entities and relationships is modified as needed to accommodate the added relationships. The originally selected graph items are deselected. The added relationships are selected.
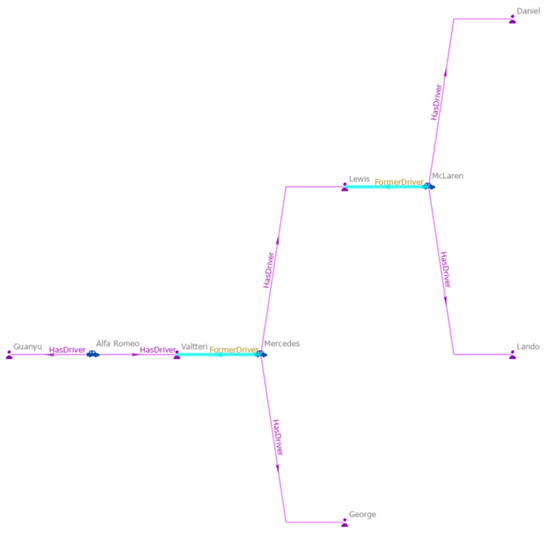
Because the added relationships are selected, it can be difficult to see the relationship types.
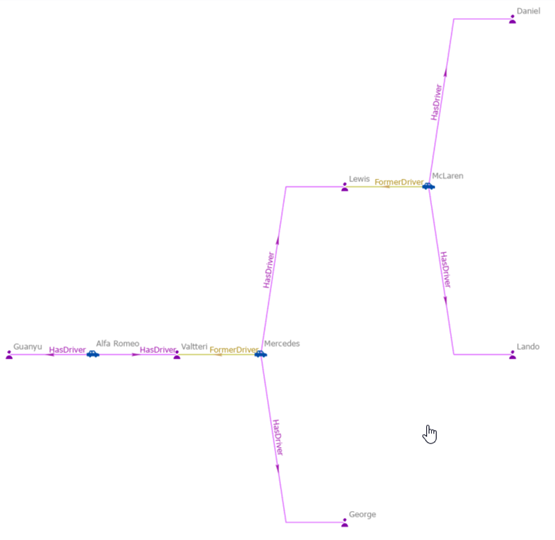
- Optionally, clear the selection and zoom in to explore the added relationships.
Find paths between entities
Whereas the Connect operation identifies a single relationship between two entities that is missing, the Find Paths operation allows you to identify a series of relationships that connect two entities in a link chart.
The Find Paths operation examines selected entities to determine whether they are connected by a series of relationships through other entities that may not be present in the link chart. All entities and relationships necessary to describe all shortest paths are added to the link chart.
This algorithm only processes selected entities. A minimum of 2 entities and no more than 10 entities must be selected in the link chart. If an entity group comprising 10 entities is selected, the 10 entities in the group are processed as individual entities. In some situations, you may have to ungroup entities and run the operation several times to evaluate all possibilities.
The algorithm searches for the shortest paths between each pair of selected entities, where a shortest path is the shortest sequence of relationships through which two entities are connected. There can be many shortest paths between two entities. Consider the following scenario:
- Jane is connected to Sara because Jane sold her house, Sara bought the house, and they used the same real estate agent.
- Jane is connected to Sara because they both have friends who own old cars and entered those cars in the same car show.
- Jane and Sara are connected because they went to the same school at different times.
In this scenario, the path through the real estate agent and the path through the school are both shortest paths and are added to the link chart. The Find Paths operation determines the length of a shortest path and retrieves all solutions for all shortest paths from the knowledge graph. All entities and relationships that occur along all shortest paths are added to the link chart and selected.
To determine the shortest paths between entities in the link chart, complete the following steps:
- Select 2 to 10 entities between which you want to find the shortest paths.

- On the Link Chart tab on the ribbon, in the Scope group, click the Find Paths button
 .
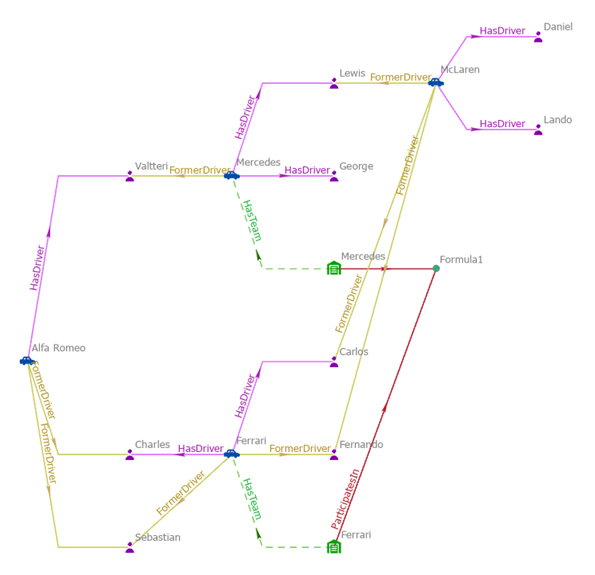
.Entities and relationships representing the shortest paths between all selected entities are retrieved from the knowledge graph and added to the link chart. The originally selected graph items are deselected and the added entities and relationships are selected. When the shortest path includes entities and relationships that were already present in the link chart, these graph items are also selected. The current layout is used to reposition all graph items on the link chart.

Because the added entities and relationships are selected, it can be difficult to see the entity and relationship types.
- Optionally, clear the selection and zoom in to explore the added relationships.
Find paths through specific entities or relationships
The Filtered Find Paths method works in a similar manner as the Find Paths method, except it allows you to selectively traverse or avoid specific entities or relationships and specify the length and direction of the paths you want to find. Open the Filtered Find Paths pane to perform this analysis. You can open it from an investigation or from a link chart.
You can define filters that specify which entity types and relationship types must be included. You can also define filters that exclude entity types and relationship types or specific entities and relationships. Additionally, you can define waypoints—individual entities that must be present or can optionally be present. Additionally, you can define mandatory and optional waypoints. When waypoints are included, each entity and relationship will only be included once in the resulting path.
For example, in the graph below, if the origin is the entity E, the destination is the entity C, and the entity B is defined as a mandatory waypoint, the shortest path is the one defined by the highlighted entities and relationships: from E to H to A to B to C. Each entity and relationship is traversed only once and the waypoint filter is satisfied.

As with the Find Paths operation, the algorithm searches for the shortest path between the origin and destination entities that meet the specified requirements. All paths found with the same length as the shortest path are included in the result. Any graph items on the shortest paths that are not already present on the link chart are added and selected. If no paths are found that satisfy the requirements, a message is returned indicating that result.
You can save the configurations you use to find paths.
To determine the shortest path, complete the following steps:
- Open a link chart.
You do not have to preselect the entities and relationships between which you want to find the shortest paths. However, if those graph items are selected, you can quickly reference them when defining the path you want to investigate.

- On the Link Chart tab on the ribbon, in the Scope group, click the Find Paths drop-down arrow and click the Filtered Find Paths button
 .
.The Filtered Find Paths pane appears. The top of the pane allows you to specify the origin and destination entities for the paths you want to find. The bottom of the pane allows you to specify the rules that the shortest path must follow between the origin and destination entities as well as settings for determining those paths.
Drag the divider to resize the two parts of the pane, or use the buttons on the divider to use all available space for either part.

- On the General Settings tab
 , under the Origin Entities heading, click in the Type column, check entity types of the origin entities, and click in the empty space below the list.
One row is added to the list for each selected entity type.
- Define specific origin entities for the paths you want to find.
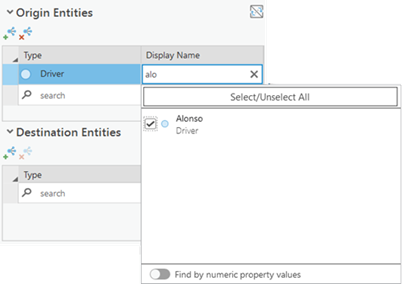
In one of the rows added for the entity types selected previously, or in a new, empty row at the bottom of the list, click in the Display Name column. Type a keyword to search for matching entities. Hover over an entity in the results list to evaluate it. Check the entities you want to use as the origin of a path.
- If the appropriate entities are selected in the link chart, click the Add Selected Entities button
 .
. - Optionally, add property filters to use a subset of the origin entities added to the list.
One row is added to the list for each selected entity.
- Under the Destination Entities heading, specify the destination entities for the paths you want to find using the same method as for specifying origin entities.
The same entity cannot be identified both as an origin entity and as a destination entity. For example, if the origin and destination entities are selected on the link chart and you click the Add Selected Entities button
 , the origin entity will be included in both lists. If this occurs, an error icon
  appears in the row. Hover over the icon to see a message describing the problem. Select the row for the origin entity in the Destination Entities list and click the Remove Selected Entities button
  to remove it.
- Click Preview Paths
 to see results from the current configuration.
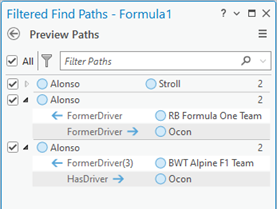
Paths satisfying the criteria are listed in the Filtered Find Paths pane. The origin and destination entities for each path are displayed, followed by the length of the path. Expand a path to see its full details. If you are happy with the results as they are, check the paths you want to keep and use the options available from the Add Paths To menu
 to add the selected results to a new or an existing link chart.
- Click Back
 .
.You return to the tab you were working with in the Filtered Find Paths pane.
- Adjust the configuration as needed to get the results in which you are interested.
For example, add path filters to control the routes that can be taken, add time and duration restrictions based on properties, and adjust settings such as path length and direction to restrict the paths that can be taken in the knowledge graph.
- Click Find Paths
 .
.If any errors are present, the Find Paths button at the bottom of the pane will not be available.
Entities and relationships representing the shortest paths between the origin and destination entities are retrieved from the knowledge graph and added to the link chart if they are not already present. The originally selected graph items are deselected. The entities and relationships that define all output paths are selected. The current layout is used to reposition graph items on the link chart.

- Optionally, save the configuration.
Note:
In the example above, it is assumed you started with a link chart. However, you can start from an investigation instead. On the Investigation tab on the ribbon, in the Tools group, click the Filtered Find Paths button  .
.
Add path filters individually
You can add filters to find paths that traverse or avoid specific relationships and include specific entities. You can also add property filters to entity and relationship types.
To add path filters individually, complete the following steps:
- On the General Settings tab
 , under the Path Filter heading, add an Exclude filter
  to the list.
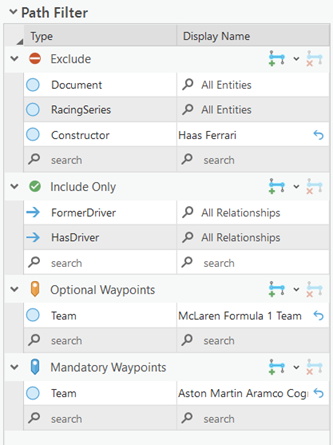
Specify the entities or relationships the paths must avoid. All graph items of a given type or specific entities and relationships can be excluded. The exclusions apply to origin entities, destination entities, and any waypoints that are specified. By default, the Exclude list includes one empty row.
- In the empty filter row at the bottom of the list, click in the Type column.
- Check entity types and relationship types to which the rule will apply.
- Click in the empty space below the list.

One row is added to the list for each entity type and relationship type selected. By default, all entities or relationships of the selected types are excluded when paths are evaluated.
- Optionally, click in the Display Name column for a specific filter and type a keyword to find individual entities or relationships to exclude. Check the graph items you want to exclude and click in the empty space below the list.

One row is added to the list for each entity and relationship selected.
- Add an Include Only filter
 to the list following the same steps as for adding an Exclude filter.
Specify the entities and relationships the paths must include. All graph items of a given type can be included. Individual entities and relationships cannot be specified.
- Add an Optional Waypoint filter
 to the list following the same steps as for adding other filters.
Optional waypoints can contain entities and relationships, defined by type, property filters, or defined individually. Each result path contains at least one of the optional waypoints.
- Add a Mandatory Waypoint filter
 to the list following the same steps as for adding other filters.
Specify individual entities that must be present on all paths.
- Click Find Paths
 .
.If any errors are present, the Find Paths button at the bottom of the pane will not be available.
Shortest paths are evaluated between the origin and destination entities accounting for the specified filters. Entities and relationships included in the paths are retrieved from the knowledge graph and added to the link chart if they are not already present. The originally selected graph items are deselected. The entities and relationships that define all output paths are selected. The current layout is used to reposition all graph items on the link chart.

Note:
No paths will be found in the knowledge graph if the filters you use are too restrictive. Try changing the origin and destination entities, the path filters, or the settings that you use.
Click Reset at any time to remove all existing settings from the Filtered Find Paths pane. This allows you to start over by selecting new origin and destination entities and adding new filters. You can also save the current settings as a configuration and use it as a save point as you experiment with different filters. Click the drop-down list under the Configuration Name heading, click a previously saved configuration to restore those settings in the pane, and add or remove filters.
Add property filters
Property filters can further enhance your link chart analysis and improve focus on specific data subsets. For example, a link chart representing an entire supply chain may include entities representing suppliers, factories, distribution centers, and parts, and relationships representing the movement and production of goods. To analyze potential supplier risks related to materials in a specific region or country, you can apply a property filter to origin entity Supplier where property Country=United States and Parts is an optional waypoint with property filter Material=steel. The resulting filtered link chart would show suppliers in the United States providing steel parts, and how they are connected to the larger supply chain.
You can define property filters for origin and destination entities. You can also define property filters for individual path filters.
Note:
Property filters are unavailable for mandatory waypoints.
Follow the below steps to define a property filter.
- Add entities or relationships to the Origin Entities or Destination Entities lists, or to the Exclude, Include Only, or Optional Waypoint lists under the Path Filter heading.
- In the Display Name column, click Show Property Filters
 to filter the entities or relationships defined on that row using a property filter.
The Property Filter table appears in the Filter Find Paths pane.
- Click in the Property column and click a property name in the drop-down list.
- Click in the Filter column and click a filter type in the drop-down list.
- Click in the Value column and click a value from the drop-down list.
- Optionally, click Add Property Filter in the empty row at the bottom of the list to add another property filter.
When additional properties are added, a condition must be specified to determine how the filters should work together.
- For any additional property filters that were added, repeat the above steps to define values in the Property, Filter, and Value columns. Click the Condition column and click an option from the drop-down list
- Optionally, select a property filter and click Remove selected property filter
 .
.The property filter is removed from the list.
- Click Back.
You return to the tab you were working with in the Filter Find Paths pane.
Add path filters using selected items
Instead of adding filters individually, you can add a set of path filters using the entities and relationships that are selected on the link chart.
- Select entities and relationships of interest on the link chart.
- On the General Settings tab
 , under the Path Filter heading, next to one of the path filter headings, click the Add Selected Entities drop-down list
  and click an option to add rules associated with the appropriate graph items.
Add All Selected

Rows are added to the path filters list for all selected entities and relationships.
Add Selected Entities

Rows are added to the path filters list for all selected entities.
Add Selected Relationships

Rows are added to the path filters list for all selected relationships.
Filters are added to the Path Filter list. If filters are already present, the selected items are evaluated. Filters are not added for selected entities and relationships if the new filter conflicts with an existing rule or if an existing rule already governs how the selected entities and relationships are evaluated.
- In the Display Name column, click the Reset to entire type button
 to change the filter to be associated with the entire entity type or relationship type instead of a specific graph item.
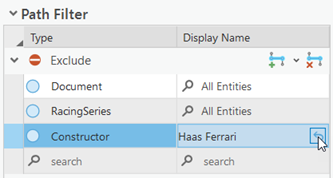
The value in the Display Name column changes from the specific graph item's display name to All Entities or All Relationships.
- Press Ctrl or Shift and click rows in the list you want to remove.
For example, after resetting a filter to apply to the entire entity or relationship type, any additional filters associated with specific graph items of those types are no longer needed.
- Click the Remove Selected Path Filters button
 .
.The selected rows are removed from the Path Filter list.
- Click Find Paths
 .
.Entities and relationships associated with the shortest paths are added to the link chart if they are not already present and selected.
- Click the Save drop-down list at the top of the pane under the Configuration Name heading and click Save As.
The Save Filtered Find Paths Configuration dialog box appears. The current knowledge graph is selected in the Target investigation drop-down list.
- Type a name for the new configuration in the Configuration Name text box.
- Click Save.
A new filtered find path configuration is saved to the investigation.
- Save the project to save your changes.
Modify filtered find path settings
If your previous attempts to find paths between specific entities did not produce the expected results, try changing the settings used to find paths in the knowledge graph.
You can reverse the direction of the path you are looking for in different ways. One way is to reassign the origin entities as destination entities, and the destination entities as origin entities. Another way is to change how the direction of relationships in the graph are evaluated. By default, paths are evaluated without considering the direction of relationships in the graph—the Traversal Direction value is set to Any  . Relationships can be evaluated in specific directions instead.
Only the shortest paths between the origin and destination entities are returned as results by default. The shortest overall path connecting any origin entity and any destination entity is determined and all paths of that length are returned. With the Paths between setting, you can return different results that include one path for each origin entity, one path for each destination entity, or one path for each origin-destination combination. The resulting paths may have different lengths, but they will be the shortest path for each combination.
You can also change the overall setting and return all paths that satisfy the criteria instead of only the shortest paths. In this case, a hard limit is set on the number of paths that will be evaluated before results are returned. Changing this number using the Max paths count setting affects the overall performance of the analysis as well as the possible results.
For all scenarios, you can change the minimum and maximum number of relationships between an origin and a destination entity that can exist in a valid result. You can require result paths to be shorter or infinitely long. Evaluating many longer paths can affect the overall performance and the results of the analysis.
To modify path settings, complete the following steps:
- At the top of the pane, on the General Settings tab
 , next to the Origin Entities heading, click the Swap Origin/Destination Entities button
  .
. Entities are moved from the origin list to the destination list and vice versa.
- At the bottom of the pane, under the path filters list, click the Traversal Direction heading.
- Click the Default drop-down list next to the Traversal Direction heading and choose the direction in which relationships will be traversed by default.
Any

Relationships are evaluated without considering their direction. This is the default setting.
Forward

When generating paths, relationships are traveled only from the origin to the destination entity.
Backward

When generating paths, relationships are traveled only from the destination to the origin entity.
- To specify separate traversal directions for different relationship types, click in the Relationship Type column in the empty row at the bottom of the list under the Traversal Direction heading.
- Check the relationship types for which you want to provide specific direction settings and click in the empty space below the list.
One row is added to the list for each relationship type selected. The selected item's type appears in the Relationship Type column. The default direction for each row matches the value in the Default drop-down list.
- For each relationship type, click in the Direction column and click the setting you want to use when evaluating paths in the knowledge graph.
- Click the Settings heading at the bottom of the pane.
By default, the Shortest toggle button is on, and the results will be the shortest paths that satisfy all requirements. The minimum Path length value is one and the maximum value is eight, and the value Any Origin, Any Destination is selected by default in the Paths between list.
- Click the drop-down list for the minimum Path length value and click another value such as 3.
- Click the drop-down list for the maximum Path length value and click another value such as 5.
With these settings, paths are included in the results if an origin and a destination entity are connected by three to five relationships.
- When evaluating paths to determine which is the shortest, the Paths between setting specifies how the origin and destination entities are considered.
Any Origin, Any Destination
The shortest path from any origin entity to any destination entity is determined. All paths with the same minimum length from any origin to any destination are returned. This is the default setting.
Any Origin, All Destinations
The lengths of the shortest paths from any origin entity to all destination entities are calculated. All shortest paths to each destination entity are returned. One path must be present for each destination. The resulting paths can have different minimum lengths.
All Origins, Any Destination
The lengths of the shortest paths from all origin entities to any destination entity are calculated. All shortest paths from each origin entity are returned. One path must be present for each origin. The resulting paths can have different minimum lengths.
All Origins, All Destinations
The lengths of the shortest paths from all origin entities to all destination entities are calculated. All shortest paths from each origin entity to each destination entity are returned. One path must be present for each origin and destination combination. The resulting paths for each combination can have different minimum lengths.
- Optionally, turn on the All toggle button.
Instead of returning only the shortest paths from the origin to the destination entities, all paths that satisfy the requirements are returned as results.
The Paths between drop-down list is replaced by the Max paths count text box. This setting determines the maximum number of paths that will be evaluated. Any additional possible solutions will not be considered once the default number has been reached. The default value is 100,000.
- Optionally, click in the Max paths count text box and change how many paths will be evaluated.
If more paths are evaluated, the process will take longer and may not complete in a timely manner or at all. If fewer paths are evaluated, fewer origin and destination entities must be provided or more restrictive filters must be used to reduce the possible solutions.

- Click Find Paths
 .
.Entities and relationships associated with the result paths are added to the link chart if they are not already present and selected.
Add a time filter
If entity types or relationship types in the knowledge graph have properties with the timestamp offset data type  , the data in those properties can be used to specify which entities and relationships are included in or excluded from paths. For example, you can find paths between entities associated with an event that occurs over a specific period of time. You can also include entities associated with separate related events that occur in sequence.
To add a time filter, complete the following steps:
- Click the Event Time Filter tab
 .
. - Turn on the Enable event time filter toggle button.
- Under the Events heading, in the empty row at the bottom of the list, click in the Type column.
All entity types and relationship types that have properties with the timestamp offset data type
 are listed.
 - Check the entity types and relationship types whose time data will be used to filter paths in the knowledge graph.
One row is added to the list for each entity type and relationship type selected.
- For each selected type, define how the time data represents temporal events.
- Click in the Start column and click the property that identifies an instant in time or the beginning of a period of time.
- If the data represents a time period, click in the End column and click the property that identifies the end of the period of time.
For events associated with an instant of time, the event type that appears in the Category column is Punctual. For events that take place over a period of time, the event type that appears in the Category column is Durative.

- For durative events, specify the length of time for events in which you are interested under the Durative Event Duration heading.
Entities and relationships associated with events that are shorter or longer than the time period specified are excluded when paths are calculated. For example, you may only be interested in events that last for several minutes and not events that last for several days.
- Click the Min drop-down arrow and click the minimum amount of time allowed for the time period.
- Click the Max drop-down arrow and click the maximum amount of time allowed for the time period.
- Click the last drop-down arrow and click the appropriate units of time.
- Specify rules to include events that occur in a specific sequence under the Events Sequencing heading.
- Click the Time Flow drop-down list and click the appropriate value to indicate whether conditions apply when one event is followed by another, when one event is preceded by another, or whether the direction of time when evaluating events will be ignored.
- If events should be included only when they have a limited amount of overlap, check the Restrict overlap between consecutive events option under the Overlap heading. Specify the maximum amount of overlap allowed between two events.
When the overlap between two events is longer than the specified time, both events are excluded.
- If events should be included only when one follows another within a given amount of time, check the Restrict gap between consecutive events option under the Gap heading. Specify the maximum amount of time allowed between events.
When a longer amount of time occurs between two events, both events are excluded.
- Specify the window of time in which you are interested under the Event Time Window heading.
Events that take place within this window of time are evaluated and included in result paths if they meet all requirements. All events are included if the gap between them is less than the specified amount. Time period events that occur in this window of time are evaluated to determine whether they have lasted for a sufficient length of time and they overlap less than the defined amount.
- Optionally, specify the start of the time period of interest.
- Optionally, specify the end of the time period of interest.
The time period of interest can have definite start and end times. Alternatively, you can define an open-ended time period with either a definite start or a definite end.
- Specify how errors in the data should be handled, if any are found, under the Error Handling heading.
By default, an error will appear if an entity or relationship associated with an event has no time information, if a time period is missing either the start or end time, or if the specified end time precedes the start time. For each of these scenarios, you can specify what action to take.
Error
Show an error message indicating which graph item has temporal data that prevents the event from being analyzed properly. This setting applies to all temporal events, and is the default behavior when a problem is found with the time data.
Exclude
Exclude any graph items that have incorrect temporal data. This setting applies to all temporal events.
Make Non-Event
Include the graph item in paths, but do not process any time information that is present as a temporal event. This setting applies to all temporal events.
Make Punctual Event
For durative temporal events where a start or end time is missing, handle the available time as a time instant.
Make Min Punctual Event
For durative temporal events where the end time occurs before the start time, handle the earliest time as a time instant.
Make Max Punctual Event
For durative temporal events where the end time occurs before the start time, handle the latest time as a time instant.
Make Durative Event
For durative temporal events where the end time occurs before the start time, reverse the times to produce a proper time period from the available information.
- Click Find Paths
 .
.Entities and relationships associated with the result paths are added to the link chart if they are not already present and selected.
Save filter find path configurations
You can save the configurations you use to find paths. This allows you to compare results using different settings and reevaluate the paths after updating the knowledge graph data, for example.
To save a configuration, complete the following steps:
- Click Save at the top of the pane under the Configuration Name heading.
The Save Filtered Find Paths Configuration dialog box appears. The current knowledge graph is selected in the Target investigation drop-down list.
- Type a name for the current filtered find path settings in the Configuration Name text box.
- Click Save.
A new filtered find path configuration is created in the investigation associated with this knowledge graph and will be saved as part of the current project.
- Save the project to save your changes to the link chart and the new configuration.
- If you want the output paths to be displayed in a different link chart, click the Find Paths drop-down arrow
 and click one of the appropriate options.
- Click New Link Chart
 . A new link chart is created and the output paths are added using default symbology and the standard organic layout. To use the hierarchical layout instead, click the New Link Chart Layout Options menu
  and check Hierarchical Layout.
 - Click the New Link Chart Using Template menu
 . Click Default Template to accept all default settings for the new link chart. Click the name of an existing link chart
  to use the same layout and settings as a template for the new link chart.
 - Click the Existing Link Charts menu
 and click the open link chart to which you want the output paths to be added.
 - Click the Current Link Chart menu
 . The output paths will be added to the current link chart.
- Click New Link Chart
Find entities between entities
The Find Between operation examines the selected entities and determines whether there are entities in the knowledge graph that are directly connected to two or more of the selected entities. Entities directly connected to only one of the selected entities are not considered. Any entity with more than one degree of separation from the originally selected entities is not considered. For example, this can help identify people who are key intermediaries in a social network or crucial suppliers in the supply chain.
If the in-between entities are missing from the link chart, they are added along with the relationships that connect them to the originally selected entities. In contrast, the Select Between operation determines and selects in-between entities using only the graph items present on the link chart; additional entities in the knowledge graph that satisfy the criteria are not added.
The Find Between algorithm only processes selected entities. A minimum of two entities must be selected in the link chart. If an entity group is selected, each entity in the group is processed individually. When the in-between entities are determined, the originally selected entities are deselected and all in-between entities are selected.
To identify the key entities between the selected entities in the link chart, complete the following steps:
- Click Find Paths
 .
.Entities and relationships associated with the result paths are added to the link chart if they are not already present and selected.
- Select two or more entities in which you are interested.

- On the Link Chart tab on the ribbon, in the Scope group, click the Find Between button
 .
.Entities directly connected to two or more of the originally selected entities are retrieved from the knowledge graph and added to the link chart if they are not already present. The originally selected graph items are deselected and the in-between entities are selected. If required, the current layout is used to reposition graph items on the link chart.
