You can open an ArcGIS Pro project in the following ways:
- Choose a project from the list of recent projects on the start page.
- Browse to a project (.aprx) or project package (.ppkx) on your computer or a network drive.
- Double-click a project or project package in Microsoft File Explorer.
- Browse to or search for a project package in your active portal.
- Open a project package from a portal item file (.pitemx).
- Configure ArcGIS Pro to open a specific project on startup.
When a project opens, its name appears in the title bar of the ArcGIS Pro window. Click the project name to see the path to the project file and the project's last modification date. (If the full path does not fit in the drop-down window, hover over it to show a tooltip.) The path is formatted as a link that opens File Explorer to the project file location. Click the Copy button  to copy the path to the clipboard.

If you open a project while another project with unsaved changes is open, you are prompted to save your changes before the new project opens. You can open more than one project at a time by starting multiple instances of ArcGIS Pro.
Note:
For portal project workflows, see Open a portal project.
Open a project from the Recent Projects list
When you start ArcGIS Pro, a list of up to 50 recent projects displays on the start page. If you can't see the entire name or path of a project in the list, you can hover over it to see its name, modification date, and path in a pop-up.
- Access the Recent Projects list in either of the following ways:
- Start ArcGIS Pro. The start page appears with the Home tab selected.
- From an open project, click the Project tab on the ribbon. On the settings page, in the list of side tabs, click Open.
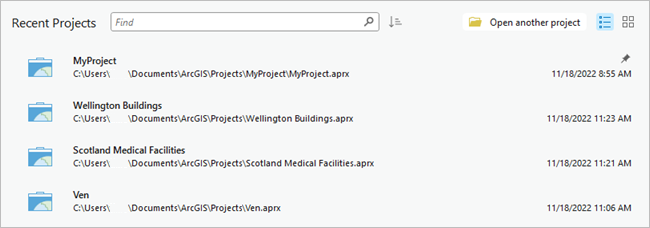
The project named MyProject is pinned to the top of the list. - Click the project you want to open.
Work with the list of recent projects
You can work with the list of recent projects in several ways:
- Find a project—Type a text string in the search box to find projects that include the string in their name. Only the list of recent projects is searched.
- Sort projects—By default, projects appear in the order of their access date, with the most recently opened project at the top. The list can also be sorted by project name or modification date. (A project is accessed if it is opened; it is modified if it is saved with changes.)
- Change the display—In List view
 , project names are shown. In Tiles view
  , project thumbnail images are also displayed.
 - Pin a project—Hover over a project and click Pin
 above the access date to pin the project to the top of the list.
 - Remove a project—Right-click a project and click Remove Project From List
 . If you try to open a project that no longer exists at the path shown, ArcGIS Pro prompts you to remove it from the list.
 - Go to a project's location:
- For projects on a local or network drive—Right-click a project and click Show In File Explorer
 .
. - For portal projects—Right-click a project and click Show In File Explorer
 to go to the project download location. Click Open Portal Item
  to open a web browser to the portal item.
- For projects on a local or network drive—Right-click a project and click Show In File Explorer
- Remove all projects from the list—Right-click a project and click Clear Recent Projects. Pinned projects are not removed.
Note:
In Tiles view  , hover over a project tile to show the pin icon. Click the options button
  to access context menu commands.
Browse to a project
If a project is not in the Recent Projects list, you can browse to it.
- On the start page, click Open another project
 .
.Alternatively, in an open project, click the Project tab on the ribbon. In the list of side tabs, click Open and click Open another project
 .
. - On the Open Project browse dialog box, browse to a project or project package on a local or network drive.
You cannot search for projects or project packages stored on a local or network drive.
- Click the project to select it and click OK.
The project opens. It is also added to the Recent Projects list and to the ArcGIS Pro jump list on the Microsoft Windows taskbar if this option is enabled on your computer.
Note:
When a project package is opened, it is unpacked in your <User Documents>\ArcGIS\Packages folder. The project file (.aprx) contained by the package is opened from this location.
Open a project from the file system
You can open a project from the file system in the following ways:.
- Browse to or search for the project you want to open. Double-click the project file (.aprx) or project package file (.ppkx) to start ArcGIS Pro and open the project.
- Create a shortcut to a project or project package and place the shortcut on your computer's desktop. Double-click the shortcut to start ArcGIS Pro and open the project.
- Use the operating system's list of recently opened projects or project packages, if available. For example, if ArcGIS Pro is pinned to the Windows taskbar, you can right-click the ArcGIS Pro button to see the list. Click a project or project package to start ArcGIS Pro and open the project.
If ArcGIS Pro is already running, the current project remains open and the selected project opens in a new instance of ArcGIS Pro.
You can also open some other ArcGIS Pro file types from the file system, including the following:
- Map files (.mapx)
- Layout files (.pagx)
- Layer files (.lyrx)
- Map packages (.mpkx)
- Layer packages (.lpkx)
When you double-click one of these files, ArcGIS Pro starts without a project template. For map files, layout files, and map packages, the maps and layouts defined in the files are added to the project. For layer files and layer packages, a map is added to the project, and the layers defined in the files are added to the map.
Caution:
Do not associate other ArcGIS Pro or ArcMap file types with ArcGIS Pro and try to open them from the file system—they will not open successfully. Start ArcGIS Pro and add or import the item to your project.
Open a project package from the active portal
You can browse to and open a project package from your active ArcGIS Online or ArcGIS Enterprise portal.
- On the start page, click Open another project
 .
.Alternatively, in an open project, click the Project tab on the ribbon. In the list of side tabs, click Open and click Open another project
 .
. - On the Open Project browse dialog box, select a portal content collection and browse to a project package
 .
.Alternatively, use the search box at the top of the dialog box to search the portal content.
- Click the project package to select it and click OK.
The project opens. It is also added to the Recent Projects list and to the ArcGIS Pro jump list on the Microsoft Windows taskbar if this option is enabled on your computer.
Note:
The package is downloaded to your computer and unpacked in your <User Documents>\ArcGIS\Packages folder. The project file (.aprx) contained by the package is opened from this location.
Update a project opened from the active portal
The unpacked project in the download location is linked to the project package in the portal. If the project package is updated, you receive a notification the next time you open the project—provided that you are signed in to the portal on which the project package is stored. The notification appears as a blue dot on the Notifications button  next to your sign-in status at the top of the application.
- Click the Notifications button
 to open the Notifications pane.
 - Hover over a notification indicating a new version of the project is available.
- Optionally, click Show More
 to see options.
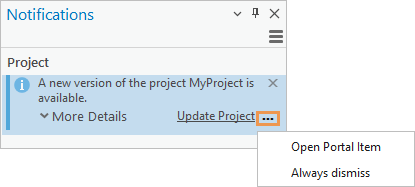
Clicking Open Portal Item opens the project package item page in a browser. The item page may contain information describing the update. Clicking Always dismiss closes the Notifications pane and removes the notification indicator. You can use this option if you don't want to update the project.
- Click Update Project.
The current project closes. The updated project package is downloaded, unpacked, and opened.
Note:
The updated project does not overwrite the earlier project. Both projects are maintained in separate project folders in your <User Documents>\ArcGIS\Packages folder, and both appear in the Recent Projects list.
Open a project package from a portal item file
A portal item file (.pitemx) is a small JSON file that you download from an item page on your portal website. Opening the file starts a new instance of ArcGIS Pro, downloads a project package from the portal, and opens the project. Portal item files can also open other ArcGIS Pro item types.
To open a portal item file, complete the following steps:
- In a web browser, browse to a project package in ArcGIS Online or ArcGIS Enterprise.
- On the item details page, on the Overview tab, click Open in ArcGIS Pro.
- Browse to the download location on your computer and double-click the <item name>.pitemx file.
The project opens in a new instance of ArcGIS Pro.
Open a specific project on startup
If you typically work with one project, you can configure ArcGIS Pro to bypass the start page and open this project automatically.
Open a read-only project
The same project can be opened in multiple instances of ArcGIS Pro. For example, if a project is stored on a network drive, it can be opened on different computers at the same time. However, the project is only writable in the first instance in which it is opened. In all other instances, it is read-only. Similarly, a project opened from a read-only location is read-only. A project's read-only status is indicated in the application window title bar and in a yellow message bar under the ribbon.

In a read-only project, you can make changes to maps, layouts, charts, and other items stored in the project file (.aprx); however, to save these changes, you must save the project with a new name. Changes made to items stored outside the project file, such as edits to datasets or geoprocessing models, can be saved from a read-only project.
Open a recovered project
If you back up your projects, you can recover unsaved changes if ArcGIS Pro shuts down unexpectedly. Unsaved changes are recovered up to the time of the most recent backup.
Follow the steps below to open a recovered project after an unexpected application shutdown.
- Start ArcGIS Pro.
- On the start page, open your project from the list of recent projects.
A Project Recovery prompt informs you that the backup copy of the project was saved more recently than the original project.
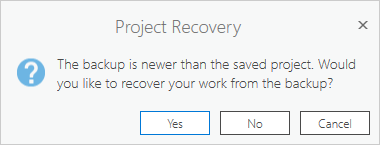
If the prompt does not appear, it means that the original project was saved more recently than the backup project. In this case, unsaved changes cannot be recovered.
- Choose how to proceed.
- Click Yes to open the backup project. Unsaved changes are recovered up to the time stamp of the backup project. The original project is deleted.
- Click No to open the original project. The project state reflects your last manual save. Unsaved changes are lost.
- Click Cancel to dismiss the prompt without opening the project.
Open a project created in a different ArcGIS Pro version
You can open a project that was created in any version of ArcGIS Pro earlier than your current version. If you then save the project in your current version, its compatibility with earlier versions may be affected.
You can open a project created in a later version if the later version belongs to the same major release. For example, you can open a project created in ArcGIS Pro 3.6 in any prior 3.x version. A warning message appears because functionality that is not supported by the earlier version is downgraded or lost.
You cannot open a project created in a later version if the later version belongs to a different major release. For example, you cannot open a project created in any 3.x version in ArcGIS Pro 2.9.
Note:
A portal project must be upgraded before it can be opened in a later minor or major release version of ArcGIS Pro. A portal project cannot be opened in an earlier major or minor release version.
Repair default project items
Every project must have a home folder, default geodatabase, and default toolbox. If you open a project in which one of these required items can't be accessed, ArcGIS Pro can automatically create a new default item. Alternatively, you can specify an existing item to be the default item or create a new default item yourself. You set your preferred option in the application general options under Repair Project Items. You can set different options for repairing the home folder, default geodatabase, and default toolbox.
A default item may become inaccessible for various reasons. For example, it may be deleted, moved, or renamed, or its containing folder may be deleted, moved, or renamed. If the item is on a network share, the network may be unavailable.
Note:
ArcGIS Pro does not always need to repair default items that are moved or renamed. For example, if the home folder contains the project file, you can open the project without interruption even if the home folder name or path changes. ArcGIS Pro updates the home folder name and path appropriately. (In this situation, you cannot open the project from the Recent Projects list because the stored path to the project is not found, but you can open it by browsing to it.)
Repair a default project item automatically
The default option is to repair default project items automatically. When this option is selected, ArcGIS Pro creates a new item with the same path previously stored for the item that is now inaccessible. It creates folders as needed to reconstruct this path. If the path cannot be reconstructed, a different path is used.
The following default project items can be repaired automatically:
- Home folders
- File geodatabases (.gdb)
- Mobile geodatabases (.geodatabase)
- ArcGIS toolboxes (.atbx)
- Python toolboxes (.pyt)
Enterprise geodatabases (.sde) and legacy toolboxes (.tbx) cannot be repaired automatically. If one of these items is an inaccessible project default item, and the handling option is set to automatically create a new item, an error message appears. When the project opens, the inaccessible item is displayed as the default item, but its path is broken. You may be able to repair the item manually.
Example: Automatically repair a home folder
This example assumes that the Home Folder Handling option on the Options dialog box is set to Automatically create a new home folder. The default home folder is C:\ProProjectsHome and the project file is in a different location.

After the project is closed, suppose that the C:\ProProjectsHome folder is deleted (or renamed or moved) on the operating system. When you reopen the project, a message indicates that the home folder is inaccessible and a new one has been created. The new folder location is the same as the previous home folder location.
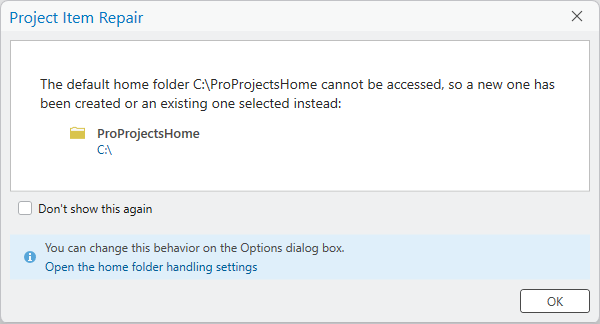
When you click OK on the message, the project opens with the new home folder.
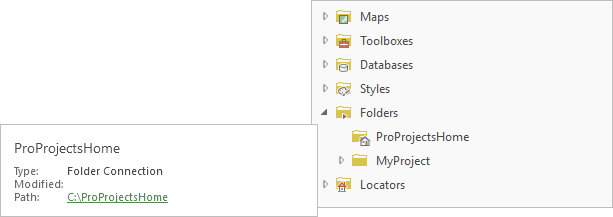
The new home folder is empty. Any content stored in the previous home folder may be lost if the folder was deleted from the operating system.
Note:
If the original path cannot be reconstructed—for example, because the home folder was located on a network share that is no longer available—the new home folder is created in the default location for creating projects.
Repair a default project item by specifying a different item
If you don't want ArcGIS Pro to manage default project item repair, you can set the item handling options to prompt you to select a different item. These options also allow you to create a new default item in a location you choose.
The option to select an existing item is useful when a default project item has been moved or renamed but is still available on your computer or a network share. You can browse to the item (if you know where to find it) and update its path in ArcGIS Pro to make the item accessible again.
Example: Repair a default geodatabase by selecting an item
This example assumes that the Default Geodatabase Handling option on the Options dialog box is set to Prompt to specify a different geodatabase. The default geodatabase path is C:\Region\WarehouseImpact.gdb.

After the project is closed, suppose that the path to the default geodatabase is changed on the operating system. When you reopen the project, a message indicates that the geodatabase is inaccessible. A repair path is suggested by default—if you immediately click OK on the dialog box, ArcGIS Pro creates a new default geodatabase in that location. However, if you know that the folder containing the default geodatabase was moved to a new location, you can browse to it and select the geodatabase.

| Element | Description |
|---|---|
 | ArcGIS Pro suggests a repair path (the original location). |
 | You can browse to a different location to select a default item. |
 | An existing item is selected, and its path is shown in the location bar. |
Tip:
Optionally, you can create a new geodatabase yourself from the New Item drop-down menu on the browse dialog box.
After you select the geodatabase and click OK, the project opens with the updated path to the item. The original (inaccessible) default geodatabase displays a broken path and can be removed from the project.

Note:
You can also replace the path suggested by ArcGIS Pro by typing in the input box. If the item or path you enter does not exist, ArcGIS Pro creates the item and folder structure. If the path exists but you do not have write permission to the location, an error message appears. The project then opens with the broken original path to the default item.