The Replace Sketch command  replaces a line or a polygon sketch with the geometry of an existing feature. This command is on the context menu with the Continue Feature tool
  , the Replace Geometry tool
  , and the editing template line and polygon construction tools.
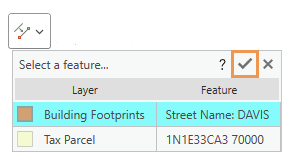
If you right-click overlapping features, the Replace Sketch chip appears allowing you to select and flash a feature in the map. When the selected feature is applied to the sketch, the new geometry is drawn coincident with the source feature.
When you replace a sketch, consider the following:
- A line sketch can be replaced with a line or polygon feature.
- A polygon sketch can be replaced only with a polygon feature.
To replace a sketch, complete the following steps:
- Start an active sketch by doing one of the following:
- In the Modify Features pane, click the Continue Feature tool
 and select a feature, or click the Replace Geometry tool
  and click at least one vertex near the source feature.
 - In the Create Features pane, click a line or polygon feature construction tool, and click at least one vertex near the source feature.
Press Esc to cancel and discard an unwanted sketch.
- In the Modify Features pane, click the Continue Feature tool
- Right-click the existing feature that is to provide the shape for the new sketch geometry, and click Replace Sketch
 on the context menu.
If you click overlapping features, the Replace Sketch chip
 appears. Click the chip drop-down arrow, and click a feature in the list to select it and flash it in the map. To apply the selection, click Apply
  or double-click the row.
To cancel the selected source feature and close the Replace Sketch chip, click Cancel
 , or press Esc.
The resulting new sketch geometry draws coincident with the selected source feature.
- Click Finish
 , or press the F2 key.
The finished sketch is the currently selected feature.
Tip:
Use the Move tool  or Rotate tool
  to reposition the new feature.