Available with ArcGIS Pro Standard and Data Reviewer licenses.
Tutorial summary
After adding attribute rules to the data, the evaluation process runs the rules on the data to ensure rules are followed. The evaluation method used depends on the rule type and properties. Validation rules are evaluated manually or at the specified time you set, while constraint rules are evaluated immediately during an edit operation. In this exercise, you will use the Reviewer attribute rules in the file geodatabase from the previous exercises to identify features that do not meet quality requirements.
Note:
This exercise is preconfigured with the Reviewer attribute rules if you didn't complete the previous exercises.
You will use the errors found during data review to identify and correct features that do not meet quality requirements.
Estimated time | 25 minutes |
Software requirements | ArcGIS Pro 2.7 or later |
Data requirements | The data for this tutorial is available from the Data Reviewer for ArcGIS Pro Tutorial page. This package contains an ArcGIS Pro project package and a subset of the Local Government sample data. To download the data, complete the following steps:
|
Overview
Open the project
Complete the following steps to open the project package using ArcGIS Pro and verify its contents.
- Start
ArcGIS Pro and sign in if necessary.
Caution:
If you have not already downloaded the Data Reviewer for ArcGIS Pro tutorial data, see the data requirements listed above.
- On the start page, next to your recent projects, click Open another project.
Note:
If you have a project open, click Open Project
 on the Quick Access Toolbar and proceed to step 4.
 - On the Open Project page, click Computer.
- Browse to the project file in the folder where you downloaded and extracted the tutorial data: <extracted location>\DataReviewer_AttributeRules\Evaluating_features_with_Attribute_Rules.
- Click the EvaluatingAttributeRules.aprx file.
- Click OK.
A topographic basemap opens with city data zoomed to Naperville, Illinois.
Evaluate validation attribute rules
The following table outlines a subset of data quality requirements that support address-finding workflows for which validation attribute rules were created. You will use these validation attribute rules to ensure that all address-related features are compliant with these requirements.
| ID | Requirement | Check | Participating feature class/table |
|---|---|---|---|
1 | Road features must not contain duplicates. | Duplicate Feature | Road Centerline |
2 | Road vertices must not exist within one foot from each other. | Duplicate Vertex | Road Centerline |
3 | Road centerline Full Road Name attribute values must match the master street index. | Table to Table Attribute | Road Centerline, Master Road Name |
Validate features with validation attribute rules
Validation rules are evaluated at the time you specify. In this exercise, you'll use the Error Inspector pane to run the rules on a file geodatabase.
- In the Contents pane, right-click any layer in the Site Addresses or Roads group, and click Add Error Layers.
The error layers are added to the map.
- On the Map tab, click Bookmarks and choose Study Area to adjust your map extent.
- On the Edit tab, in the Manage Edits group, click Error Inspector
 .
.The Error Inspector pane appears.
- In the Error Inspector pane, click the Evaluate Rules drop-down arrow
 and uncheck the Batch Calculation check box.
Tip:
Ensure that the Visible Extent check box is checked to limit the evaluation area to your active map extent.
- Click the Evaluate Rules button
 .
.
Errors appear as rows in the Error Inspector pane.
Review and correct an error result
You will now review and fix an error in the Error Inspector pane.
- Click the menu button
 on the Error Inspector toolbar and click Show Status.
The Data Reviewer error life cycle columns are added to the Error Inspector pane.
- In the Filter group, click Fields
 to display a list of error properties that can be used to filter the errors displayed in the Error Inspector pane.
- In the Severity section, check the 1 check box to only display features with a severity value of 1 in the Error Inspector pane.
The Road name missing from master street list error remains.
- Click the numbered column next to the error phase column to highlight the feature that has the error.
- On the Edit tab, click Attributes
 to open the Attributes pane.
 - Click Select By Rectangle
 and drag a rectangle across the road with the error to select it.
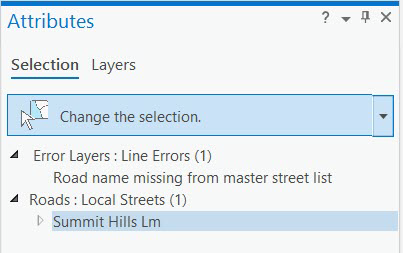
The road appears in the Attributes pane.
- Click Summit Hills Lm to select it.

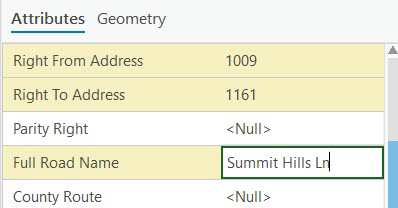
- In the attributes, scroll to Full Road Name and change Lm to Ln, and press Enter.

- Click Apply.
- Click Save Edits
 on the Edit tab and click Yes to save your edit.
 - Click Clear
 to clear your selection.
 - Click the Evaluate Rules button
 .
.

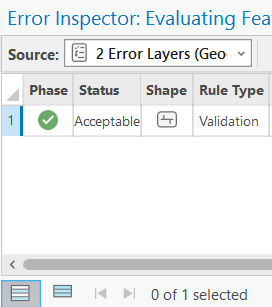
The error you corrected appears in the Error Inspector pane with the verified status.
Validate features with constraint attribute rules
In this exercise, you will edit data and introduce errors to check that your edits meet the quality requirements with the constraint attribute rules.
The following table outlines a subset of data quality requirements that support address-finding workflows for which constraint attribute rules were created. You will use requirement ID 3 where the road length must be greater than 20 feet to ensure that your edits are compliant.
| ID | Requirement | Check | Participating feature class/table |
|---|---|---|---|
1 | Road centerline must split at an intersection. | Feature on Feature | Road Centerline |
2 | Road centerline must not have sharp angles of 15 degrees or less. | Cutbacks | Road Centerline |
3 | Road length must be greater than 20 feet. | Evaluate Polyline Length | Road Centerline |
- On the Edit tab, click Create Features
 .
.The Create Features pane appears.
- Click the Roads: Local Streets template in the Create Features pane.
- Draw a small road in the map.

An error message appears in the Create Features pane that lists the requirements of the rule and informs you that the edit could not be completed.

- Draw the road with a distance greater than 20 feet to correct the error.
- Click Save Edits
 on the Edit tab and click Yes to save your edits.
You have completed the quality assurance workflow by evaluating rules and error results to validate your data using configured checks implemented using Reviewer attribute rules.
